
Android Table Layout
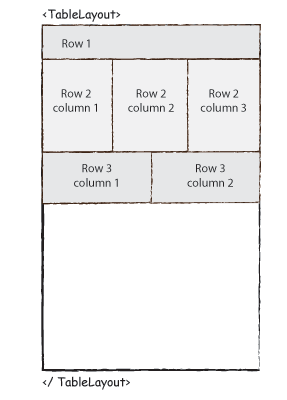
Android TableLayout going to be arranged groups of views into rows and columns. You will use the <TableRow> element to build a row in the table. Each row has zero or more cells; each cell can hold one View object.
TableLayout containers do not display border lines for their rows, columns, or cells.
TableLayout Attributes
Following are the important attributes specific to TableLayout −
| Sr.No. | Attribute & Description |
|---|---|
| 1 |
android:id This is the ID which uniquely identifies the layout. |
| 2 |
android:collapseColumns This specifies the zero-based index of the columns to collapse. The column indices must be separated by a comma: 1, 2, 5. |
| 3 |
android:shrinkColumns The zero-based index of the columns to shrink. The column indices must be separated by a comma: 1, 2, 5. |
| 4 |
android:stretchColumns The zero-based index of the columns to stretch. The column indices must be separated by a comma: 1, 2, 5. |
Example
This example will take you through simple steps to show how to create your own Android application using Table Layout. Follow the following steps to modify the Android application we created in Hello World Example chapter −
| Step | Description |
|---|---|
| 1 | You will use Android Studio IDE to create an Android application and name it as demo under a package com.example.demo as explained in the Hello World Example chapter. |
| 2 | Modify the default content of res/layout/activity_main.xml file to include few widgets in table layout. |
| 3 | No need to modify string.xml, Android studio takes care of default constants |
| 4 | Run the application to launch Android emulator and verify the result of the changes done in the application. |
Following is the content of the modified main activity file src/com.example.demo/MainActivity.java. This file can include each of the fundamental lifecycle methods.
package com.example.demo;

import android.os.Bundle;
import android.app.Activity;
import android.view.Menu;

public class MainActivity extends Activity {
   @Override
   protected void onCreate(Bundle savedInstanceState) {
      super.onCreate(savedInstanceState);
      setContentView(R.layout.activity_main);
   }

}
Following will be the content of res/layout/activity_main.xml file −
<TableLayout xmlns:android="https://schemas.android.com/apk/res/android"
   android:layout_width="fill_parent"
   android:layout_height="fill_parent">

   <TableRow
      android:layout_width="fill_parent"
      android:layout_height="fill_parent">

      <TextView
         android:text="Time"
         android:layout_width="wrap_content"
         android:layout_height="wrap_content"
         android:layout_column="1" />

      <TextClock
         android:layout_width="wrap_content"
         android:layout_height="wrap_content"
         android:id="@+id/textClock"
         android:layout_column="2" />

   </TableRow>

   <TableRow>

      <TextView
         android:text="First Name"
         android:layout_width="wrap_content"
         android:layout_height="wrap_content"
         android:layout_column="1" />

      <EditText
         android:width="200px"
         android:layout_width="wrap_content"
         android:layout_height="wrap_content" />
   </TableRow>

   <TableRow>

      <TextView
         android:text="Last Name"
         android:layout_width="wrap_content"
         android:layout_height="wrap_content"
         android:layout_column="1" />

      <EditText
         android:width="100px"
         android:layout_width="wrap_content"
         android:layout_height="wrap_content" />
   </TableRow>

   <TableRow
      android:layout_width="fill_parent"
      android:layout_height="fill_parent">

      <RatingBar
         android:layout_width="wrap_content"
         android:layout_height="wrap_content"
         android:id="@+id/ratingBar"
         android:layout_column="2" />
   </TableRow>

   <TableRow
      android:layout_width="fill_parent"
      android:layout_height="fill_parent"/>

   <TableRow
      android:layout_width="fill_parent"
      android:layout_height="fill_parent">

      <Button
         android:layout_width="wrap_content"
         android:layout_height="wrap_content"
         android:text="Submit"
         android:id="@+id/button"
         android:layout_column="2" />
   </TableRow>

</TableLayout>
Following will be the content of res/values/strings.xml to define two new constants −
<?xml version="1.0" encoding="utf-8"?>
<resources>
   <string name="app_name">HelloWorld</string>
   <string name="action_settings">Settings</string>
</resources>
Let's try to run our modified Hello World! application we just modified. I assume you had created your AVD while doing environment setup. To run the app from Android Studio, open one of your project's activity files and click Run  icon from the toolbar. Android studio installs the app on your AVD and starts it and if everything is fine with your setup and application, it will display following Emulator window −


