
CouchDB - Curl & Futon
cURL Utility
cURL utility is a way to communicate with CouchDB.
It is a tool to transfer data from or to a server, using one of the supported protocols (HTTP, HTTPS, FTP, FTPS, TFTP, DICT, TELNET, LDAP or FILE). The command is designed to work without user interaction. cURL offers a busload of useful tricks like proxy support, user authentication, ftp upload, HTTP post, SSL (https:) connections, cookies, file transfer resume and more.
The cURL utility is available in operating systems such as UNIX, Linux, Mac OS X and Windows. It is a command line utility using which user can access HTTP protocol straight away from the command line. This chapter teaches you how to use cURL utility.
Using cURL Utility
You can access any website using cURL utility by simply typing cURL followed by the website address as shown below −
curl www.tutorialspoint.com/
By default, the cURL utility returns the source code of the requested page. It displays this code on the terminal window.
cURL Utility Options
cURL utility provides various options to work with, and you can see them in cURL utility help.
The following code shows some portion of cURL help.
$ curl --help
Usage: curl [options...] <url>
Options: (H) means HTTP/HTTPS only, (F) means FTP only
      --anyauth Pick "any" authentication method (H)
   -a/--append Append to target file when uploading (F/SFTP)
      --basic Use HTTP Basic Authentication (H)
      --cacert <file> CA certificate to verify peer against (SSL)
-d/--data <data> HTTP POST data (H)
      --data-ascii <data> HTTP POST ASCII data (H)
      --data-binary <data> HTTP POST binary data (H)
      --data-urlencode <name=data/name@filename> HTTP POST data
urlencoded (H)
      --delegation STRING GSS-API delegation permission
      --digest Use HTTP Digest Authentication (H)
      --disable-eprt Inhibit using EPRT or LPRT (F)
      --disable-epsv Inhibit using EPSV (F)

   -F/--form <name=content> Specify HTTP multipart POST data (H)
      --form-string <name=string> Specify HTTP multipart POST data (H)
      --ftp-account <data> Account data to send when requested by server
(F)
      --ftp-alternative-to-user <cmd> String to replace "USER [name]" (F)
      --ftp-create-dirs Create the remote dirs if not present (F)
      --ftp-method [multi cwd/no cwd/single cwd] Control CWD usage (F)
      --ftp-pasv Use PASV/EPSV instead of PORT (F)

   -G/--get Send the -d data with a HTTP GET (H)

   -H/--header <line> Custom header to pass to server (H)
   -I/--head Show document info only
   -h/--help This help text
      --hostpubmd5 <md5> Hex encoded MD5 string of the host public key.
(SSH)
   -0/--http1.0 Use HTTP 1.0 (H)
      --ignore-content-length Ignore the HTTP Content-Length header
   -i/--include Include protocol headers in the output (H/F)

   -M/--manual Display the full manual

   -o/--output <file> Write output to <file> instead of stdout
      --pass <pass> Pass phrase for the private key (SSL/SSH)
      --post301 Do not switch to GET after following a 301
redirect (H)
      --post302 Do not switch to GET after following a 302
redirect (H)
   -O/--remote-name Write output to a file named as the remote file
      --remote-name-all Use the remote file name for all URLs
   -R/--remote-time Set the remote file's time on the local output
   -X/--request <command> Specify request command to use
      --retry <num> Retry request <num> times if transient problems
occur
      --retry-delay <seconds> When retrying, wait this many seconds
between each
      --retry-max-time <seconds> Retry only within this period
   -T/--upload-file <file> Transfer <file> to remote site
      --url <URL> Set URL to work with
   -B/--use-ascii Use ASCII/text transfer
While communicating with CouchDB, certain options of cURL utility were extensively used. Following are the brief descriptions of some important options of cURL utility including those used by CouchDB.
-X flag
(HTTP) Specifies a custom request method used when communicating with the HTTP server. The specified request is used instead of the method otherwise used (which defaults to GET). Read the HTTP 1.1 specification for details and explanations.
(FTP) Specifies a custom FTP command to use instead of LIST when doing file lists with ftp.
-H
(HTTP) Extra header is used when getting a web page. Note that if you add a custom header that has the same name as one of the internal ones cURL would use, your externally set header will be used instead of the internal one. This allows you to make even trickier work than cURL would normally do. You should not replace internally set headers without perfectly knowing what you’re doing. Replacing an internal header with the one without content on the right side of the colon, will prevent that header from appearing.
cURL assures that each header you add/replace get sent with the proper end of line marker. Neither you should add that as a part of the header content nor add newlines or carriage returns to disorder things.
See also the -A/--user-agent and -e/--referer options.
This option can be used multiple times to add/replace/remove multiple headers.
-d flag
Using this flag of cURL, you can send data along with the HTTP POST request to the server, as if it was filled by the user in the form and submitted.
Example
Suppose there is a website and you want to login into it or send some data to the website using –d flag of cURL utility as shown below.
curl -X PUT https://mywebsite.com/login.html -d userid=001 -d password=tutorialspoint
It sends a post chunk that looks like "userid=001&password=tutorialspoint". Likewise you can also send documents (JSON ) using -d flag.
-o flag
Using this flag, cURL writes the output of the request to a file.
Example
The following example shows the use of -o flag of cURL utility.
$ curl -o example.html www.tutorialspoint.com/index.htm
% Total % Received % Xferd Average Speed Time Time Time Current
      Dload Upload Total Spent Left Speed
100 81193 0 81193 0 0 48168 0 --:--:-- 0:00:01 --:--:--
58077
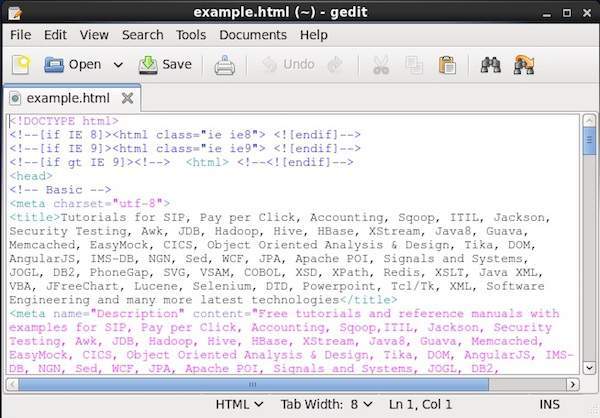
This gets the source code of the homepage of tutorialspoint.com, creates a file named example.com and saves the output in the file named example.html.
Following is the snapshot of the example.html.
-O
This flag is similar to –o, the only difference is with this flag, a new file with the same name as the requested url was created, and the source code of the requested url will be copied to it.
Example
The following example shows the use of -O flag of cURL utility.
$ curl -O www.tutorialspoint.com/index.htm
% Total % Received % Xferd Average Speed Time Time Time Current
      Dload Upload Total Spent Left
Speed
100 81285 0 81285 0 0 49794 0 --:--:-- 0:00:01 --:--:--
60077
It creates a new file with the name index.htm and saves the source code of the index page of tutorialspoint.com in it.
Hello CouchDB
You can access the homepage of the CouchDB by sending a GET request to the CouchDB instance installed. First of all make sure you have installed CouchDB in your Linux environment and it is running successfully, and then use the following syntax to send a get request to the CouchDB instance.
curl https://127.0.0.1:5984/
This gives you a JSON document as shown below where CouchDB specifies the details such as version number, name of the vendor, and version of the software.
$ curl https://127.0.0.1:5984/
{
   "couchdb" : "Welcome",
   "uuid" : "8f0d59acd0e179f5e9f0075fa1f5e804",
   "version" : "1.6.1",
   "vendor" : {
      "name":"The Apache Software Foundation",
      "version":"1.6.1"
   }
}
List of All Databases
You can get the list of all the databases created, by sending a get request along with the string "_all_dbs string ". Following is the syntax to get the list of all databases in CouchDB.
curl -X GET https://127.0.0.1:5984/_all_dbs
It gives you the list of all databases in CouchDB as shown below.
$ curl -X GET https://127.0.0.1:5984/_all_dbs
[ "_replicator" , "_users" ]
Creating a Database
You can create a database in CouchDB using cURL with PUT header using the following syntax −
$ curl -X PUT https://127.0.0.1:5984/database_name
Example
As an example, using the above given syntax create a database with name my_database as shown below.
$ curl -X PUT https://127.0.0.1:5984/my_database
{"ok":true}
Verification
Verify whether the database is created, by listing out all the databases as shown below. Here you can observe the name of newly created database, "my_database" in the list
$ curl -X GET https://127.0.0.1:5984/_all_dbs

[ "_replicator " , "_users" , "my_database" ]
Getting Database Info
You can get the information about database using the get request along with the database name. Following is the syntax to get the database information.
Example
As an example let us get the information of the database named my_database as shown below. Here you can get the information about your database as a response.
$ curl -X GET https://127.0.0.1:5984/my_database

{
   "db_name" : "my_database",
   "doc_count" : 0,
   "doc_del_count" : 0,
   "update_seq" : 0,
   "purge_seq" : 0,
   "compact_running" : false,
   "disk_size" : 79,
   "data_size" : 0,
   "instance_start_time" : "1423628520835029",
   "disk_format_version" : 6,
   "committed_update_seq" : 0
 }
Futon
Futon is the built-in, web based, administration interface of CouchDB. It provides a simple graphical interface using which you can interact with CouchDB. It is a naive interface and it provides full access to all CouchDB features. Following is the list of those features −
Databases −- Creates databases.
- Destroys databases.
- Creates documents.
- Updates documents.
- Edits documents.
- Deletes documents.
Starting Futon
Make sure CouchDB is running and then open the following url in browser −
https://127.0.0.1:5984/_utils/
If you open this url, it displays the Futon home page as shown below −
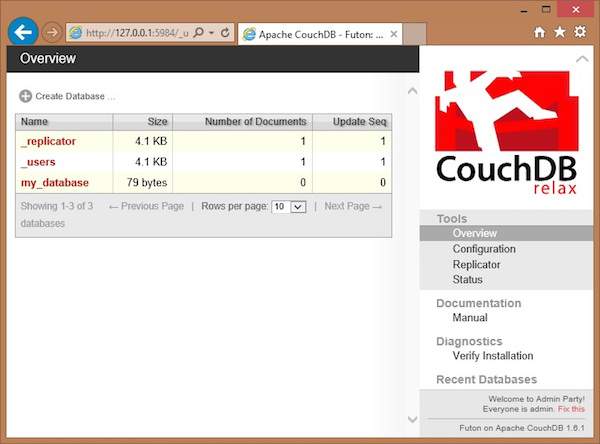
On the left hand side of this page you can observe the list of all the current databases of CouchDB. In this illustration, we have a database named my_database, along with system defined databases _replicator and _user.
On the right hand side you can see the following −
Tools − In this section you can find Configuration to configure CouchDB, Replicator to perform replications, and Status to verify status of CouchDB and recent modifications done on CouchDB.
Documentation − This section contains the complete documentation for the recent version of CouchDB.
Diagnostics − Under this you can verify the installation of CouchDB.
Recent Databases − Under this you can find the names of recently added databases.


