
Entity Framework - First Example
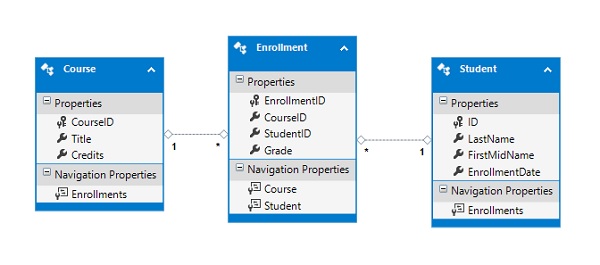
Let’s define a very simple model using classes. We’re just defining them in the Program.cs file but in a real-world application you will split your classes into separate files and potentially a separate project. Following is a data model which we will be creating using Code First approach.
Create Model
Add the following three classes in Program.cs file using the following code for Student class.
public class Student {
   public int ID { get; set; }
   public string LastName { get; set; }
   public string FirstMidName { get; set; }
   public DateTime EnrollmentDate { get; set; }

   public virtual ICollection<Enrollment> Enrollments { get; set; }
}
The ID property will become the primary key column of the database table that corresponds to this class.
The Enrollments property is a navigation property. Navigation properties hold other entities that are related to this entity.
In this case, the Enrollments property of a Student entity will hold all of the Enrollment entities that are related to that Student entity.
Navigation properties are typically defined as virtual so that they can take advantage of certain Entity Framework functionality such as lazy loading.
If a navigation property can hold multiple entities (as in many-to-many or one-tomany relationships), its type must be a list in which entries can be added, deleted, and updated, such as ICollection.
Following is the implementation for Course class.
public class Course {
   public int CourseID { get; set; }
   public string Title { get; set; }
   public int Credits { get; set; }

   public virtual ICollection<Enrollment> Enrollments { get; set; }
}
The Enrollments property is a navigation property. A Course entity can be related to any number of Enrollment entities.
Following is the implementation for Enrollment class and enum.
public enum Grade {
   A, B, C, D, F
}

public class Enrollment {
   public int EnrollmentID { get; set; }
   public int CourseID { get; set; }
   public int StudentID { get; set; }
   public Grade? Grade { get; set; }

   public virtual Course Course { get; set; }
   public virtual Student Student { get; set; }
}
The EnrollmentID property will be the primary key.
The Grade property is an enum. The question mark after the Grade type declaration indicates that the Grade property is nullable.
A grade that's null is different from a zero grade. Null means a grade isn't known or hasn't been assigned yet.
The StudentID and CourseID properties are foreign keys, and the corresponding navigation properties are Student and Course.
An Enrollment entity is associated with one Student and one Course entity, so the property can only hold a single Student and Course entity.
Create Database Context
The main class that coordinates Entity Framework functionality for a given data model is the database context class which allows to query and save data. You can create this class by deriving from the DbContext class and exposing a typed DbSet
public class MyContext : DbContext {
   public virtual DbSet<Course> Courses { get; set; }
   public virtual DbSet<Enrollment> Enrollments { get; set; }
   public virtual DbSet<Student> Students { get; set; }
}
Following is the complete code in Program.cs file.
using System.ComponentModel.DataAnnotations.Schema;
using System.Data.Entity;
using System.Linq;
using System.Text;
using System.Threading.Tasks;

namespace EFCodeFirstDemo {

   class Program {
      static void Main(string[] args) {}
   }

   public enum Grade {
      A, B, C, D, F
   }

   public class Enrollment {
      public int EnrollmentID { get; set; }
      public int CourseID { get; set; }
      public int StudentID { get; set; }
      public Grade? Grade { get; set; }

      public virtual Course Course { get; set; }
      public virtual Student Student { get; set; }
   }

   public class Student {
      public int ID { get; set; }
      public string LastName { get; set; }
      public string FirstMidName { get; set; }
      public DateTime EnrollmentDate { get; set; }

      public virtual ICollection<Enrollment> Enrollments { get; set; }
   }

   public class Course {
      public int CourseID { get; set; }
      public string Title { get; set; }
      public int Credits { get; set; }

      public virtual ICollection<Enrollment> Enrollments { get; set; }
   }

   public class MyContext : DbContext {
      public virtual DbSet<Course> Courses { get; set; }
      public virtual DbSet<Enrollment> Enrollments { get; set; }
      public virtual DbSet<Student> Students { get; set; }
   }

}
The above code is all we need to start storing and retrieving data. Let’s add some data and then retrieve it. Following is the code in main method.
static void Main(string[] args) {

   using (var context = new MyContext()) {
      // Create and save a new Students
      Console.WriteLine("Adding new students");

      var student = new Student {
         FirstMidName = "Alain", LastName = "Bomer",
            EnrollmentDate = DateTime.Parse(DateTime.Today.ToString())
      };

      context.Students.Add(student);

      var student1 = new Student {
         FirstMidName = "Mark", LastName = "Upston",
            EnrollmentDate = DateTime.Parse(DateTime.Today.ToString())
      };

      context.Students.Add(student1);
      context.SaveChanges();

      // Display all Students from the database
      var students = (from s in context.Students
         orderby s.FirstMidName select s).ToList<Student>();

      Console.WriteLine("Retrieve all Students from the database:");

      foreach (var stdnt in students) {
         string name = stdnt.FirstMidName + " " + stdnt.LastName;
         Console.WriteLine("ID: {0}, Name: {1}", stdnt.ID, name);
      }

      Console.WriteLine("Press any key to exit...");
      Console.ReadKey();
   }
}
When the above code is executed, you will receive the following output.
Adding new students
Retrieve all Students from the database:
ID: 1, Name: Alain Bomer
ID: 2, Name: Mark Upston
Press any key to exit...
Now the question that comes to mind is, where is the data and the database in which we have added some data and then retrieved it from database. By convention, DbContext has created a database for you.
If a local SQL Express instance is available then Code First has created the database on that instance.
If SQL Express isn’t available, then Code First will try and use LocalDb.
The database is named after the fully qualified name of the derived context.
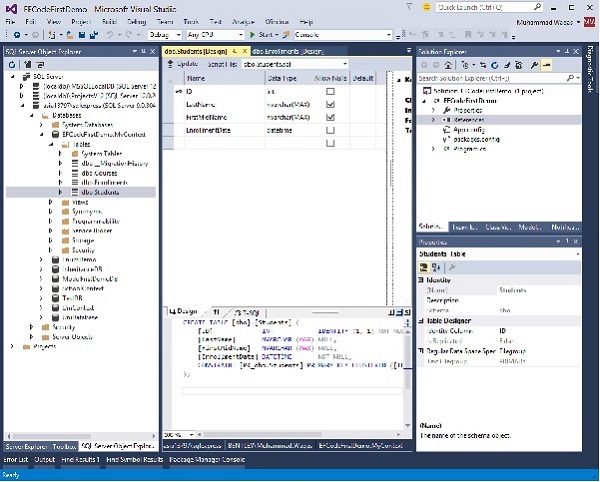
In our case, SQL Express instance is available, and the database name is EFCodeFirstDemo.MyContext as shown in the following image.
These are just the default conventions and there are various ways to change the database that Code First uses.
As you can see in the above image, it has created Students, Courses and Enrollments tables and each table contains columns with appropriate datatype and length.
The column names and datatype also matches with the properties of the respective domain classes.
Database Initialization
In the above example, we have seen that Code First creates a database automatically, but if you want to change the name of the database and server, let us see how Code First decides the database name and server while initializing a database. Take a look at the following diagram.
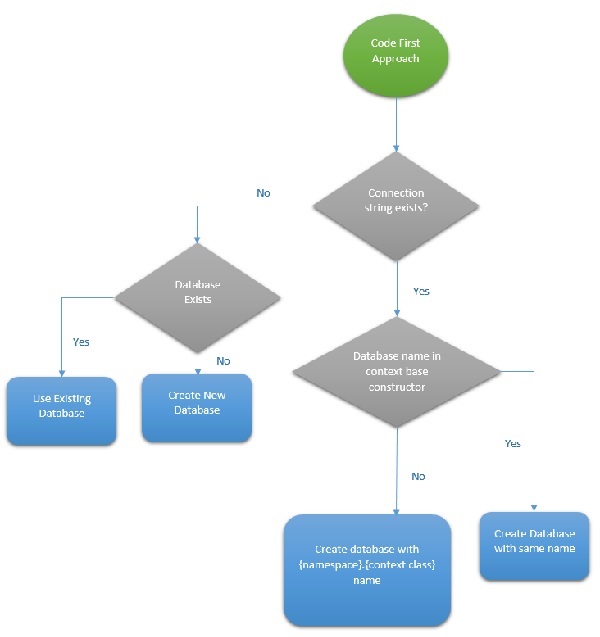
You can define the base constructor of the context class in the following ways.
- No Parameter
- Database Name
- Connection String Name
No Parameter
If you specify the base constructor of the context class without any parameter as shown in the above example, then entity framework will create a database in your local SQLEXPRESS server with a name {Namespace}.{Context class name}.
In the above example, the database which is created automatically has the name EFCodeFirstDemo.MyContext. If you look at the name, you will find that EFCodeFirstDemo is the namespace and MyContext is the context class name as shown in the following code.
public class MyContext : DbContext {
   public MyContext() : base() {}

   public virtual DbSet<Course> Courses { get; set; }
   public virtual DbSet<Enrollment> Enrollments { get; set; }
   public virtual DbSet<Student> Students { get; set; }
}
Database Name
If you pass the database name as a parameter in a base constructor of the context class, then Code First will create a database automatically again, but this time the name will be the one passed as parameter in the base constructor on the local SQLEXPRESS database server.
In the following code, MyContextDB is specified as parameter in the base constructor. If run your application, then the database with MyContextDB name will be created in your local SQL server.
public class MyContext : DbContext {
   public MyContext() : base("MyContextDB") {}
   public virtual DbSet<Course> Courses { get; set; }
   public virtual DbSet<Enrollment> Enrollments { get; set; }
   public virtual DbSet<Student> Students { get; set; }
}
Connection String Name
This is an easy way to tell DbContext to use a database server other than SQL Express or LocalDb. You may choose to put a connection string in your app.config file.
If the name of the connection string matches the name of your context (either with or without namespace qualification), then it will be found by DbContext when the parameter less constructor is used.
If the connection string name is different from the name of your context, then you can tell DbContext to use this connection in Code First mode by passing the connection string name to the DbContext constructor.
public class MyContext : DbContext {
   public MyContext() : base("name = MyContextDB") {}
   public virtual DbSet<Course> Courses { get; set; }
   public virtual DbSet<Enrollment> Enrollments { get; set; }
   public virtual DbSet<Student> Students { get; set; }
}
In the above code, snippet of context class connection string is specified as a parameter in the base constructor.
Connection string name must start with "name=" otherwise, it will consider it as a database name.
This form makes it explicit that you expect the connection string to be found in your config file. An exception will be thrown if a connection string with the given name is not found.
<connectionStrings>
   <add name = "MyContextDB"
      connectionString = "Data Source =.;Initial Catalog = EFMyContextDB;Integrated Security = true"
      providerName = "System.Data.SqlClient"/>
</connectionStrings>
The database name in the connection string in app.config is EFMyContextDB. CodeFirst will create a new EFMyContextDB database or use existing EFMyContextDB database at local SQL Server.
Domain Classes
So far we’ve just let EF discover the model using its default conventions, but there are going to be times when our classes don’t follow the conventions and we need to be able to perform further configuration. But you can override these conventions by configuring your domain classes to provide EF with the information it needs. There are two options to configure your domain classes −
- Data Annotations
- Fluent API
Data Annotations
DataAnnotations is used to configure your classes which will highlight the most commonly needed configurations. DataAnnotations are also understood by a number of .NET applications, such as ASP.NET MVC which allow these applications to leverage the same annotations for client-side validations.
Following are the data annotations used in student class.
public class Enrollment {

   [Key]
   public int EnrollmentID { get; set; }
   public int CourseID { get; set; }
   public int StudentID { get; set; }
   public Grade? Grade { get; set; }

   [ForeignKey("CourseID")]
   public virtual Course Course { get; set; }

   [ForeignKey("ID")]
   public virtual Student Student { get; set; }
}
Fluent API
Most model configuration can be done using simple data annotations. The fluent API is a advanced way of specifying model configuration that covers everything that data annotations can do, in addition to some more advanced configuration not possible with data annotations. Data annotations and the fluent API can be used together.
To access the fluent API you override the OnModelCreating method in DbContext. Now let’s rename the column name in student table from FirstMidName to FirstName as shown in the following code.
public class MyContext : DbContext {

   protected override void OnModelCreating(DbModelBuilder modelBuilder) {
      modelBuilder.Entity<Student>().Property(s ⇒ s.FirstMidName)
         .HasColumnName("FirstName");
   }

   public virtual DbSet<Course> Courses { get; set; }
   public virtual DbSet<Enrollment> Enrollments { get; set; }
   public virtual DbSet<Student> Students { get; set; }
}


