
MS Project - Advanced Scheduling
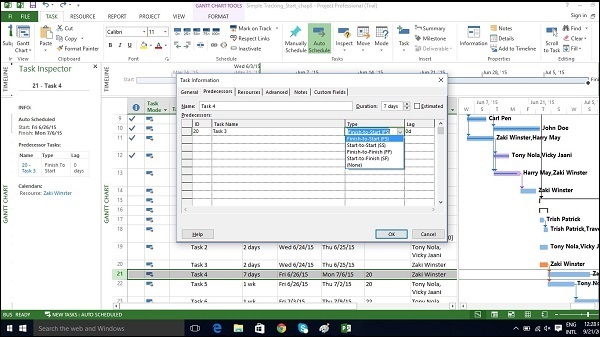
There are four types of task dependencies.
Finish to Start (FS) − Finish the first floor before starting to build the second floor. Most used.
Finish to Finish (FF) − Cooking all the dishes for dinner to finish on time.
Start to Start (SS) − When doing a survey, we would seek survey responses but will also start tabulating the responses. One does not have to finish collecting survey responses before starting the tabulation.
Start to Finish (SF) − Exam preparation will end when exam begins. Least used.
Adjust Task Link Relationship
Click Task Tab → double-click the required task under Task Name column →
   Task Information dialog box opens → Predecessors Tab.

Click the box under the Type column and choose the relationship according to your requirement.
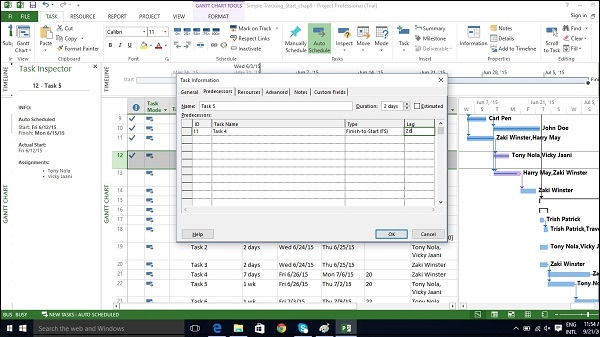
Apply Lead and Lag
By default when you link tasks they are assigned a “Finish to Start” relationship. In this relationship,
Lead − Lead time causes successor task to begin before its predecessor tasks ends.
Lag − Lag time causes successor task to start after its predecessor task ends.
Click Task Tab → double-click the required Task under Task Name column →
   Task Information dialog box opens → Predecessors Tab.
Under Lag heading column, enter the lag in terms of hours, days, weeks, or years. You can also apply lag or lead as a percentage. If you enter 50% for the selected Task which is 6 days long, the task is delayed by 3 days after the predecessor ends.
Lag is entered as positive units and lead in negative units (example,-3d or -50%).
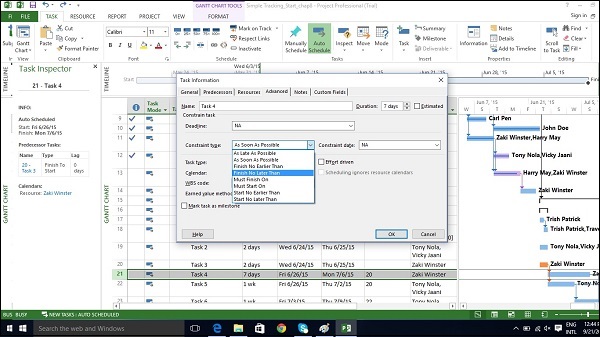
Apply Task Constraints
Each task created in MS Project 2013 will be constrained as “As Soon As Possible” by default when Automatic Scheduling is turned ON. As Soon As Possible means the task starts as soon as the project starts, if there are no dependencies that would delay it. So, no fixed start or end dates are imposed by this constraint type, but of course predecessor and successor dependencies are maintained.
When MS Project 2013 performs calculations to save you time in a project that’s running late, constraint settings are enforced.
There are 8 Task Constraints.
| Constraint type | Constraint name | Description |
|---|---|---|
| Flexible | As Late As Possible (ALAP) | Task is scheduled as late as possible with the task ending before the project ends and without delaying subsequent tasks. Default constraint when you schedule from the project finish date. Do not enter a task start or finish date with this constraint. |
| As Soon As Possible (ASAP) | Task is scheduled to begin as early as possible. Default constraint when you schedule from the project start date. Do not enter a start or finish date with this constraint. | |
| Semi-Flexible | Start No Earlier Than (SNET) | Task is scheduled to start on or after a specified date. |
| Finish No Earlier Than (FNET) | Task is scheduled to finish on or after a specified date. | |
| Start No Later Than (SNLT) | Task is scheduled to start on or before a specified date. | |
| Finish No Later Than (FNLT) | Task is scheduled to finish on or before a specified date. | |
| Inflexible | Must Finish On (MFO) | Task is scheduled to finish on a specified date. |
| Must Start On (MSO) | Task is scheduled to start on a specified date. |
Click Task Tab → double-click the required Task under Task Name column →
   Task Information dialog box opens → Advanced Tab.

Click dropdown box for Constraint type. Choose the constraint you would like to apply.
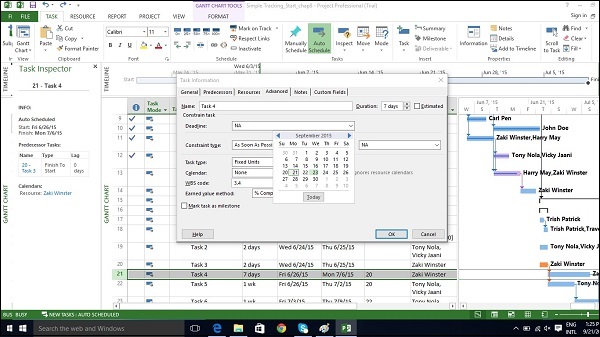
Enter Deadline Date
If you use Tasks Constraints, you limit your scheduling flexibility, where MS Project 2013 will fix a particular start or finish date of the task according to the constraint. It is a better idea to use a Deadline Date which has no effect on the scheduling of a task or summary task. MS Project will alert you with a red exclamation symbol in the indicators column, if the scheduled completion of the task exceeds its deadline date.
Click Task Tab → double-click the required Task under Task Name column → Task Information dialog box opens → Advanced Tab.
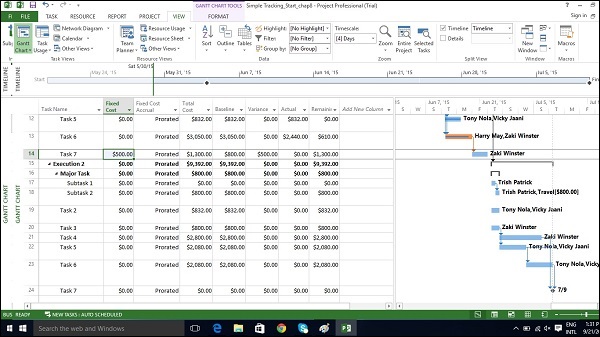
Enter Fixed Cost
Fixed Cost is associated with a task that is not tied to any resources or amount of work.
Click View Tab → Data group → Tables → Cost.
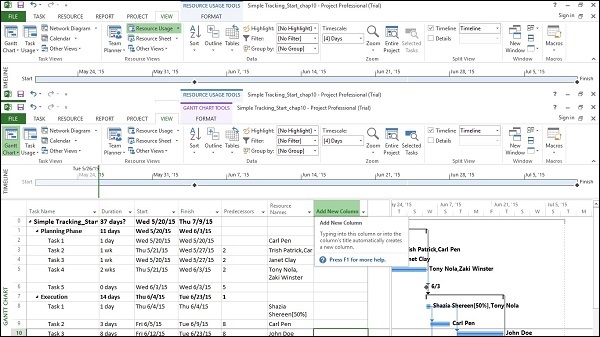
Enter the cost under the Fixed Cost column for the task of interest. In the following example, we have assigned a fixed cost of $500 to Task 7.
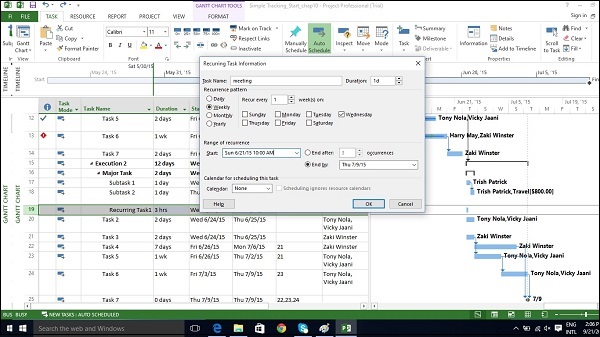
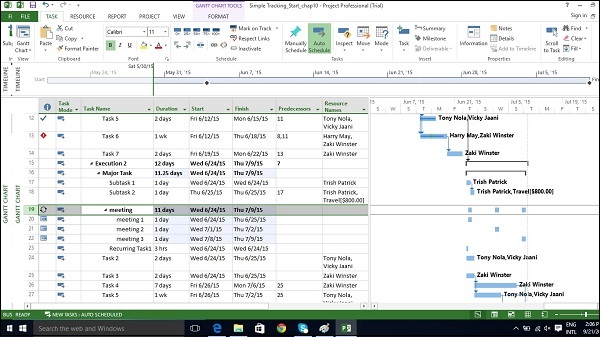
Enter a Recurring Task
Status meetings, status reports, inspection dates can recur with a particular frequency. In MS Project 2013, you can specify recurring tasks without having to assign tasks each time separately. You can also assign resources to these task.
In Gantt Chart View → Task Tab → Insert group → dropdown box for Task → Recurring Task.
Enter Task Name and choose Recurrence pattern.
You can also choose a specific time for the task to start as well. By default Project schedules a recurring task to start on plan’s default start time. You can add time value in the Start box for Recurring Task Information dialog box to change this. In the following figure, start time of 10:00 AM is entered.
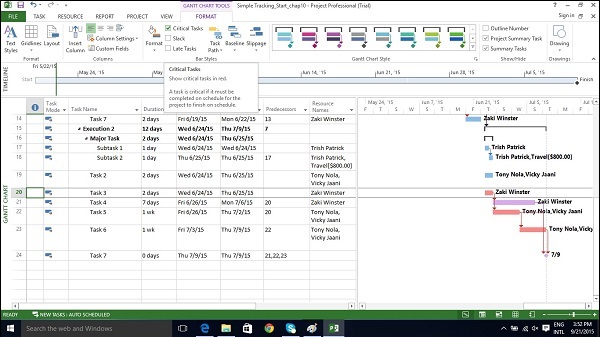
View Critical Path
Critical Path is the succession of connected tasks that will take the longest to complete. The word “critical” does not mean that the tasks are complex or important or need to be closely monitored, but the focus is on terms schedule that will affect the project finish date.
So, if you want to shorten the duration of a project, you should first start with activities/tasks on the critical path. Critical path can be a single sequence of tasks (a single critical path) or there can be more than 1 critical paths for a single project. While schedule changes are made, it is also likely that the critical path will change from time to time.
One needs to always focus on the Critical Path first, when one wants to apply fast-tracking or crashing to shorten the project duration.
Slack or Float are key to understanding Critical path. There are two types of Float −
Free Float − It is the amount of time a task can be delayed without delaying another task.
Total Float − It is the amount of time a task can be delayed without delaying the completion of the project.
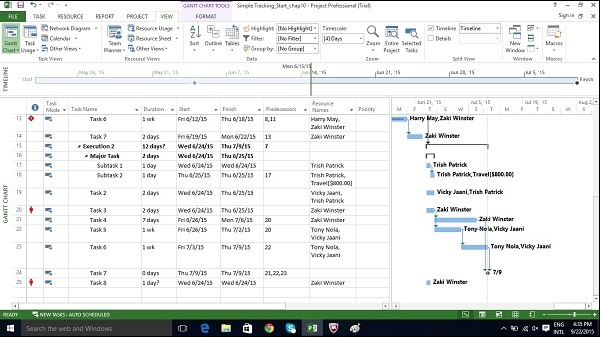
In Gantt Chart view → Format Tab → Bar Styles Group → Check the Critical Tasks box ON.
All task bars in the critical path, in the Gantt Chart View on the right, will turn Red in color.
Check Resource Allocations
Relationship between a resource’s capacity and task assignments is called allocation.
This can defined by 3 states −
Under allocated − An Engineer who works for 40 hours a week, has work assigned for only 20 hours.
Fully allocated − A skilled worker who works for 40 hours a week, is assigned 40 hours of work in that week.
Over allocated − A carpenter is assigned 65 hours of work, when he only has a 40 hour work week.
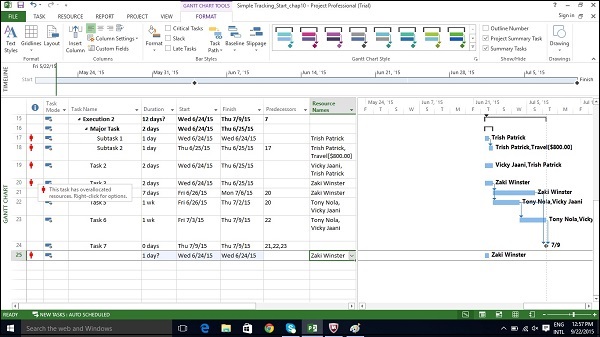
In Gantt Chart View
Click View Tab → Task Views group → Gantt Chart view.
Gantt Chart View displays some limited resource information, as shown in the following screenshot.
It summarizes whether there may be a problem by the red over allocated icon in the indicator column.
Click View Tab → Resource Views group → Resource Usage view.
The Resource Usage view displays resources and all tasks assigned to them underneath the Resource Name. The left-hand side of the screen lists the Resources and the Task Names together with columns of total information for the resource or assignment. The right-hand side shows a time-phased view.
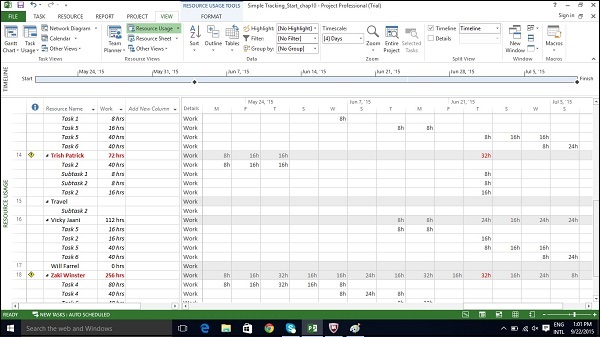
You can also collapse the outline in the table to see total work per resource over time.
Click on Resource Name column heading.
Click View Tab → Data group → Outline → Hide Subtasks.
Resolve Resource Over Allocation
One would need to either change the scope (reduce the amount of work), assign more resources, or accept a longer schedule to resolve overallocation.
This can be achieved by using some of the following techniques −
Adjust Schedule
By changing its lead or lag time when the resource has more tasks assigned than can be completed during a given time period. If you add delay that is less than or equal to the amount of slack on the task, you will not affect the finish date of the project.
By default when you link tasks, they are assigned a “Finish to Start” relationship. In this relationship,
Lead − Lead time causes successor task to begin before its predecessor tasks ends.
Lag − Lag time causes successor task to start after its predecessor task ends.
Click Task Tab → double-click the required Task under Task Name column → Task Information dialog box opens → Predecessors Tab.
Under Lag heading column, enter the lag in terms of hours, days, weeks, or years. You can also apply lag or lead as a percentage. If you enter 50% for the selected Task which is 6 days long, the task is delayed by 3 days after the predecessor ends.
Lag is entered as positive units and lead in negative units (example,-3d or -50%).

Substitute Resources or Add Additional Resources
You can manually allot some other resource to the task.
Click View Tab → Gantt Chart View → Resource Name column.

Click the box below the Resource Name column for the task you need the resource to be assigned.

From the dropdown, choose the resource name. In the following example,
   for Task 1 “PT1”, we have chosen the resource “Celic”.
You can also select multiple resources to work on a single task.

Reduce Assigned Work
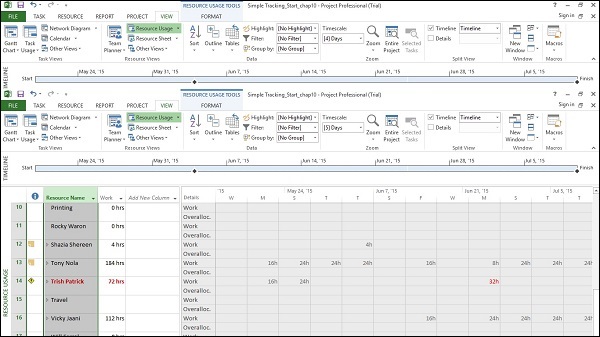
Click View Tab → Resource Views group → Resource Usage view.
In the following example, Trish Patrick is over allocated, the Resource Name and Work appear in red.
On View tab → Zoom group → Timescale box → Days.
You can also right-click on the Time-phased grid in the right hand side window to display amount of overallocation by switching on overallocation.
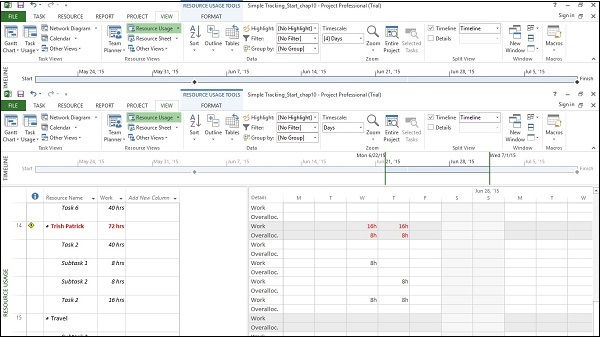
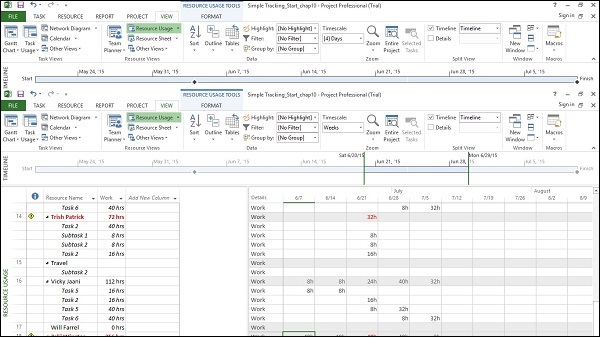
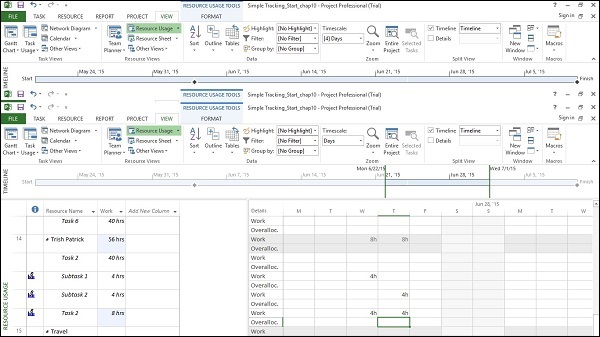
Now you can reduce the assigned hours. In the following example, 8-hour assignment is reduced to 4-hour assignments. Not only is Trish Patrick’s work reduced but total work in the plan has changed. You will also notice a new icon in the indicator column to let you know that the assignment work has been edited.
Decrease Task Duration
You can decrease task duration (if no actual work has been entered) to reduce the amount of work required of the resource, who is assigned to complete the task. If actual work has been recorded, you must manually reduce the remaining work on the task.
Remove Overallocated Resource
You can just remove a resource assignment from an overallocated resource.
Level Overallocated Resources
If resources are overallocated you can use resource-leveling feature in MS Project 2013. It works by either splitting tasks or by adding delay to tasks to ensure the resource is not overloaded. Leveling can delay the individual task finish dates and even the project finish date. Project does not change who is assigned to each task, total work, or assignment unit values.
Project first delays tasks to use up any available slack. Once the slack becomes zero, MS Project 2013 makes changes according to priorities, dependency relationships and task constraints (such as a Finish No Later Than constraint).
Set Priorities
It is always better to set task priorities (this is a measure of a task's importance/availability for leveling). You can enter value between 1 and 1000, according to the amount of control you like in the leveling process. A priority level of 1000 will ensure MS Project does not level a particular task. By default, priority is set at 500 or a medium level of control. Tasks that have lower priority are delayed or split before those that have higher priority.
Click View Tab → Task Views → Gantt chart View.

In the Gantt chart table area, scroll to the right to see Add New Column.

Click on the dropdown box and select Priority.
Now you can add priority to each task as required.
Leveling
Steps in the Leveling process are only a few, but it is important to understand what each option does. The steps are as follows −
Click on View Tab → Resource View group → Resource Sheet.

Click Resource tab → Level group → Leveling Options → Level All.
Project does leveling and overallocated indicators are removed (If leveling is done completely, sometimes this might not happen).
In the following section, we will look at Leveling Options in detail −
Click Resource tab → Level group → Leveling Options.
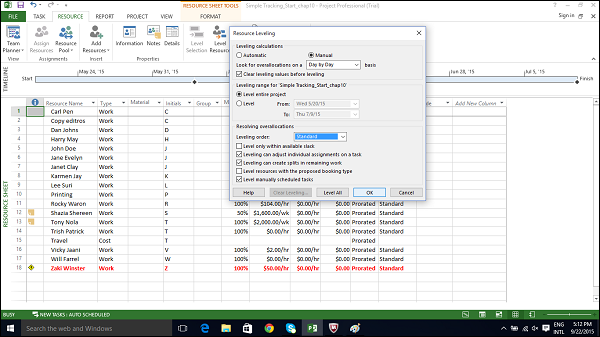
In Resource Leveling dialog box, under Level calculations, try to use Manual more often. This will ensure MS Project 2013 does the leveling process only when you ask it to, and not as soon as a resource becomes overallocated even if you don’t want it to (when you choose Automatic option). For examples, if a resource is overallocated, for say half an hour more in a week, from 40 hours to 40.5 hours, you wouldn’t want this to inconvenience you by getting automatically leveled.
In Resource Leveling dialog box, under Level calculations, choose Day by Day basis for “Look for overallocations on a” option. Doing so will not level resources, but it will determine when Project displays overallocation indicators next to resource names.
In Resource Leveling dialog box, under Level calculations, use the clear leveling values before leveling checkbox is selected. Doing so will ensure Project removes any existing leveling delays from all tasks and assignments before leveling. And if you previously leveled the plan and then added more assignments, you might want checkbox to be unchecked to ensure you don’t lose the previous leveling results.
In Resource Leveling dialog box, under Leveling range for “…….”, you can choose Level entire project. Here you choose to level either the entire plan or only assignments that fall within a date range you specify.
In Resource Leveling dialog box, under Resolving overallocations, Leveling order dropdown box you can choose Standard. You have 3 options here −
ID only option delays tasks only according to their ID numbers. Numerically higher ID numbers (for example, 10) will be delayed before numerically lower ID numbers. You might want to use this option when your plan has no task relationships or constraints.
Standard option delays tasks according to predecessor relationships, start dates, task constraints, slack, priority, and IDs.
Priority, standard option looks at the task priority value before the other standard criteria (Task priority is a numeric ranking between 0 and 1000).
In Resource Leveling dialog box, under Resolving overallocations, you have several options that you can select. These are explained as follows −
Level only within available slack. Selecting this checkbox would prevent Project from extending the plan’s finish date. MS Project will use only the free slack within the existing schedule, which could mean that resource overallocations might not be fully resolved.
Leveling can adjust individual assignments. Selecting this checkbox allows Project to add a leveling delay (or split work on assignments if Leveling Can Create Splits in Remaining Work is also selected) independently of any other resources assigned to the same task. This might cause resources to start and finish work on a task at different times.
Leveling can create splits in remaining work checkbox. This allows Project to split work on a task (or on an assignment if Leveling Can Adjust Individual Assignments on a Task is also selected) as a way of resolving overallocation.
Level manually scheduled tasks. Selecting this allows Project to level a manually scheduled task just as it would an automatically scheduled task.
Check Plan’s Cost
Types of cost in a project life cycle includes −
Baseline costs − All planned costs as saved in baseline plan.
Actual costs − Costs that have been incurred for tasks, resources or assignments.
Remaining costs − Difference between baseline/current costs and actual costs.
Current costs − When plans are changed due to assigning or removing resources, or adding or subtracting tasks, MS Project 2013 will recalculate all costs. This will appear under the fields labeled Cost or Total Cost. If you have started to track actual cost, it will include actual cost + remaining cost per task.
Method 1
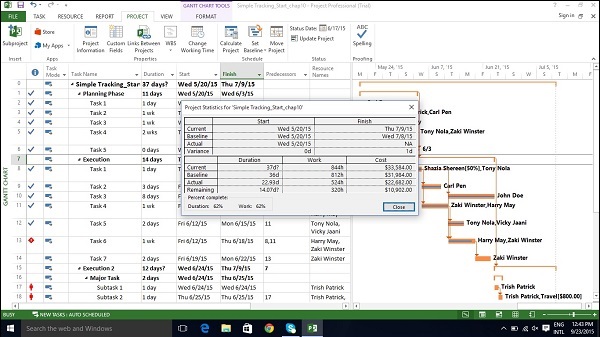
You can view plan’s cost values in the Project Statistics dialog box.
Click Project tab → Properties Group → Project Information → Statistics…
Method 2
Click View tab → Task Views group → Other Views → Task Sheet.

Click View tab → Data group → Tables → Cost.


