
SharePoint - Quick Guide
SharePoint - Overview
This tutorial will give you an idea of how to get started with SharePoint development. Microsoft SharePoint is a browser-based collaboration, document management platform and content management system. After completing this tutorial, you will have a better understating of what SharePoint is and what are the high-level feature areas and functionalities of SharePoint.
What is SharePoint
SharePoint is a platform to support collaboration and content management system. It is a central web-based portal. Using SharePoint, you can manage your colleague’s and your own documents, social activities, data, and information.
It allows groups to set up a centralized, password-protected space for document sharing.
Documents can be stored, downloaded and edited, then uploaded for continued sharing.
SharePoint offers such a wide array of features that it is very challenging for any one person to be an expert across all the workloads.
Let us understand what all can we do with SharePoint. It is divided into three separate areas −
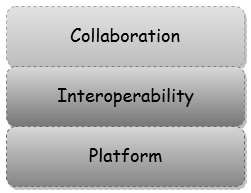
Collaboration
The term collaboration contains a very strong theme for SharePoint. It means bringing people together through different types of collaboration, such as enterprise content management, Web content management, social computing, discoverability of people and their skills.
In SharePoint 2013, collaboration is managed through Apps.
Developers can extend, customize, or build their own Apps for SharePoint as well manage collaboration on SharePoint.
Interoperability
SharePoint is also about bringing this collaboration together through interoperability such as −
Office and web-based document integration.
Capability to build and deploy secure and custom solutions that integrate line-ofbusiness data with SharePoint and Office.
Integrating with wider web technologies, or deploying applications to the cloud.
Platform
SharePoint is also a platform that supports not only interoperability and collaboration but also extensibility, through a rich object model, a solid set of developer tools, and a growing developer community.
One of the key paradigm shifts is the notion of the cloud in SharePoint.
The cloud introduces new App models such as −
New ways of developing, deploying, and hosting SharePoint applications.
New forms of authentication through OAuth.
New ways of data interoperability using OData and REST.
SharePoint - Types
In this chapter, we will be covering the different types and versions to start working on SharePoint.
There are three main ways to install and use SharePoint −
- SharePoint Foundation
- SharePoint Server
- Office 365
The first two options are SharePoint on-premise, while Office 365 has emerged as a third, fully cloud-hosted model for SharePoint.
SharePoint Foundation
SharePoint Foundation is the essential solution for organizations that need a secure, manageable, web-based collaboration platform. SharePoint Foundation provides you with the basic collaboration features that are included within SharePoint.
SharePoint Foundation ships as a free, downloadable install and represents the foundational parts of SharePoint.
It includes a number of features such as security and administration, user and Team site collaboration, and a number of Apps (such as document libraries and lists).
In essence, it provides a baseline set of features that enable you to get started with both using and developing for SharePoint.
SharePoint Foundation requires some features to build standard collaboration and communication solutions within your organization. The primary features of SharePoint Foundation revolve around document management and collaboration.
Key Features of SharePoint Foundation
Following are some of the major features, which are responsible for its wide adoption in businesses.
Effective document and task collaboration − Team websites offer access to information in a central location.
Reduced implementation and deployment resources − SharePoint Foundation is available to Windows Server customers as a free download, with the help of which implementation time and cost are greatly reduced.
Better control of your organization’s important business data − SharePoint Foundation also offers features for data and information management and security.
Embrace the web for collaboration − By extending and customizing SharePoint Foundation
In short, SharePoint Foundation represents the core content storage and collaboration features of SharePoint. It is the ideal edition for teams and small organizations looking to improve on their ability to work with one another in a secure, easy-to-use, collaborative workspace.
SharePoint Server
SharePoint Server offers a wealth of features that extend upon those offered in SharePoint Foundation. It provide a richer, more advanced collection of features that you can utilize in your organization’s solutions.
Key Features of SharePoint Server
Some of these additional features are described in the following list −
Advanced Search − The search features and functionality features available within the Server versions offer more flexibility. They allow customized Search Results pages that you can configure with customized search Web Parts.
Web Content Management − SharePoint Server supports web content creation and publishing for the internet.
Enterprise Services − These services provide ways for you to build custom solutions quickly and easily using tools that are available to you within the Office product family.
Business Connectivity Services − Business Connectivity Services (BCS) enables you to connect to these external data sources and display business data via Web Parts, user profiles, or SharePoint lists.
Social Networking and Computing − Social networking is everywhere and has become an expected feature set of many solutions.
Records management − SharePoint Server provides excellent support for the management of content throughout its entire life cycle.
Office 365
Office 365 has emerged as a third, fully cloud-hosted model for SharePoint. It is the alternate option to hosting your own farm in your own on-premises Data Center.
Key Features of Office 365
The options for licensing SharePoint Online through Office 365 are based on factors such as the number of users you want to add, the amount of data you need to store, and the features you need to be available.
It has also become a great place where you can develop rich applications (both as SharePoint-hosted and cloud-hosted apps) and scale without the cost of managing the on-premises infrastructure.
It does not have all the same services and features as SharePoint Server, but does carry with it some great development capabilities.
There are .NET applications that you build using C# or Visual Basic and then deploy into SharePoint as .WSPs or .APPs. There are lighter-weight apps such as HTML5 and JavaScript apps that you can also deploy.
As a developer, you have the capability to customize any of the SharePoint editions, whether it is SharePoint Foundation, Server, or Office 365.
SharePoint - Capabilities
In this chapter, we will be covering the default set of capabilities (or features) built into SharePoint that enables you to take advantage of the platform without doing any development.
You can use or extend these core capabilities when building your Apps. Microsoft has historically referred to these capabilities as workloads.
These workloads provide a way to talk about the different capabilities of SharePoint coming together. You should see these workloads as representing not only a core set of related applications but also as opportunities for your application development.
Following are the workloads, which were added in SharePoint 2010 −
Sites − Representing the different types of sites available for use and the features within these sites.
Communities − Representing the community and social features such as blogs and wikis.
Content − Representing core enterprise content management features.
Search − Representing the search-driven features.
Insights − Representing business intelligence features such as KPIs.
Composites − Representing the ability to integrate external applications by using, for example, Business Connectivity Services.
SharePoint 2013 – Capabilities
In SharePoint 2013, Microsoft has extended the capabilities to add more features and provide tighter integration.
Following are the core capabilities for SharePoint 2013 −
| Capability | Native Features | Example Extensibility |
|---|---|---|
| Sites | Sites is where you will find the collaborative aspects of SharePoint. Sites contain an abundance of features, including the capability to create, store, and retrieve data, and manage, tag, and search for content, documents, and information. You also have connectivity into the Microsoft Office 2013 client applications through the list and document library. | Sites, site templates, Apps for SharePoint, workflow, master pages, site pages |
| Social | Provides social and social networking capabilities, newsfeeds, and profile searching and tagging, along with the capability to search, locate, and interact with people through their skills, organizational location, relationships, and rating of content. | Search customization, rating and tagging capabilities, blogs, wikis, metadata tags |
| Content | Contains the capability to explore, search, and manage content using Web pages, apps, workflow, or content types. | Apps for SharePoint, workflows, Word or Excel Services |
| Search | The ability to search content inside and outside of SharePoint in a rich and dynamic way with real-time document views through Office Web Apps. In addition, the integration of information in structured database systems and on-premises or cloud-based LOB systems such as SAP, Siebel, and Microsoft Dynamics. | SharePoint Search, Search customization, Business Data Connectivity (BDC) |
| Insights | Predominantly about BI and support, for example, the capability to integrate Microsoft Access into SharePoint; leverage Excel and SQL Server to access and display data on a Web page; enable the use of dashboards and key performance indicators (KPIs) to transform raw data into actionable information. | Excel Services, Access Services, dashboards, BDC, PerformancePoint Services |
| Interoperability | Ranges from LOB integration to Office integration, through the new Apps for Office application model; (think HTML and JavaScript-fueled custom task panes that link to cloud services instead of VSTO managed code add-ins) to custom solution development. | BDC, Apps for Office, custom development |
| Branding | Changing the look and feel of your site through built-in template changes or more detailed and organizationally driven branding. | Out of the box configuration, master pages and customized Apps for SharePoint |
SharePoint - Setup Environment
In this chapter, we will setup the development environment for SharePoint. As you already know that there are three different options of SharePoint. They are −
- SharePoint Foundation
- SharePoint Server
- Office 365
In this chapter, we will be using the Office 365, which is cloud-based version.
Step 1 − You can easily create a free trial account here https://products.office.com/en/business/office-365-enterprise-e3-business-software.
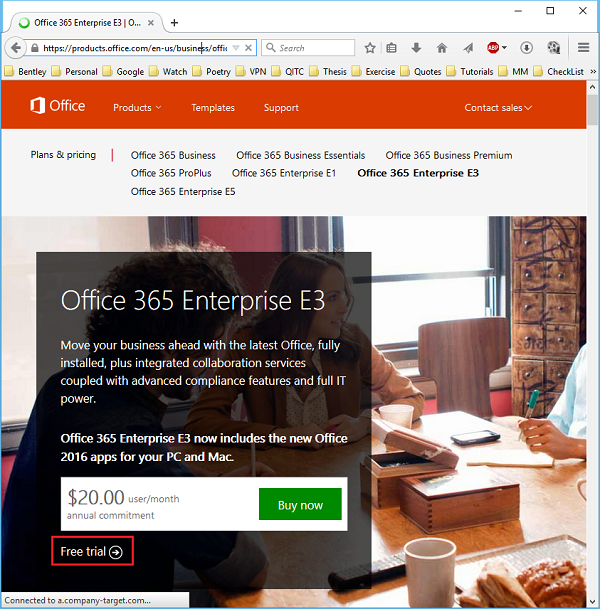
Step 2 − Click the Free trial option. A new page will open.
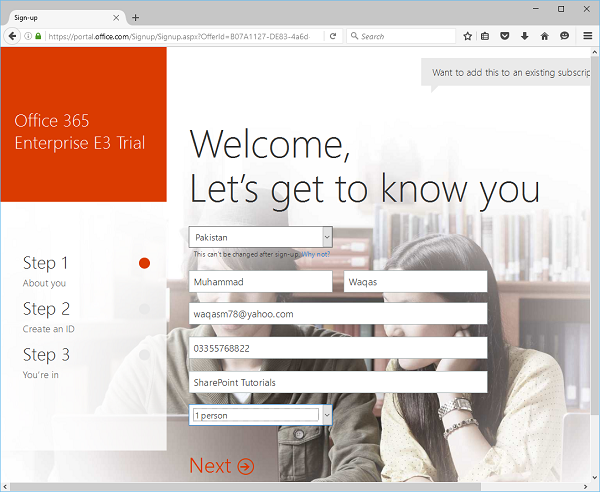
Step 3 − Enter the required information and click Next and you will see the following page.
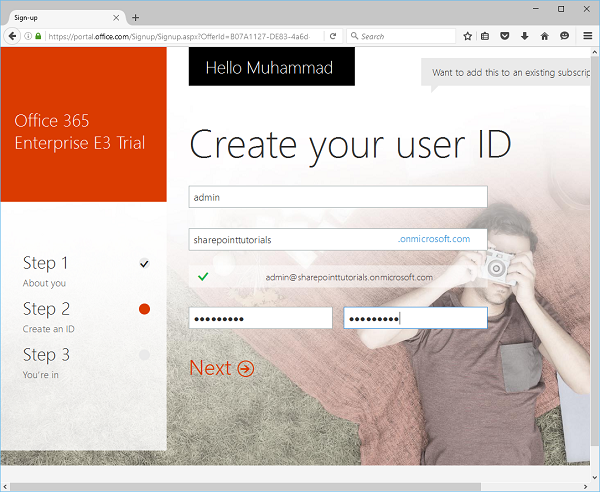
Step 4 − Enter the username, company name and password and click Next. It will send you a verification code. Once the verification is completed then it will start creating the account.
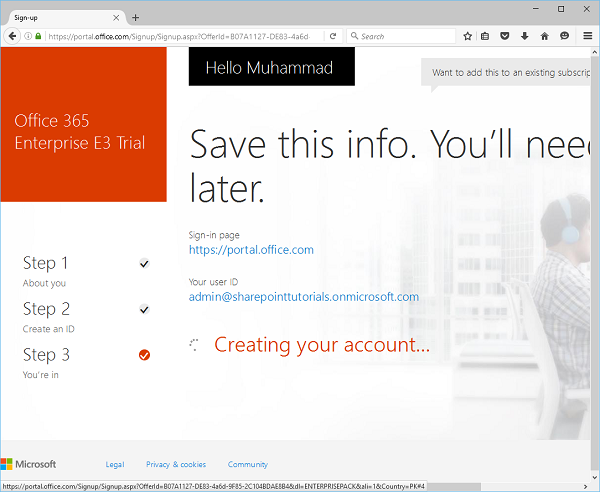
Step 5 − Once your account is created, you will see the following page.
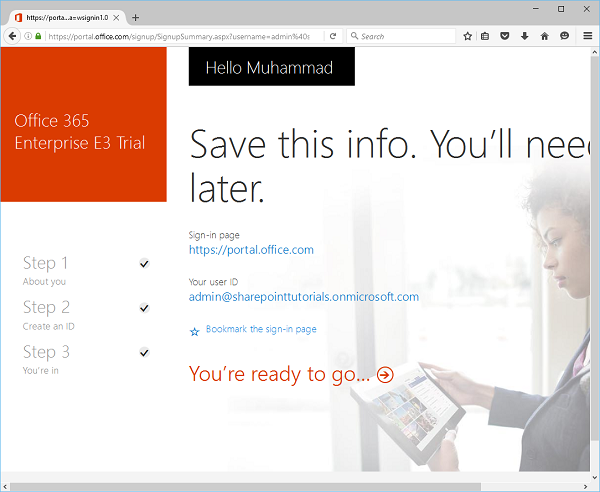
Step 6 − Click You’re ready to go and you will see the following page −
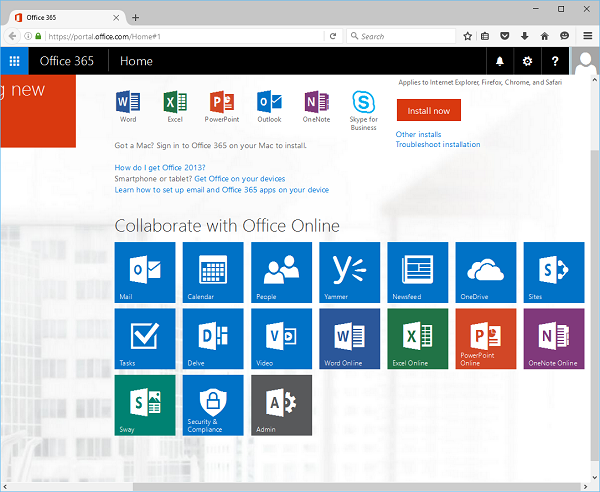
Now your environment is ready and you can start share point development but you will also need to install visual studio.
Microsoft provides a free version of visual studio, which also contains SQL Server and it can be downloaded from https://www.visualstudio.com/en-us/downloads/download-visual-studio-vs.aspx.
Installation
Following steps will guide you to install SharePoint.
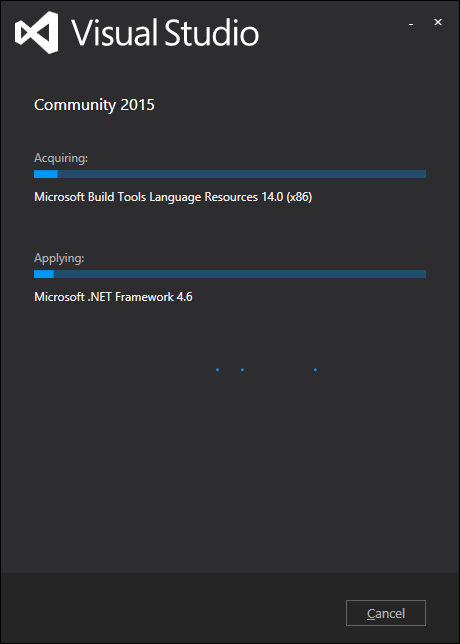
Step 1 − Once downloading is complete, run the installer. The following dialog will be displayed.
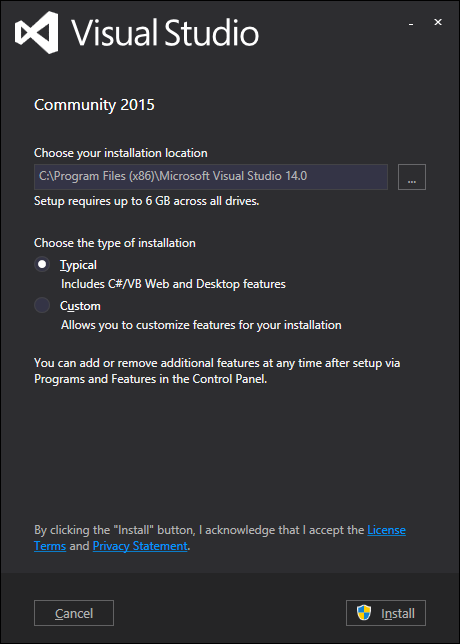
Step 2 − Click Install and it will start the installation process.
Step 3 − Once the installation process is completed successfully, you will see the following message −
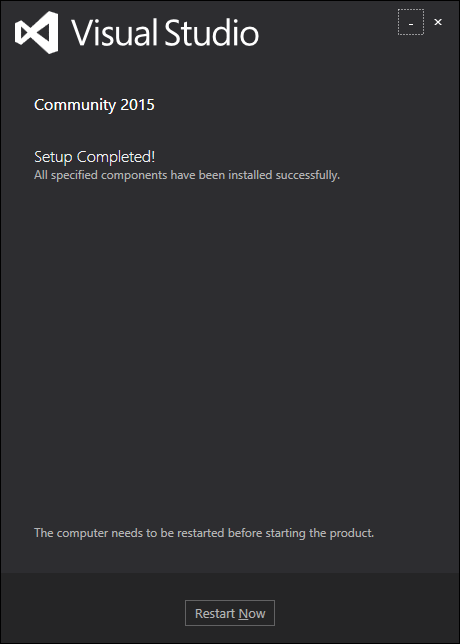
Step 4 − Restart your computer if required. Now open Visual studio from the Start Menu. It will open the following dialog box and it will take some time for preparation.
Step 5 − Once all is done, you will see the main window of Visual studio.
You are now ready to start your application.
Step 6 − Select File → New → Project menu option.

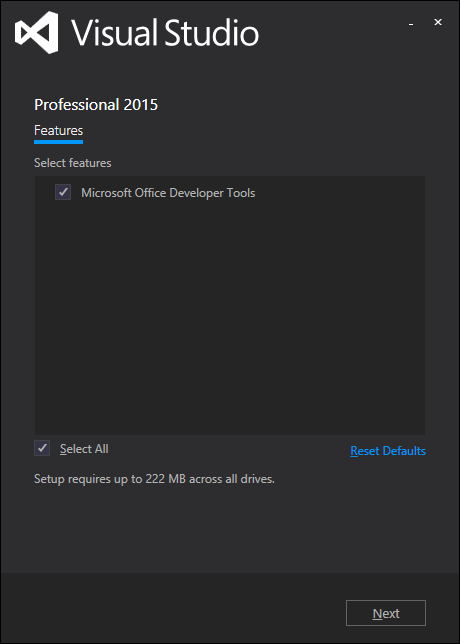
Step 7 − Select Office/SharePoint in the left pane under Templates → Visual C#. Doubleclick Install Office Developer Tools.
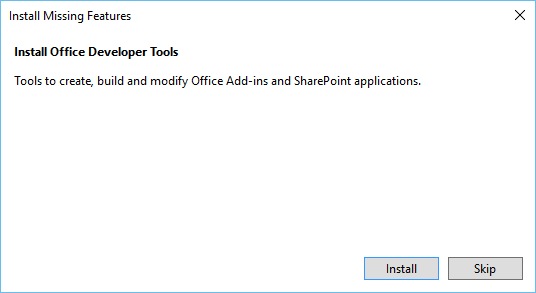
Step 8 − Click Install and close all Visual Studio instances. A new page will open. Click Next.
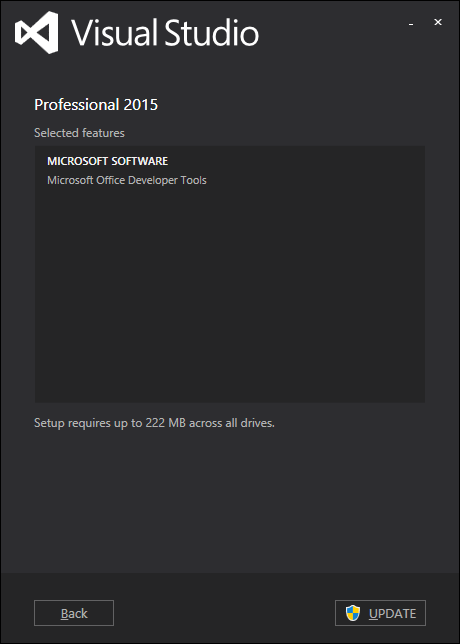
Step 9 − A message box will appear. Click Update.
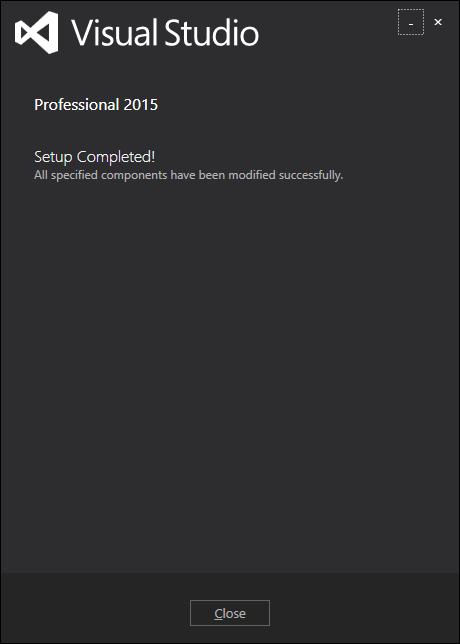
Step 10 − Once it is updated, you will see the message as follows −
SharePoint - Create Site Collection
The site is the core thing to SharePoint and represents the starting point for developers, and without site collection, you cannot start SharePoint development. A Microsoft SharePoint online site collection is a top-level site that contains subsites.
A number of site templates are available which you can use. The subsites share administration settings, navigation, and permissions each of which can be changed for individual subsites as needed.
Create Site Collection
When learning an application such as SharePoint, it is a good idea to create an area where you can perform exercises without affecting the existing environments or users.
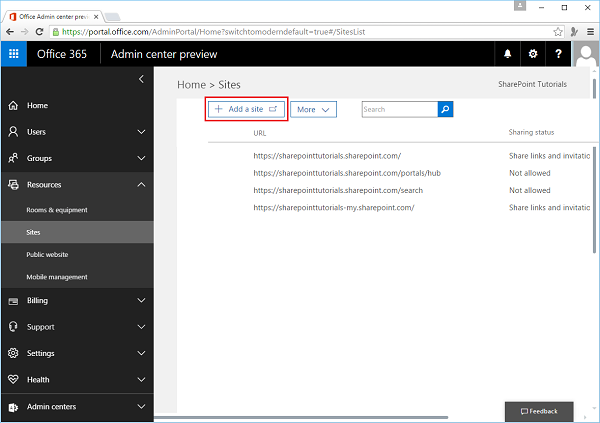
Step 1 − To create a new site collection let us go to the site https://portal.office.com/

Step 2 − Select Admin icon and you will see the following page −
Step 3 − Select Resources → Sites, in the left pane. In the right pane, click Add a site.
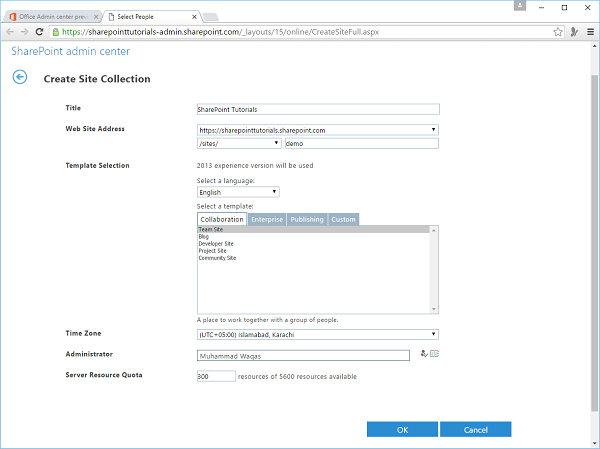
Step 4 − Following page will open. Enter the required information and click OK.
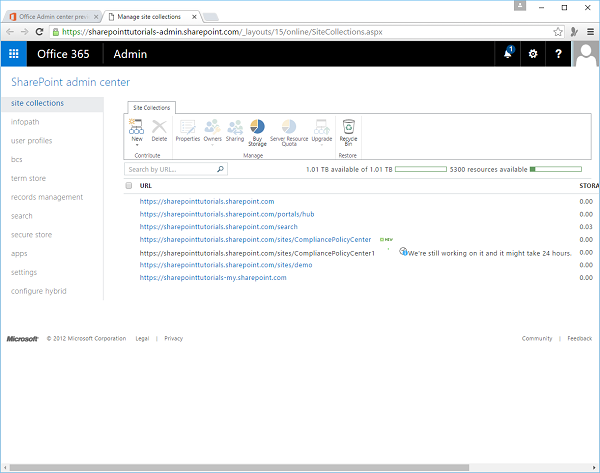
You can see that the site collection is added in your admin center URL list. The URL is the site collection location at which the administrator can start to create and manage sites.
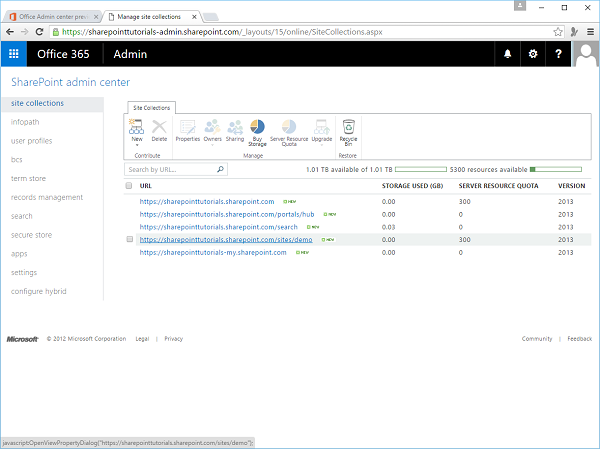
Step 5 − Click the link and you will see the detailed information regarding that site collection.

SharePoint - APIs
In this chapter, we will be covering the several sets of APIs to access the SharePoint platform.
The selection of APIs depend upon the following different factors −
- Application type
- Developer existing skills
- Device on which the code runs
Application Type
There are different types of applications such as −
- SharePoint Add-in
- Web Part on a SharePoint page
- Silverlight application running on either a client computer or a client mobile device
- ASP.NET application exposed in SharePoint
- JavaScript running in a SharePoint site page
- SharePoint application page
- Microsoft .NET Framework application running on a client computer
- Windows PowerShell script
- Timer job running on a SharePoint server
Developer Existing Skills
You can easily create applications in SharePoint if you already have experience in any of the following programming models without needing to learn a lot about SharePoint programming −
- JavaScript
- ASP.NET
- REST/OData
- .NET Framework
- Windows Phone
- Silverlight
- Windows PowerShell
Device on Which the Code Runs
The device on which the code runs can be any of the following −
- Server in the SharePoint farm.
- An external server such as a server in the cloud.
- A client computer and a mobile device.
The following table provides guidance for different set of APIs, which can be used for a selected list of common SharePoint extensibility projects.
| S.No. | API & Usage |
|---|---|
| 1 | .NET Framework client object model, Silverlight client object model, REST/OData endpoints Create an ASP.NET web application that performs CRUD operations on SharePoint data or external data that is surfaced in SharePoint by a BCS external content type, but does not have to call SharePoint across a firewall. |
| 2 | REST/OData endpoints Create a LAMP web application that performs CRUD operations on SharePoint data or external data that is surfaced in SharePoint by a BCS external content type. Create an iOS or Android app that performs CRUD operations on SharePoint data. |
| 3 | Mobile client object model Create a Windows Phone app that performs CRUD operations on SharePoint data. |
| 4 | Mobile client object model and the server object model Create a Windows Phone app that uses the Microsoft Push Notification Service to alert the mobile device of events in SharePoint. |
| 5 | .NET Framework client object model Create a .NET Framework application that performs CRUD operations on SharePoint data. |
| 6 | Silverlight client object model Create a Silverlight application that performs CRUD operations on SharePoint data. |
| 7 | JavaScript client object model Create an HTML/JavaScript application that performs CRUD operations on SharePoint data. Create an Office Add-in that works with SharePoint |
| 8 | Server object model Create a custom Windows PowerShell command. Create a timer job. Create an extension of Central Administration. Create consistent branding across an entire SharePoint farm. Create a custom Web Part, application page, or ASP.NET user control. |
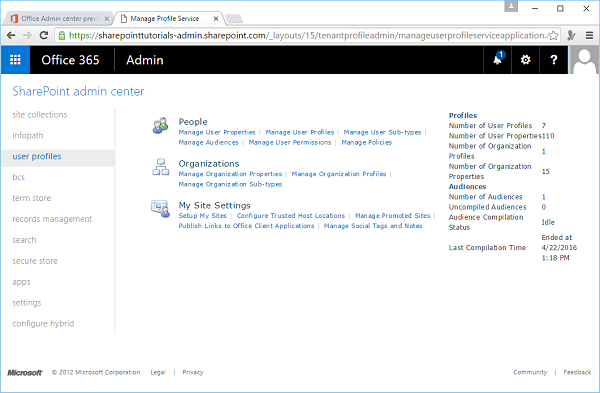
SharePoint - Central Administration
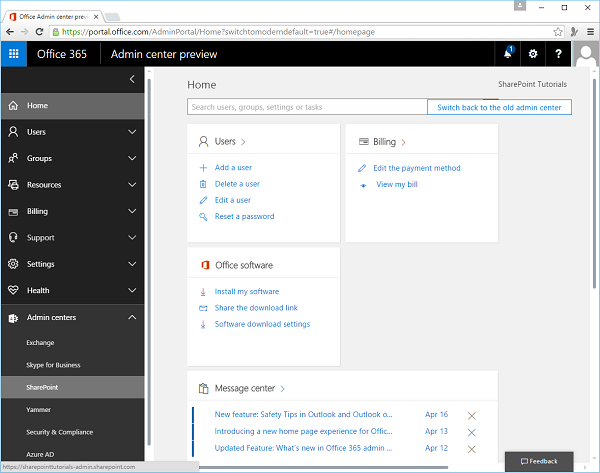
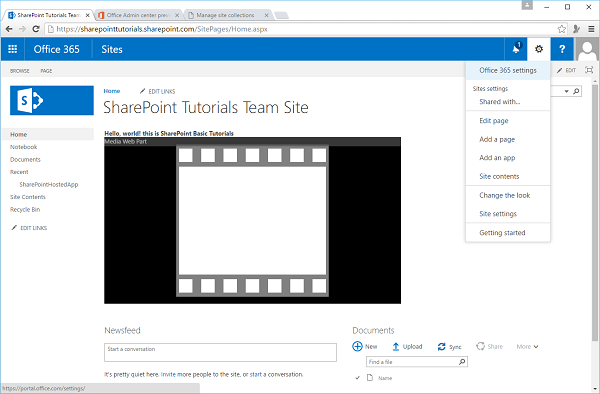
In this chapter, we will be covering the high-level introduction of SharePoint Central Administration. Central Administration is the place where you can perform administration tasks from a central location. As we have already signed up for an Office 365, so we also have an administration site.
Open the URL https://portal.office.com/ in the browser.
Step 1 − Select the Admin icon.
Step 2 − Now select Admin centers → SharePoint in the left pane.
The following page will open.
You can see a variety of site collection administration features and manage the following activities −
- Application management
- Monitoring
- Security
- General application settings
- System settings
- Backup and restore
- Upgrade and migration
- Configuration wizard
- Apps
Application Management
In Application Management, you can perform tasks like creating new web applications and site collections. You can manage the services that are installed on your SharePoint site such as Word, Excel or BCS and manage your content database.
You can also perform tasks like modifying the properties of the content database, activating features, and creating new site collections etc.
Monitoring
Monitoring is the central place wherein you can manage reporting, monitoring, and the status of your SharePoint site. The Monitoring site is divided into three areas, which are as follows −
Health Status − You can see the status of different services on your SharePoint Server.
Timer Jobs − You can define the specific jobs and decide when to run them.
Reporting − A set of tools that enables you to create and manage reports, run diagnostic logging, and view reports on various server-side activities.
Security
Security settings is all about the security in the main browser UI, where the users and the site administrators can assess specific permissions that relate to users for their sites. Security covers many areas such as −
- Management of administrator accounts
- Configuration and management of service accounts.
- Management of password change settings and policies.
- Specifications of authentication providers, trusted identity providers.
- Antivirus settings.
- Blocked file types.
- Self-service security.
- Secure token services.
General Application Settings
In General Application Settings, you can configure a number of general options for your SharePoint site collections and sites such as send mail to users.
You can also manage a number of deployment and approval options such as content deployment location and approvers of that content. In general, think of this site as the generic settings for your SharePoint sites.
System Settings
You can configure server-centric settings such as farm-level or access features, or even manage the services like Excel and Word Services, which are available to the users of the site collection. You manage these types of settings from within the System Settings site.
Backup and Restore
Sometimes, you might need to backup and restore your SharePoint site. The backup and restore feature enables you to create and schedule regular backups for your SharePoint, perform ad hoc backups, restore from a previously backed-up SharePoint site etc.
Upgrade and Migration
Sometimes, you might want to upgrade from one version of SharePoint to another version such as moving from SharePoint Standard to SharePoint Enterprise. This requires a license and some facility to upgrade the server.
This type of activity can be done in the Upgrade and Migration section of the Central Administration site. You can also install service patches, check on installation, and upgrade progress from within this part of the administration toolset.
Configuration wizard
It is simply a step-by-step wizard that configures SharePoint Server for you.
You should have seen this wizard when you first installed SharePoint. However, you can run it again after installation to change some of the configurations on your SharePoint server.
Apps
Apps is a new category within the Central Administration site that enables you to manage different facets of the apps that are installed on your SharePoint instance.
For example, you can use Apps to manage the licenses, ensure that apps are running and performing in an error-free way, and also manage the App Catalog.
SharePoint - App Model
In this chapter, we will be covering the SharePoint deployment App models. Since, SharePoint is moving towards the cloud, the following deployment models are available to use Apps for SharePoint −
- SharePoint-hosted
- Autohosted
SharePoint-hosted App
The SharePoint-hosted deployment type represents a way to deploy client-side, lightweight apps to SharePoint. The easiest way to think about the SharePoint-hosted App as an application that has no server-side code.
The key features of SharePoint-hosted App are −
It is an application made up of static application files or pages that reside on your SharePoint like HTML and JavaScript files that enable client-side coding.
When users access the SharePoint-hosted App, they are redirected to the page that contains your application.
The SharePoint-hosted deployment type is good for lighter-weight Apps such as branded list views, media apps, or weather apps.
If you decide to leverage the SharePoint-hosted deployment model, then you are limited to the code that does not run on the server.
You can use Silverlight with SharePoint and take advantage of HTML along with JavaScript.
Let us have a look at a simple example of SharePoint-hosted application.
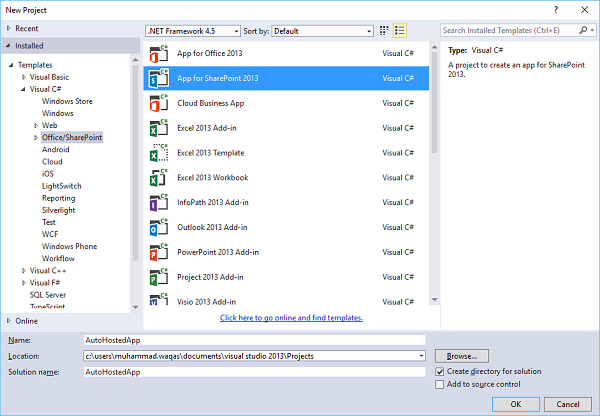
Step 1 − Open Visual Studio and select the File → New → Project menu.
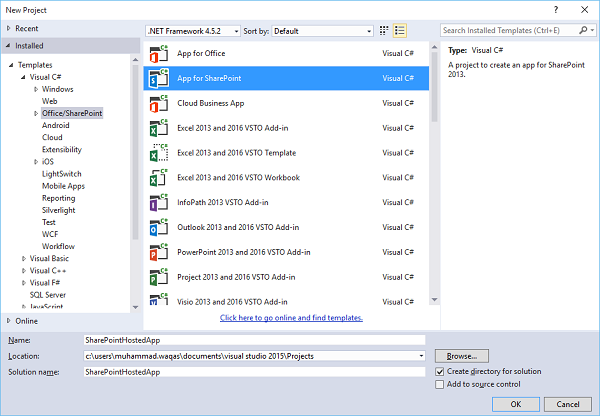
Step 2 − In the left pane select Templates → Visual C# → Office/SharePoint and then in the middle pane select App for SharePoint.
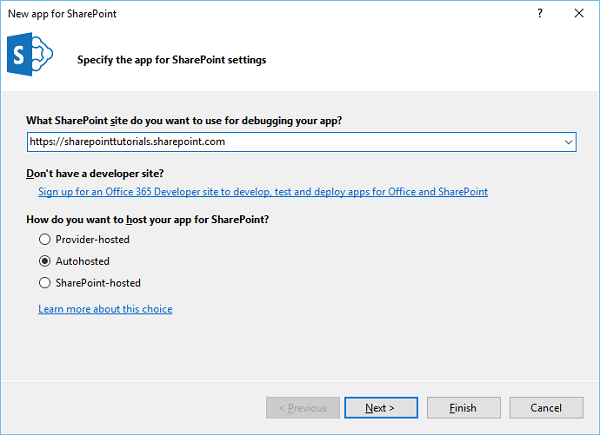
Enter the Name in the Name field, Click OK and you will see the following dialog box.
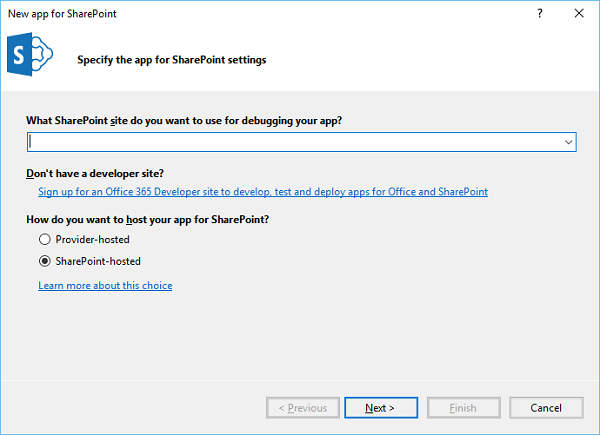
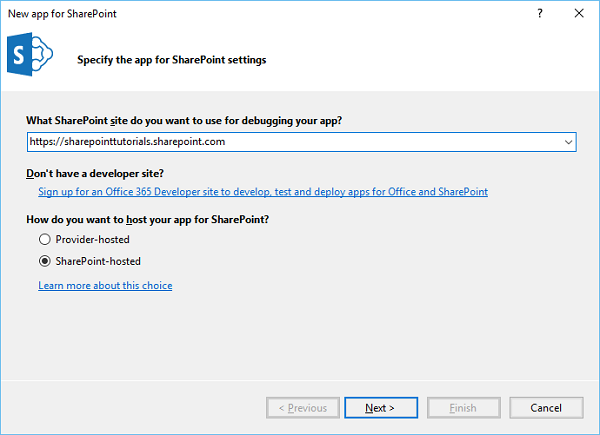
In the New App for SharePoint, we need to add the SharePoint site URL that we want to debug and then select the SharePoint-hosted model as the way you want to host your app for SharePoint.
Step 3 − Go to the SharePoint admin center and copy the SharePoint URL.
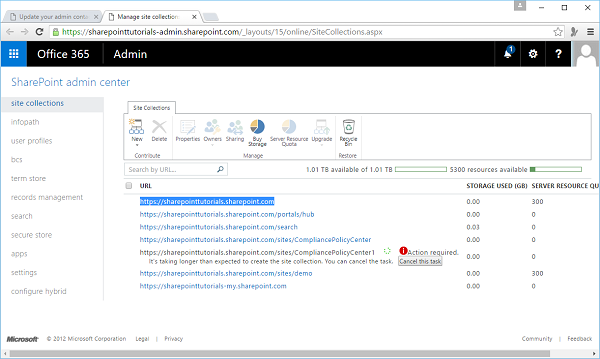
Step 4 − Paste the URL in the New App for SharePoint dialog box as shown below.
Step 5 − Click Next and it will open the Connect to SharePoint dialog box where we need to login.
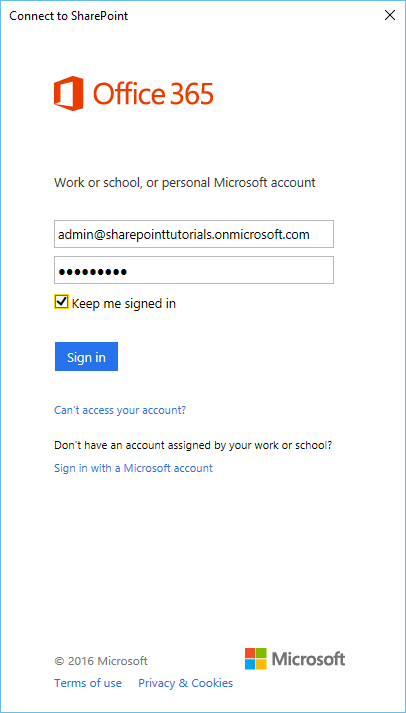
Step 6 − Enter your credentials and click the Sign in button. Once you are successfully logged in to the SharePoint site, you will see the following dialog box −
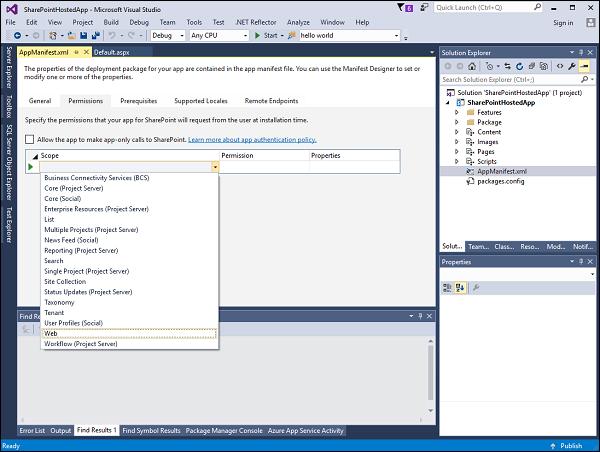
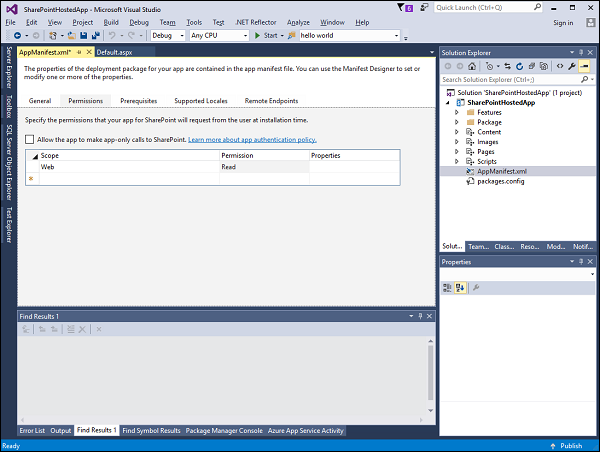
Step 7 − Click Finish. Once the project is created, click the AppMenifest.xml file in the Solution Explorer.

Step 8 − Click the Permissions tab. A Scope dropdown list will open.
Step 9 − In the Scope dropdown list, select Web, which is the scope of permissions that you are configuring. In the Permission drop-down list, select Read, which is the type of permission you are configuring.
Step 10 − Open the Default.aspx file and replace it with the following code.
<%-- The following 4 lines are ASP.NET directives needed when
   using SharePoint components --%>

<%@ Page Inherits = "Microsoft.SharePoint.WebPartPages.WebPartPage,
   Microsoft.SharePoint, Version = 15.0.0.0, Culture = neutral,
   PublicKeyToken = 71e9bce111e9429c" MasterPageFile = "~masterurl/default.master"
   Language = "C#" %>

<%@ Register TagPrefix = "Utilities" Namespace = "Microsoft.SharePoint.Utilities"
   Assembly = "Microsoft.SharePoint, Version = 15.0.0.0, Culture = neutral,
   PublicKeyToken = 71e9bce111e9429c" %>

<%@ Register TagPrefix = "WebPartPages"
   Namespace = "Microsoft.SharePoint.WebPartPages" Assembly = "Microsoft.SharePoint,
   Version = 15.0.0.0, Culture = neutral, PublicKeyToken = 71e9bce111e9429c" %>

<%@ Register TagPrefix = "SharePoint"
   Namespace = "Microsoft.SharePoint.WebControls" Assembly = "Microsoft.SharePoint,
   Version = 15.0.0.0, Culture = neutral, PublicKeyToken = 71e9bce111e9429c" %>

<%-- The markup and script in the following Content element
   will be placed in the <head> of the page --%>

<asp:Content ID = "Content1" ContentPlaceHolderID = "PlaceHolderAdditionalPageHead"
   runat = "server">
   <script type = "text/javascript" src = "../Scripts/jquery- 1.6.2.min.js"></script>
   <link rel = "Stylesheet" type = "text/css" href = "../Content/App.css" />
   <script type = "text/javascript" src = "../Scripts/App.js"></script>
</asp:Content>

<asp:Content ID = "Content2" ContentPlaceHolderID = "PlaceHolderMain"
   runat = "server">
   <script type = "text/javascript">
      function hello() {
         var currentTime = new Date();
         $get("timeDiv").innerHTML = currentTime.toDateString();
      }
   </script>
   <div id = "timeDiv"></div>
   <input type = "button" value = "Push me!" onclick = "hello();" />
</asp:Content>
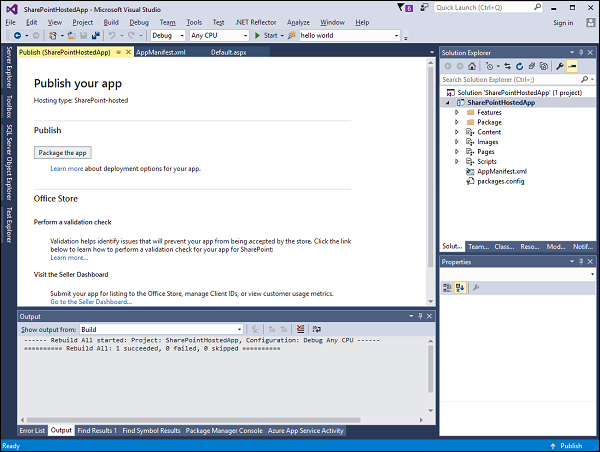
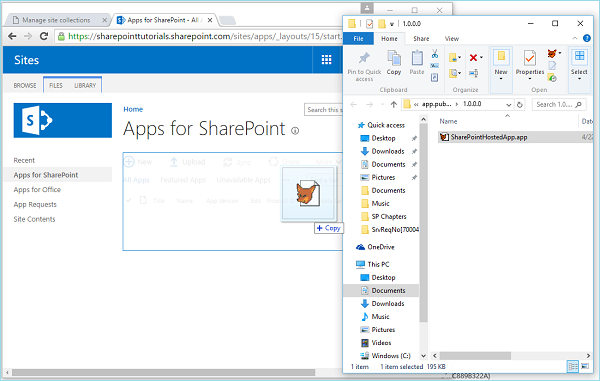
Step 11 − Go to the Solution explorer, right-click the project and select Publish. Click the Package the app button. This builds your SharePoint-hosted app and prepares it for you for deployment to your SharePoint site.
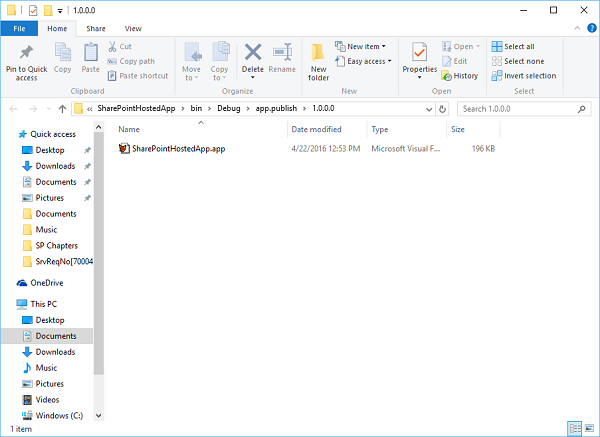
You will see the following folder, which contains the *.app file.
Step 12 − Navigate to your SharePoint online site.
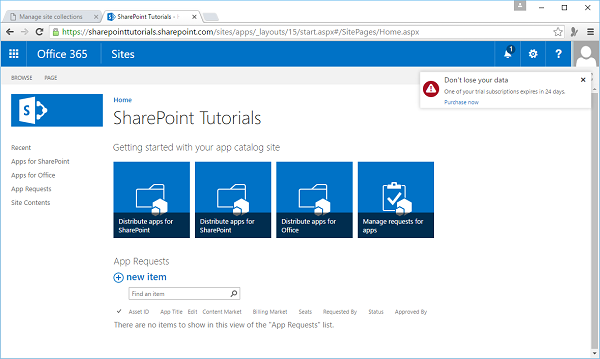
Step 13 − Click Apps for SharePoint in the left pane. A new page will open.
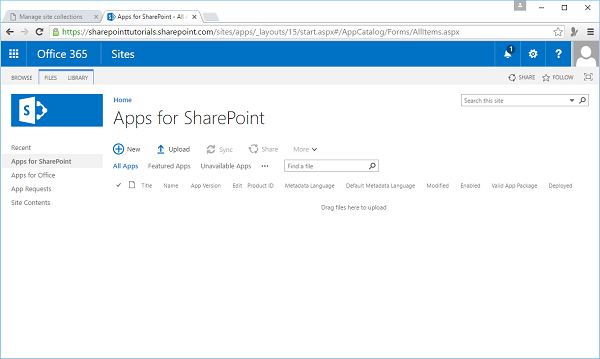
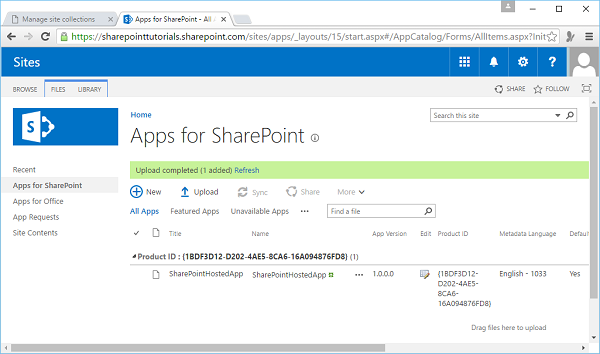
Step 14 − Drag your files here to upload.
Once the file is uploaded, you will see the following page −
Step 15 − Click the option - Site Contents in the left pane. Click the add an app icon as shown in the following screen shot −
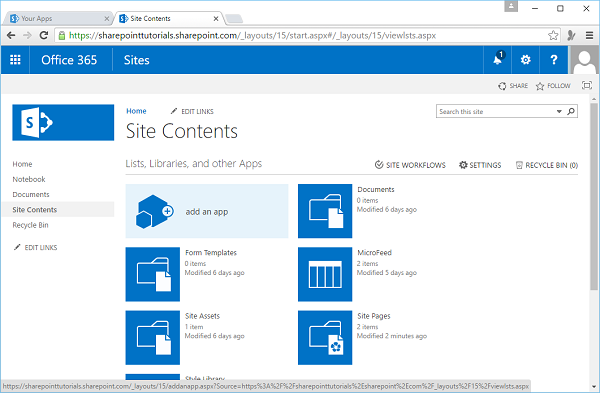
A new page will open.
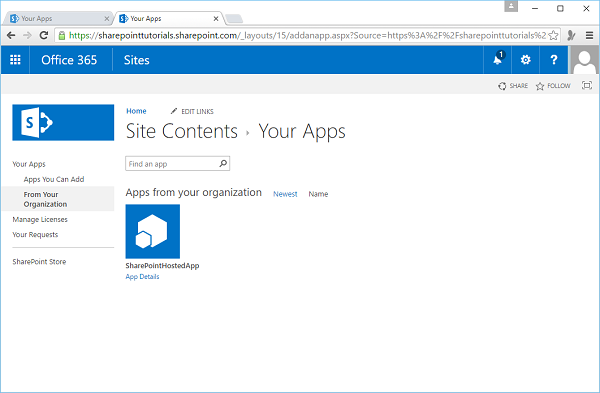
Step 16 − Select Your Apps → From Your Organization in the left pane and you will see that the app is available for installation. Click the app.
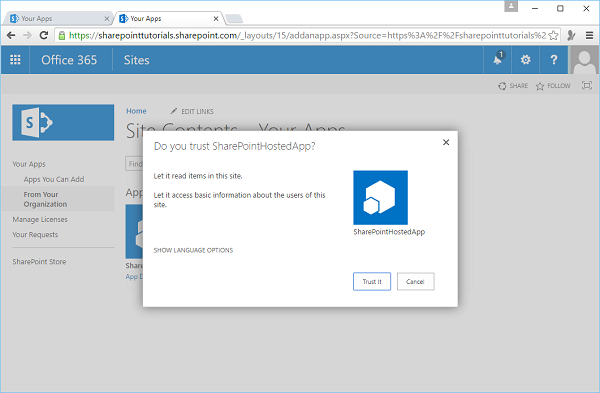
Step 17 − When you click the app, a dialog box opens as shown in the following screen shot. Click Trust it.
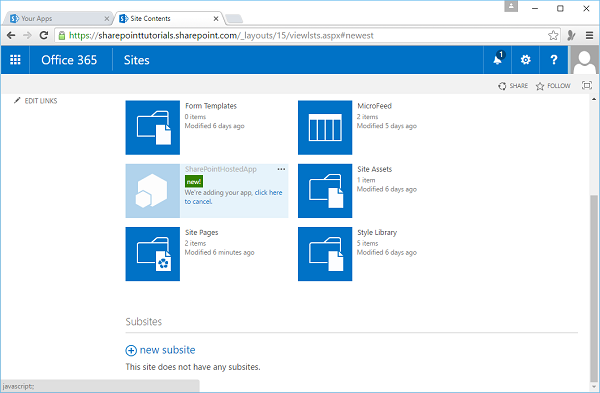
Step 18 − You will see that the app is installed. Once the installation is complete, you can click the app.
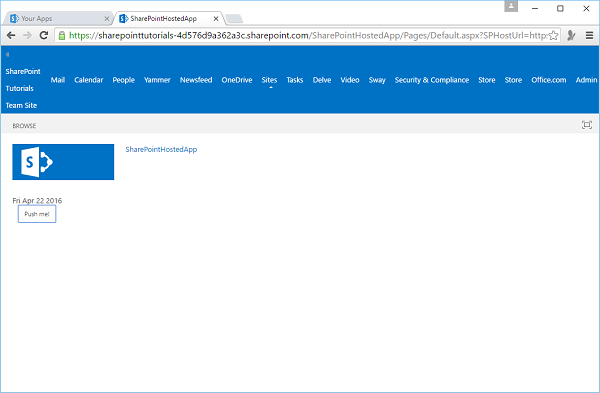
You will see the following page, which contains one button −
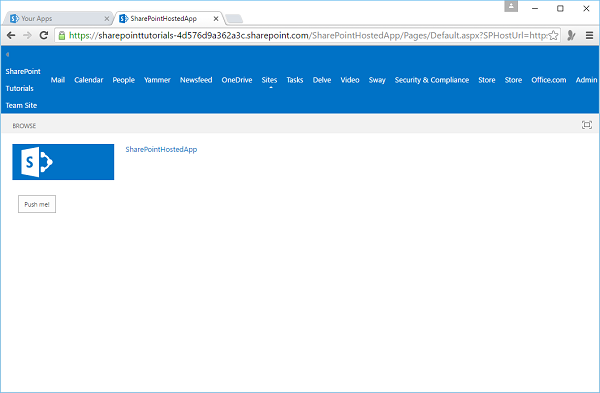
When you click the Push me button, it will display the current date.
Autohosted
The Autohosted deployment model is a significant departure from previous SharePoint applications. In this model, you build Apps for SharePoint, but the code is seamlessly deployed to Windows Azure in the background, so SharePoint automatically creates the cloud-hosted app for you.
The important features are −
It looks like it is running on SharePoint, but in the background it is actually deployed to a special Office 365 Windows Azure instance and registered as an authenticated and authorized App with SharePoint.
You do not have complete access to the entire platform capabilities of the Windows Azure platform with the Autohosted deployment model, but you do have enough of the platform to build some interesting applications.
Let us have a look at a simple example of Autohosted by creating a new project.
Step 1 − Select App for SharePoint 2013 and click OK.
A new dialog box opens.
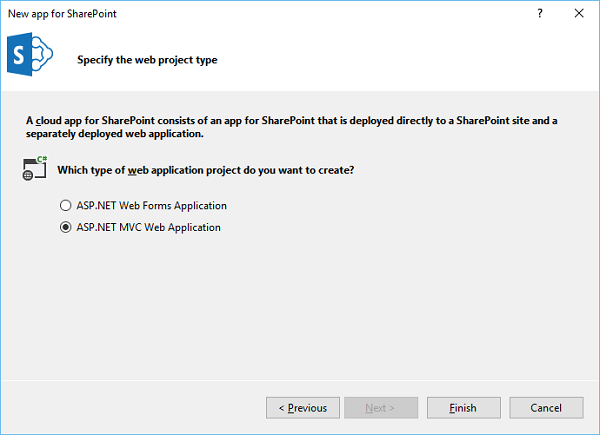
Step 2 − Select Autohosted and click Next.
Step 3 − A new dialog box will open. Select ASP.NET MVC Web Application and click Finish.
Once the project is created, publish your app. The rest of the steps are the same as given for the SharePoint-hosted option.
SharePoint - Integration Options
In this chapter, we will be covering the integration options. The new application model in SharePoint 2013 offers a number of options for your application to integrate deeply with SharePoint, other systems, and data. These options are as follows −
- User interface integration
- Events and logic integration
- Data integration
User Interface Integration
In user interface integration, three main integration points are available to you as a part of the SharePoint application model, which are as follows −
- App Parts and Pages
- Ribbon and Action menus
- Navigation
App Parts and Pages
App Parts and Pages offer you the ability to surface your applications’ user interface to your users. For people familiar with SharePoint 2010, App Parts are similar to Web Parts.
App Parts are reusable and configurable windows into your application.
Pages are much like an App Part except that they are viewed in a larger, fuller window style.
Ribbon and Action Menus
The ribbon was first introduced in SharePoint 2010. It provides a central location for all actions that a user may want to take on documents and other data.
In SharePoint 2010, developers could include custom actions for their applications in the ribbon; SharePoint applications also allow this customization. This enables you to include actions where users expect them, alongside all the other standard actions SharePoint provides.
The Action menu is a context-aware menu on items in a SharePoint list or library. For example, in a SharePoint document library the Action menu exposes common functions such as Check In and Check.
Another term commonly used for this menu is Edit Control Block.
SharePoint applications allow you to include additional actions on this menu. For example, it is a great location to display your application’s functions, which apply to a single list item.
Navigation
Navigation lets users find your application, and integrating with the Ribbon and Action menus lets your users take actions in the same familiar location that they do elsewhere in SharePoint.
Using one or more of these building blocks enables you to integrate your application’s user interface with that of SharePoint’s and expose your app to its users.
Events and Logic Integration
Providing a UI for users is usually the most prominent aspect of any application. On the other hand, responding to the actions users take- either within an application, or to interact with an application, is also extremely important.
The key features are −
SharePoint applications provide the ability to both respond to activities within your application such as a button click and respond to activities within SharePoint such as a document being checked out etc.
Responding to activities within your application is very straightforward. Your application’s UI and code run remotely from SharePoint and are simply surfaced via App Parts and Pages. For this reason, responding to an event such as a button being clicked in your application is entirely tied to your application’s programming framework. For example, if your app is built with ASP.NET then you simply catch the OnClick event for an ASP.NET button.
SharePoint does not get in your way for these types of events. For responding to events that occur inside SharePoint, such as a document being saved or updated, SharePoint provides event receivers.
SharePoint 2013 also provides event receivers that allow applications to respond to events occurring within a SharePoint site.
Data Integration
Data is the heart of every application, which is typically, what users want to work with within your application. SharePoint provides a number of out-of-the-box options for storing and working with data. These options are as follows −
Storing and manipulating data within SharePoint.
Working with data that lives external to SharePoint.
From the very first version of SharePoint, the goal has been to make working with data simple and straightforward for users.
The simplest example of this is the concept of list data. Users are able to store and work with tabular style data via a common web interface.
Many see using lists analogous to using a table of data in a database. SharePoint applications can also take advantage of these same data storage capabilities natively by using lists, SharePoint offers developers the ability to take advantage of many of the data storage capabilities that SharePoint provides without having to reinvent the wheel.
If used properly, SharePoint can save time and effort and potentially reduce the management and support costs of your operation.
The following are the core data-storage capabilities −
Lists − For storing structured data, much like in a table.
Libraries − For storing unstructured data, such as in a document or file.
SharePoint provides a comprehensive set of APIs for developers to use within the applications to interact with and manipulate data that resides in SharePoint. For SharePoint applications, those APIs are exposed in the Client-Side Object Model (CSOM).
You will see many of these options in the forthcoming chapters.
SharePoint - Development Tools
In this chapter, we will be covering the different levels of “development” concerning SharePoint. Each level serves the end user of the SharePoint site in some way. You can divide this spectrum into the following −
End users − who use the platform as an application platform.
Power users − who create and administer (and maybe brand) sites.
Designers − who brand the site and build the user experience.
Developers − who build and deploy apps.
A range of people interacts with SharePoint from the developers to the end users. It is represented in the following figure

Site Settings
Site Settings is one of the main parts of SharePoint. It is very important that we need to be familiar with it.
Step 1 − To access the Site Settings page, click User Profile in SharePoint Admin center. Click the option Setup My Site under My Site Settings.
The following page will open.
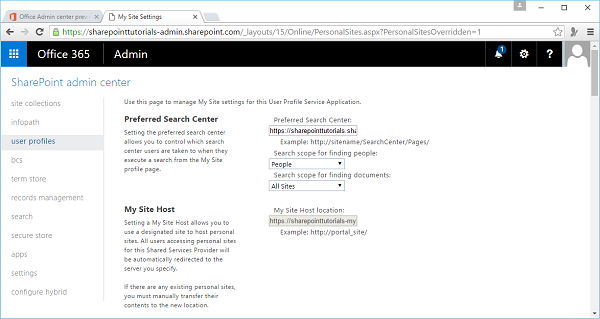
You will find most of the configurations for your site on this page such as −
- Change the theme of your site.
- Activate features.
- Manage permissions.
Step 2 − Some settings options are also available in the Settings. So click the Settings in the left pane.
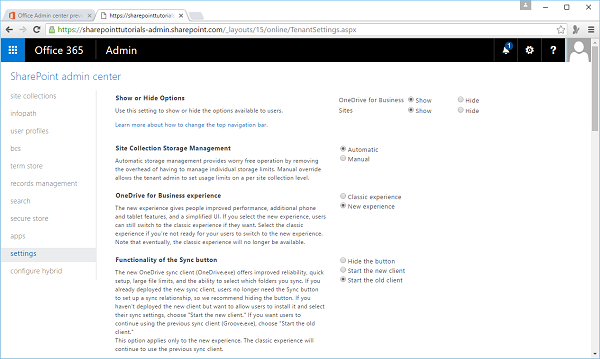
Note that the core features of the Site Settings page are split into major categories. For example, most of your security settings are available to you in the Users and Permissions category, theming in Web Designer Galleries, and so on.
Add HTML page
The editing experience ranges from formatting text to adding images or multimedia. You can get a little more into the code by embedding HTML directly within your SharePoint site.
This task feels a little more like development, so let us have a look at a simple example by adding an HTML page.
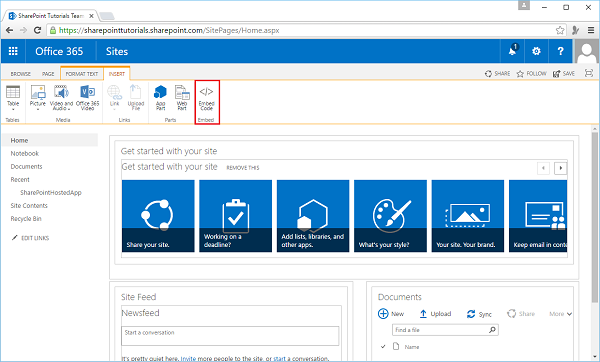
Step 1 − Open your SharePoint site and navigate to the home page of the site. On the Page tab, click the Edit menu option.
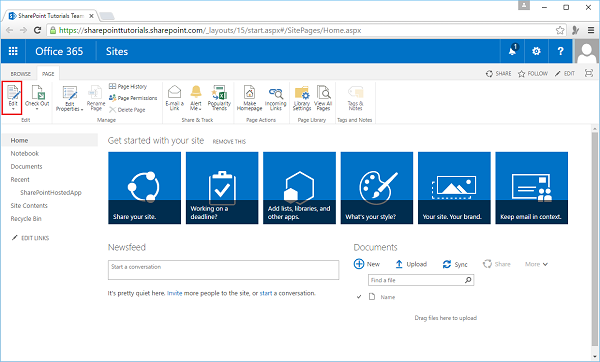
Step 2 − On the INSERT tab, click the Embed Code option.
The following dialog box will open −
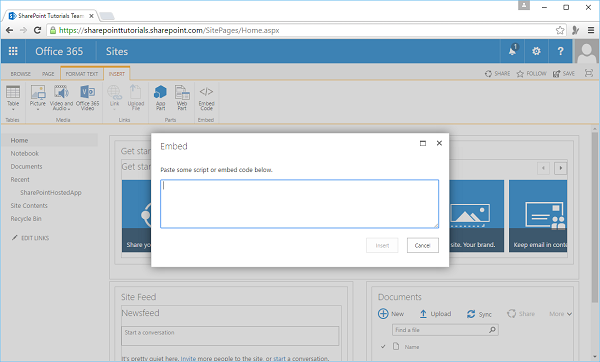
Step 3 − Add some HTML code into the code field as shown below −
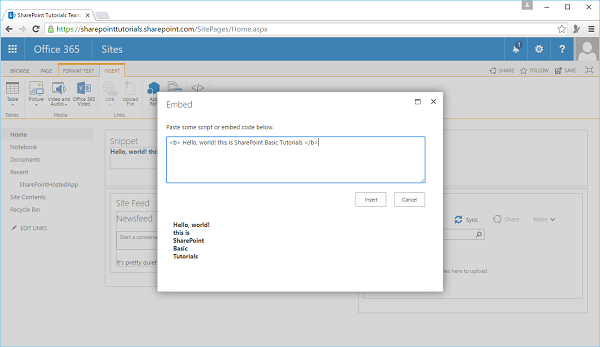
Step 4 − Click Insert and you will see that the HTML snippet is inserted.
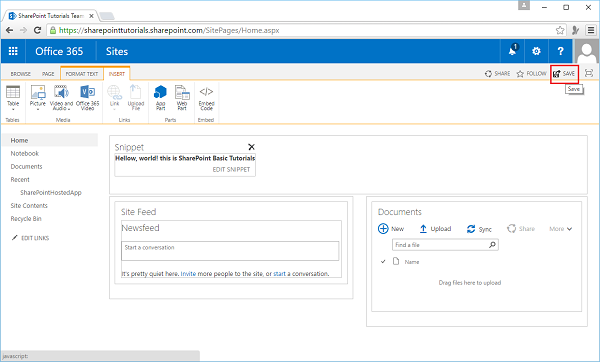
Step 5 − Click Save.
You can see that the HTML code is inserted in your SharePoint site.
Add Media file
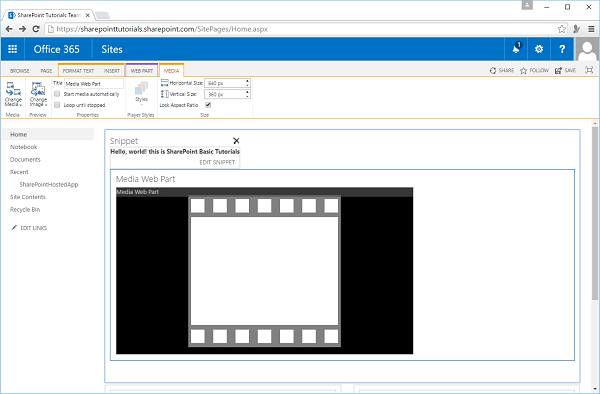
To add a Media Player app to your SharePoint site, open your SharePoint site and navigate to the home page of the site.
Step 1 − On the Page tab, click the Edit menu option.
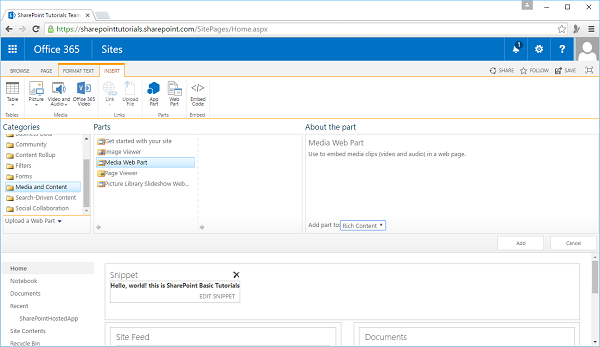
Step 2 − Select the Web Part option.
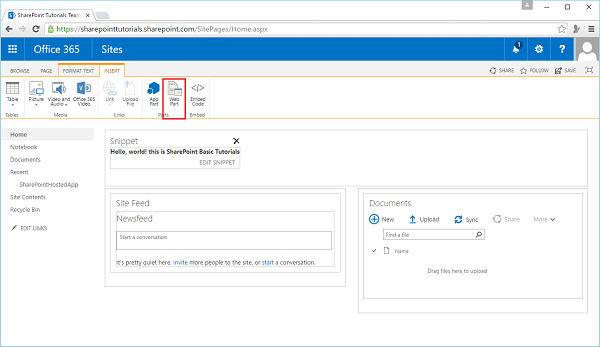
Step 3 − Select the Media and Content from Categories and select the Media with Parts from the Parts section. Click Add.
Step 4 − Save the page and you will see the following page, which contains the Media file.
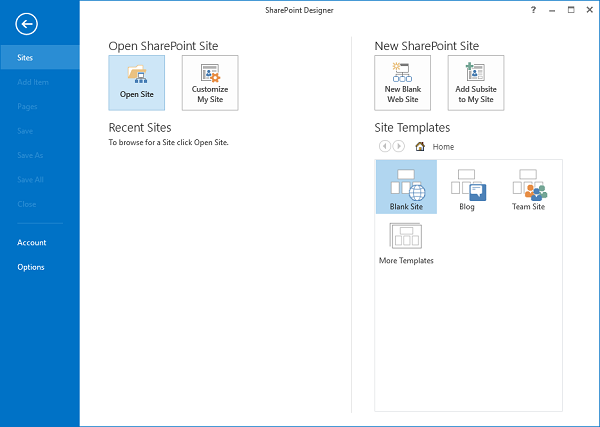
SharePoint Designer
Many developers prefer not to use SharePoint Designer as a tool for developing SharePoint site. However, the point is that the SharePoint Designer tool can make some development tasks easier.
The important features are −
SharePoint Designer can be used for a variety of designer functions for SharePoint, including creating and editing sites, pages, lists, and content types.
SharePoint Designer is also useful for creating rules-based, declarative workflow that can then be imported in Visual Studio for deeper-level customization.
It can be downloaded and installed from https://www.microsoft.com/en-pk/download/details.aspx?id=35491
When you first open SharePoint Designer, you need to provide it with the URL for your SharePoint site and authenticate as an elevated user.
SharePoint Designer inherits standard SharePoint permissions.
After you open your site in SharePoint Designer, a number of navigable options and some information about your site appear, such as site metadata, permissions, subsites etc.
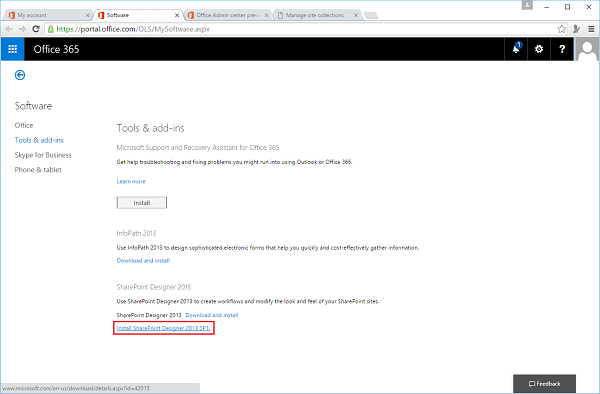
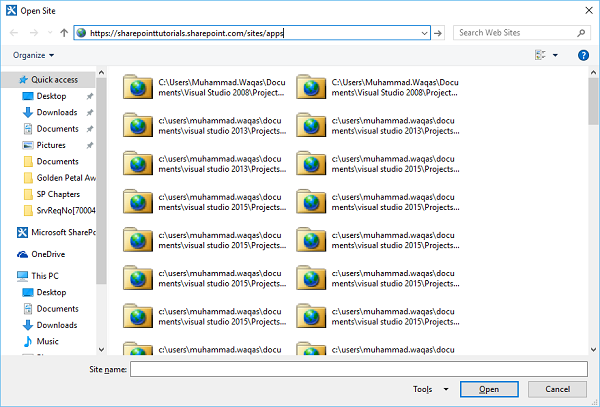
So let us use the SharePoint Designer, but first we need to setup SharePoint Designer using the Office 365 by opening your SharePoint site.
Step 1 − Open the SharePoint site.
Step 2 − Select Office 365 Settings menu option. Select Settings in the left pane and then select the software in the middle pane.
Step 3 − Select Tools & add-ins in the left pane and you will see the different options. In the end you will see SharePoint Designer Option, click the link.
Step 4 − Open the SharePoint Designer after installation. Click the Open Site option.
Step 5 − Specify the URL for your SharePoint site and click Open.
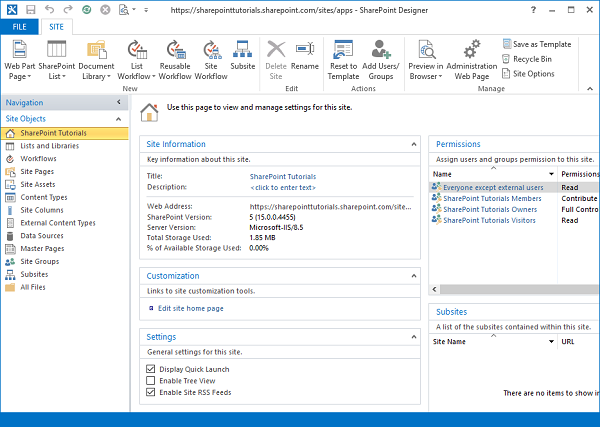
Step 6 − Once the SharePoint Designer site is open, you will see that different options are available.
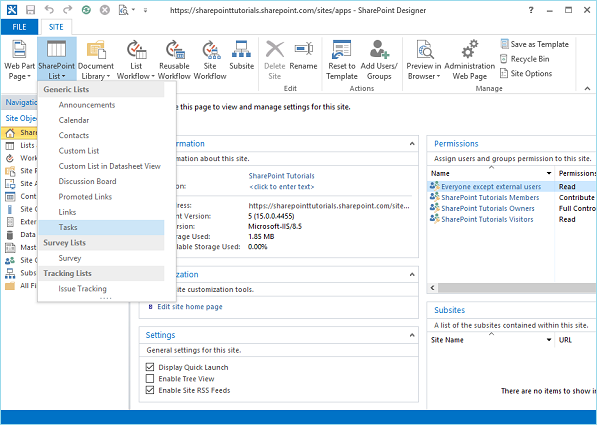
Step 7 − Click SharePoint Lists on the Ribbon and select Tasks from the menu.
Step 8 − A new dialog box opens. Specify the name and description and click OK.

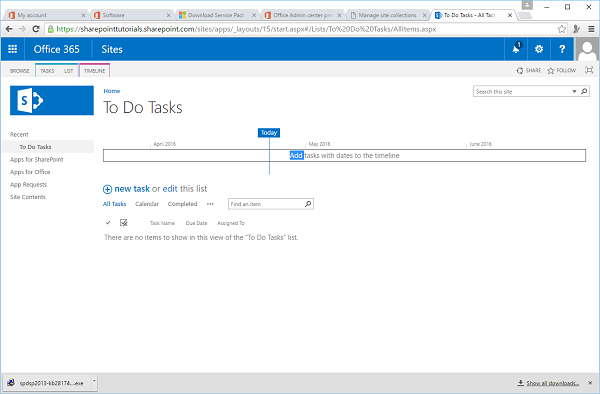
Step 9 − Let us go the same site, using the portal and you will see the To Do list in your site.
Visual Studio and Expression Blend
You can also use Visual Studio and Blend to add some content to your SharePoint site. Visual Studio offers many features to help develop applications in SharePoint; it is helpful to familiarize yourself with them in detail.
Let us have a look at a simple example of SharePoint-hosted application by opening Visual Studio. Select File → New → Project option.
Step 1 − Open Visual Studio and select the File → New → Project menu.
Step 2 − In the left pane select Templates → Visual C# → Office/SharePoint and then in the middle pane select App for SharePoint.
Enter the Name in the Name field, Click OK and you will see the following dialog box.
In the New App for SharePoint, we need to add the SharePoint site URL that we want to debug and then select the SharePoint-hosted model as the way you want to host your app for SharePoint.
Step 3 − Go to the SharePoint admin center and copy the SharePoint URL.
Step 4 − Paste the URL in the New App for SharePoint dialog box as shown below.
Step 5 − Click Next and it will open the Connect to SharePoint dialog box where we need to login.
Step 6 − Enter your credentials and click the Sign in button. Once you are successfully logged in to the SharePoint site, you will see the following dialog box −
Step 7 − Click Finish. Once the project is created, click the AppMenifest.xml file in the Solution Explorer.
Step 8 − Click the Permissions tab. A Scope dropdown list will open.
Step 9 − In the Scope dropdown list, select Web, which is the scope of permissions that you are configuring. In the Permission drop-down list, select Read, which is the type of permission you are configuring.
Step 10 − Open the Default.aspx file and replace it with the following code.
<%-- The following 4 lines are ASP.NET directives needed when
   using SharePoint components --%>

<%@ Page Inherits = "Microsoft.SharePoint.WebPartPages.WebPartPage,
   Microsoft.SharePoint, Version = 15.0.0.0, Culture = neutral,
   PublicKeyToken = 71e9bce111e9429c" MasterPageFile = "~masterurl/default.master"
   Language = "C#" %>

<%@ Register TagPrefix = "Utilities" Namespace = "Microsoft.SharePoint.Utilities"
   Assembly = "Microsoft.SharePoint, Version = 15.0.0.0, Culture = neutral,
   PublicKeyToken = 71e9bce111e9429c" %>

<%@ Register TagPrefix = "WebPartPages"
   Namespace = "Microsoft.SharePoint.WebPartPages" Assembly = "Microsoft.SharePoint,
   Version = 15.0.0.0, Culture = neutral, PublicKeyToken = 71e9bce111e9429c" %>

<%@ Register TagPrefix = "SharePoint"
   Namespace = "Microsoft.SharePoint.WebControls" Assembly = "Microsoft.SharePoint,
   Version = 15.0.0.0, Culture = neutral, PublicKeyToken = 71e9bce111e9429c" %>

<%-- The markup and script in the following Content element
   will be placed in the <head> of the page --%>

<asp:Content ID = "Content1" ContentPlaceHolderID = "PlaceHolderAdditionalPageHead"
   runat = "server">
   <script type = "text/javascript" src = "../Scripts/jquery- 1.6.2.min.js"></script>
   <link rel = "Stylesheet" type = "text/css" href = "../Content/App.css" />
   <script type = "text/javascript" src = "../Scripts/App.js"></script>
</asp:Content>

<asp:Content ID = "Content2" ContentPlaceHolderID = "PlaceHolderMain" runat = "server">

   <script type = "text/javascript">
      function hello() {
         var currentTime = new Date();
         $get("timeDiv").innerHTML = currentTime.toDateString();
      }
   </script>

   <div id = "timeDiv"></div>
   <input type = "button" value = "Push me!" onclick = "hello();" />
</asp:Content>
Step 11 − Go to the Solution explorer, right-click the project and select Publish. Click the Package the app button. This builds your SharePoint-hosted app and prepares it for you for deployment to your SharePoint site.
You will see the following folder, which contains the *.app file.
Step 12 − Navigate to your SharePoint online site.
Step 13 − Click Apps for SharePoint in the left pane. A new page will open.
Step 14 − Drag your files here to upload.
Once the file is uploaded, you will see the following page −
Step 15 − Click the option - Site Contents in the left pane. Click the add an app icon as shown in the following screen shot −
A new page will open.
Step 16 − Select Your Apps → From Your Organization in the left pane and you will see that the app is available for installation. Click the app.
Step 17 − When you click the app, a dialog box opens as shown in the following screen shot. Click Trust it.
Step 18 − You will see that the app is installed. Once the installation is complete, you can click the app.
You will see the following page, which contains one button −
When you click the Push me button, it will display the current date.
SharePoint - List Functionality
In this chapter, we will discuss from an end-user perspective mostly, covering Lists and some of the value-added features on top of lists like views, validation etc. When the end users create content within SharePoint, it is stored in the form of lists.
Lists are really the data storage mechanism within SharePoint.
It provides the user interface to be able to view the items in a list, add, edit, and delete items or view individual items.
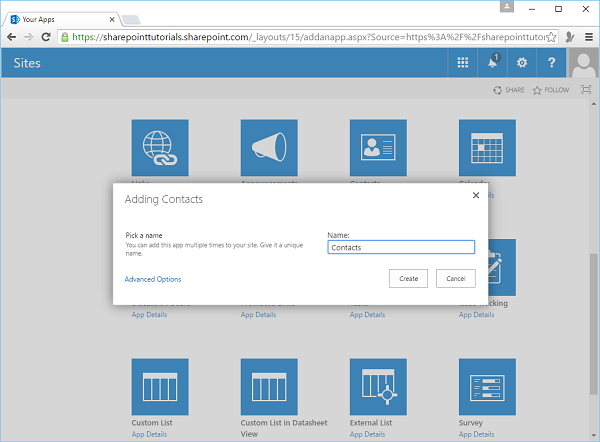
Let us have a look into a simple example in which we will add a contacts list.
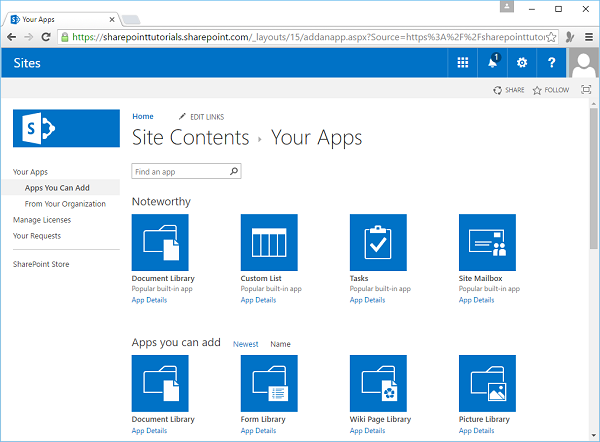
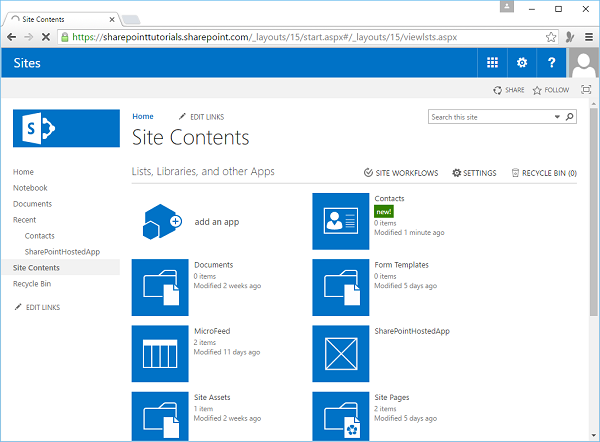
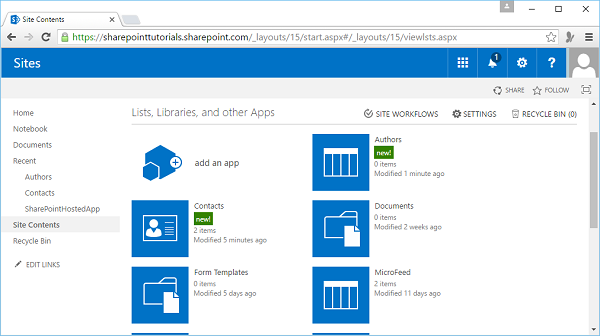
Step 1 − Open your SharePoint site and go to the Site Contents page. You can see the current contents, lists and libraries, and we have the ability to add new content by clicking add an app.
Step 2 − So let us take a look at some of the things we can add to our site −
We can create a new document library.
We can create a custom list where we define the schema.
There are also some lists with predefined schemas like the task list here.
We can add pictures, some wiki pages, forms, a links list, announcements list, contacts list, and calendar etc.
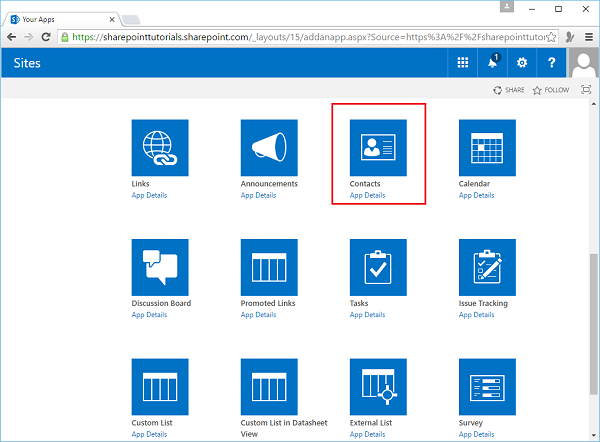
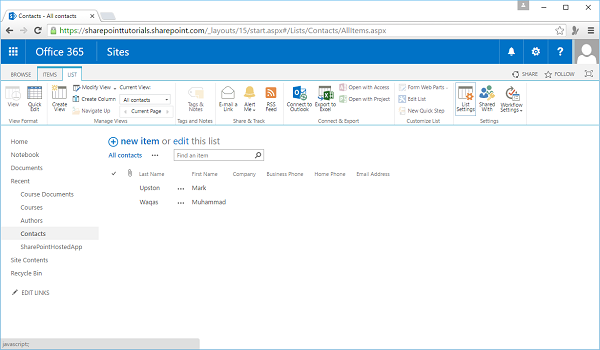
Step 3 − Let us select the contacts list.
Step 4 − We will call this list- Contacts and then click the Create button.
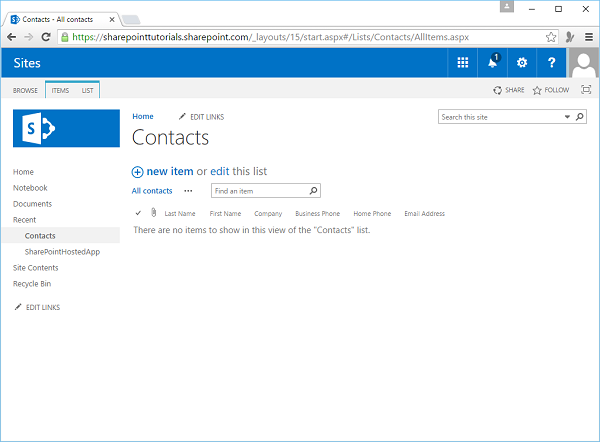
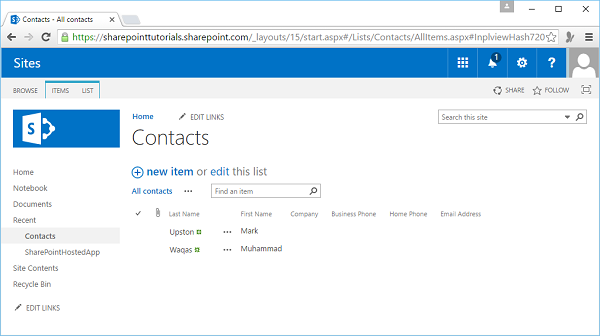
Step 5 − So now you can see here in your site contacts, you have the contacts list and you can click on that to work with the items in the list.
Step 6 − One way to add a new item to this list is to click this New Item link and then add it in my content.
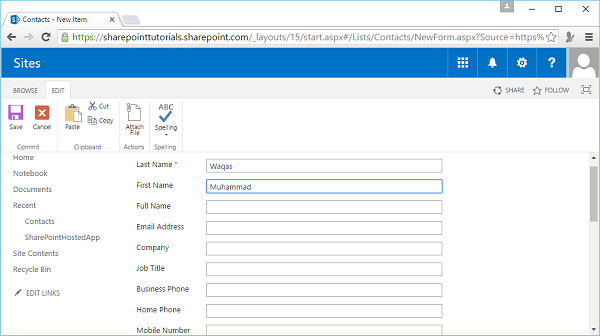
Step 7 − Enter the Last Name and First name, and then come up to the tool bar or the Ribbon and click Save.
Step 8 − We can also put the list into edit mode by clicking on the edit link.

Step 9 − Next, we can add some other Contacts. Once editing is finished, click the Stop editing to get out of badge edit mode.
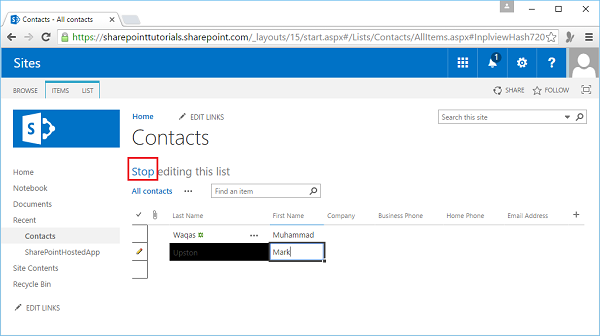
The page will show all the contacts.
A couple of other things when we are working with the list here.
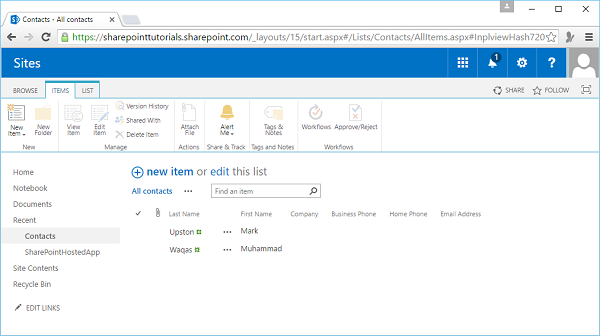
Step 10 − Click ITEMS to get access to the items on Ribbon.
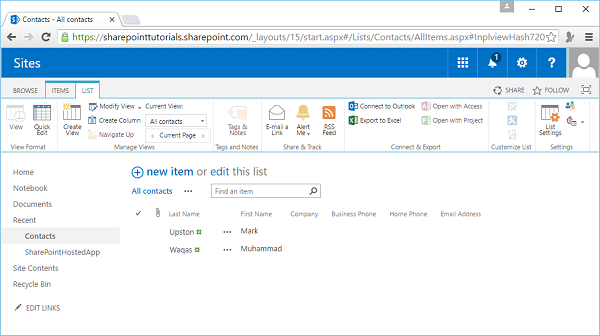
Step 11 − Click LIST here to get access to the Ribbon items related to the entire list.
SharePoint - Additional List Functionality
SharePoint provides a lot of functionality for lists. It provides storage for the list data, the ability to customize the list schema, and the ability to view, add, edit, and delete list items etc. There are a lot more functionality available like creating views on list data, simple validation at both the field and list level, content approval, item versioning etc.
Views
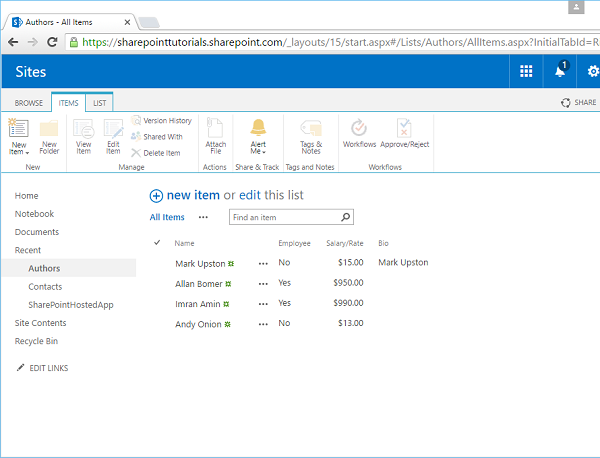
Let us start working with Views on list data. Here we are back in the Authors list, and as you notice, that we have added only four items. With only four items, it is not hard to garner any information we need out of its data.
As the number of items grows, say from 4 to 50 to 100, to maybe 500, it becomes increasingly more difficult to just glance at the list and quickly get the information that we need. To address this issue, SharePoint enables you to create multiple Views on lists, so that we can filter out information we do not need, such as −
- We can sort the field values.
- We can group information.
- We can get totals.
- We can also have different ways to present the information.
For most lists, when you create them, you get one View by default. It is called the All Items View and that is the view we have seen in the example given above.
Now let us have a look at how we can create custom views. Just as with the creation of the list schema, SharePoint gives us a couple of different ways we can use to create views. One way is to start with an existing view and change the sorting and filtering of different columns. We can get the data the way you want it to look, and then save it as a new view.
You will notice that if we go to the other column headers, most of them give us a little drop-down menu we can access as shown below for Salary/Rate header.
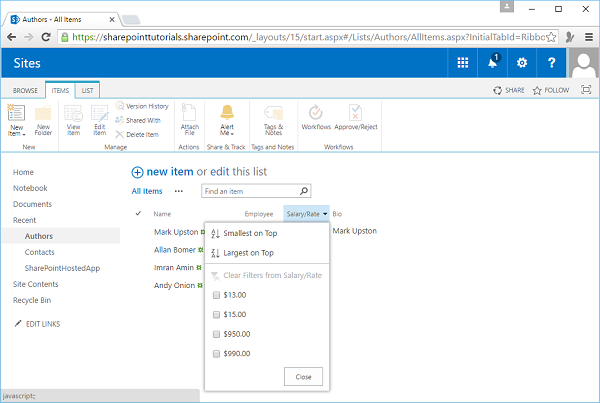
Go to the other column header- Bio. It does not have a dropdown list as it contains multiple lines of text. The other columns have this option. It gives us the ability to sort the information, or to filter it.
Let us create a filter here that only shows Employees.

Once we add that filter, notice there is a little icon in the column header that indicates that these field values have been filtered. Let us sort it in descending order.
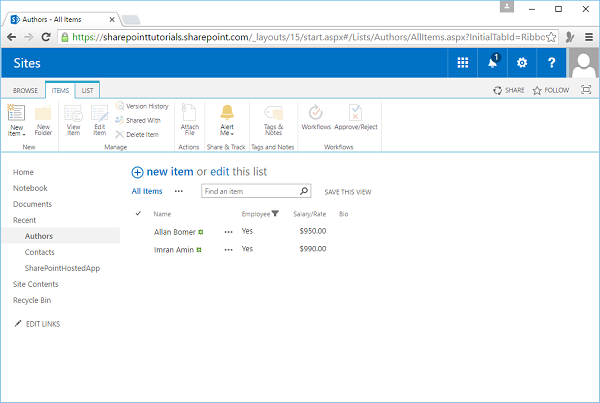
So now we have a new view of the data i.e. the descending order view.
Now the filtering and sorting is not preserved. Therefore, we need to save the descending order view for future.
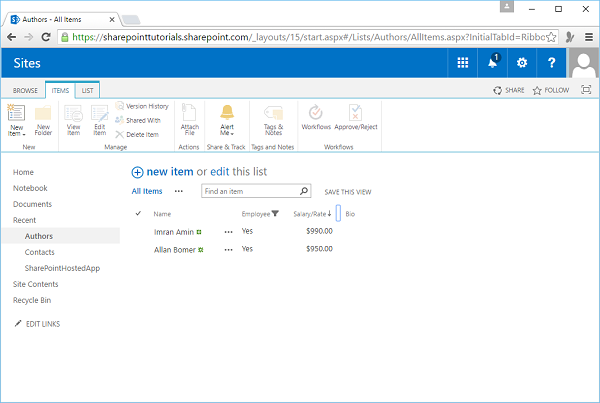
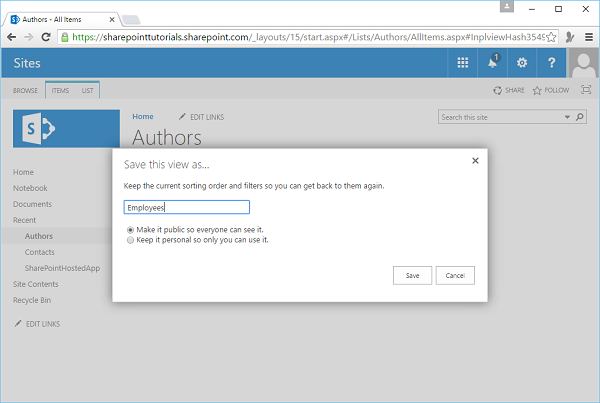
If we just navigate back to the Authors list, then we will see All Items. If we want to have a view that is only Employees, sorted by Salary/Rate descending, click SAVE THIS VIEW option.
We will call this view the Employees view. Select from the options given whether this view should be available to all users or just to me. Click Save.
So now we have the two different views, All Items view and Employees view, we can switch between these views using the links at the top of the List view as shown in the screenshot given below.

Validation
We will be adding simple validation rules to fields and items in a SharePoint list. Now when we created the Authors list, we added some validation rules using the properties of the different field types.
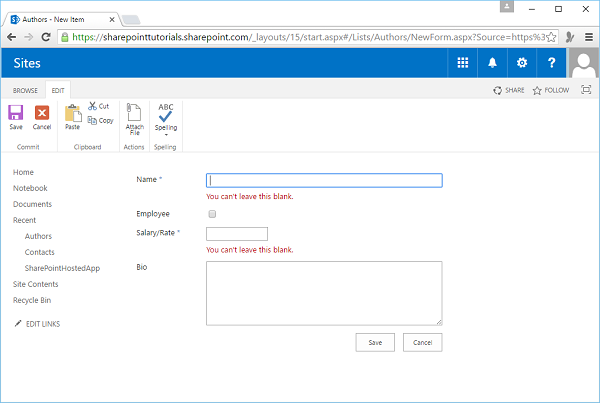
Click New Item from the Author’s list. Now, click Save.
When you click Save, you will get two errors. This is because we have indicated that Name and Salary/Rate are required fields.
Enter the name and Salary/Rate as Aamir Jameel and 1500 respectively. Click Save.
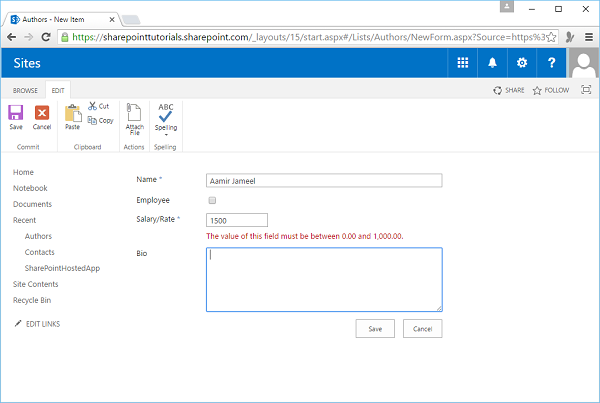
As you can see we still have an issue with Salary/Rate, because when we created the field we indicated that its value should be between 0 and 1000, and 1500 does not satisfy that requirement. Click Cancel.
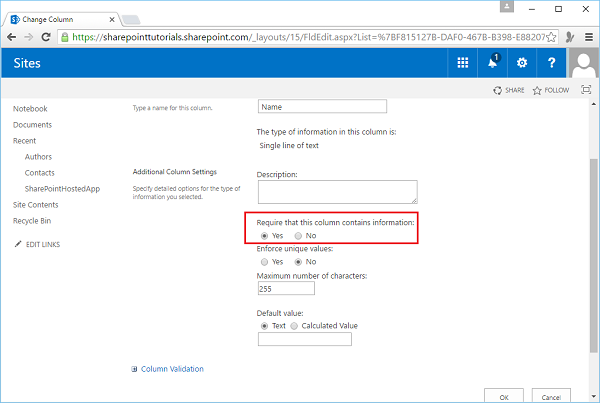
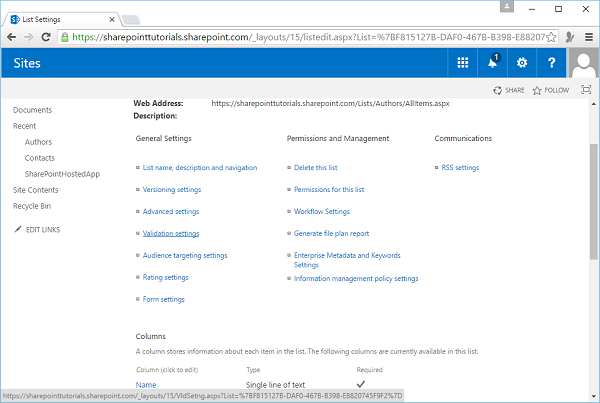
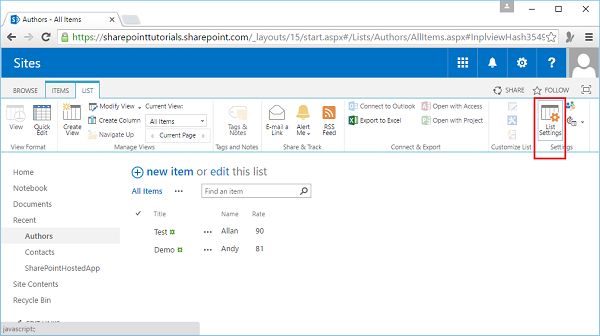
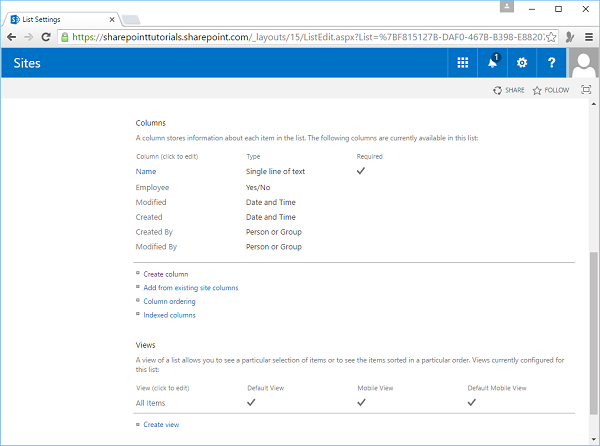
Go to the List tab on the Ribbon and then click List Settings. Click Name. As you can see in the screenshot given below, it a required field,
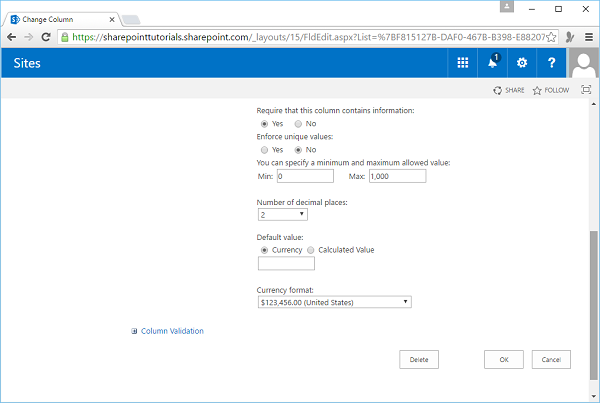
Now go back, click Salary/Rate, and scroll down. You will see that it is also a required field.
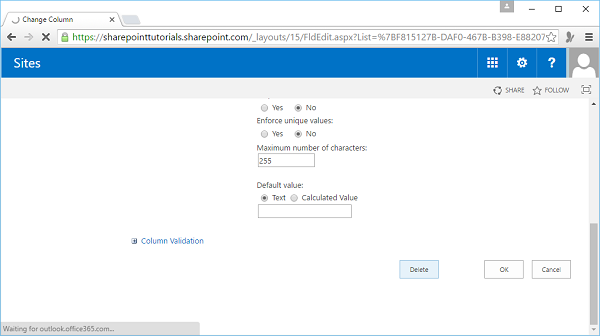
Here we have also set the valid range of values. So, it is all good if the field type has these properties, but what do you do if it does not? Well, we can add in some simple custom validation. So if we scroll down to the bottom, you can see there is an area for column validation. Let us expand that. Here we can specify a formula and then give a message if the value entered by the user does not satisfy that formula.
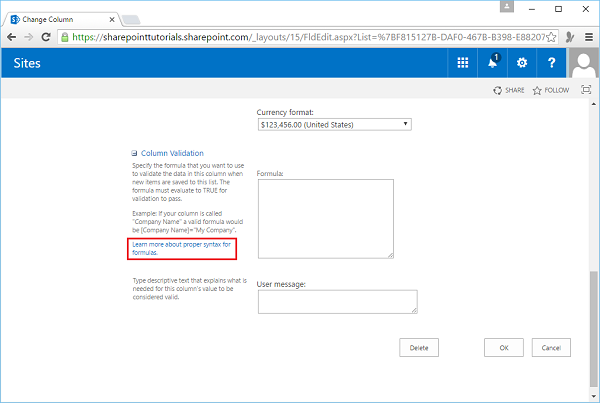
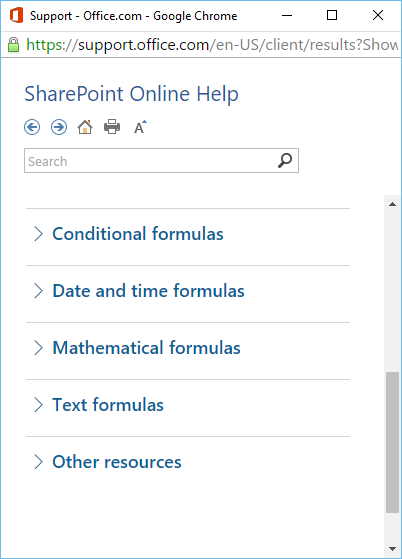
If you are not familiar with building formulas in SharePoint, there is a link which gives you help on how to do that.
Now the validation that we want to add is that if you are not an employee, then your Salary/Rate indicates your hourly rate and we want to say that the maximum value for the rate is $50.00. So here, the validation depends on both the value of the Employee field and of the Salary/Rate field. Therefore, instead of adding the validation to either of those fields, we are going to add it to the item and then the way we indicate the item validation is by going to the List Settings.
Click Validation Settings and set the formula as shown below.
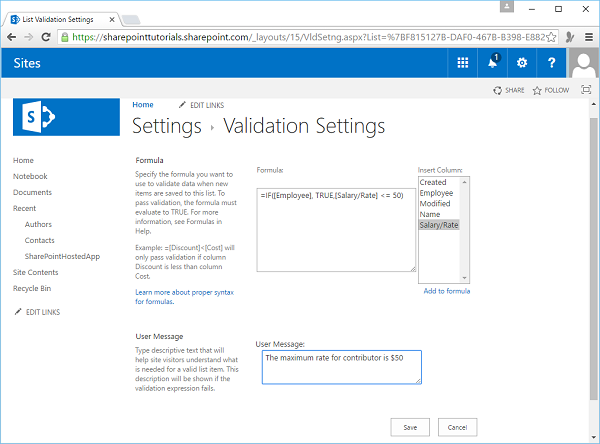
So the condition is going to be pretty simple, first, are you an employee? So if you are an employee, then we already set the valid range of salary values between 0 and 1000. Therefore, only True value is returned. If you are not an employee, then we will check if the Salary/Rate is less than or equal to 50.
If this formula returns True, then the item is considered valid. If it returns false, it is invalid. Lastly, we add the error message, ‘The maximum rate for a contributor is $50’.
This completes the Validation Settings. Click Save.
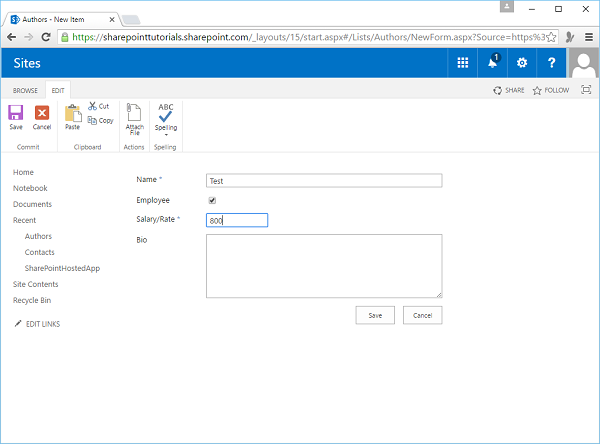
Now go back to the Authors list and add a new item. We will name this as Test, check the Employee check box(as we are testing for an employee), enter Salary/Rate as 800 and then click Save.
The data was saved. There was no error. Now let us enter different conditions. Go to Authors List. We will name this as Test 2.
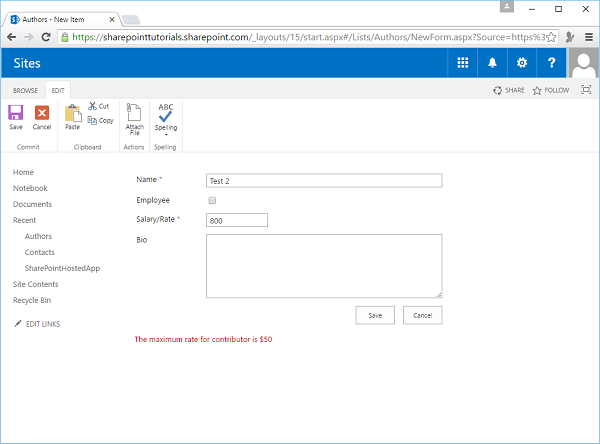
Now do not select the Employee checkbox as now we are assuming that the person is a contributor. Enter Salary/Rate is 800 and then click Save.
You will see an error message. Therefore, let us change the Salary/Rate to a valid value.
Enter 40 in the Salary/Rate field.
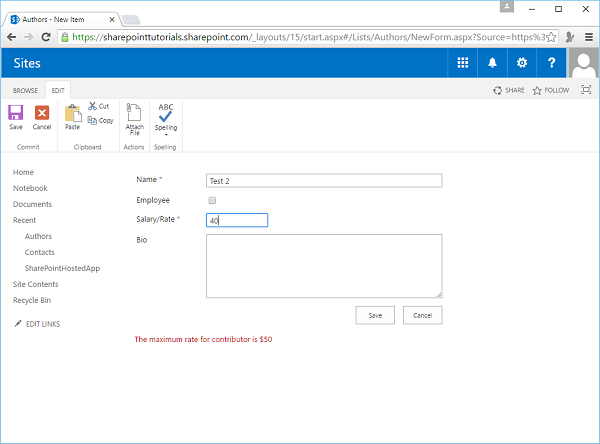
Click Save.
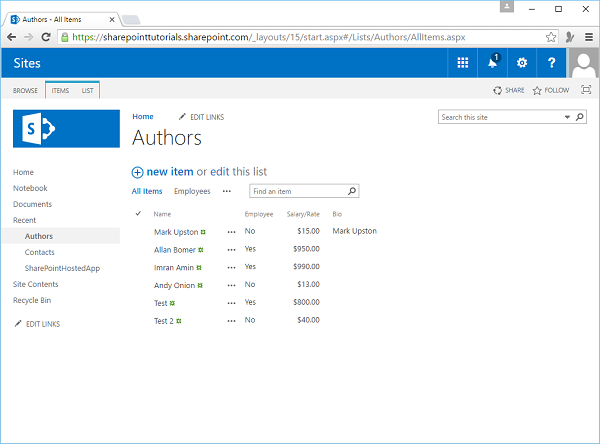
You will see that the data is saved properly and is updated in the list as shown in the following screenshot.
Lookup Fields
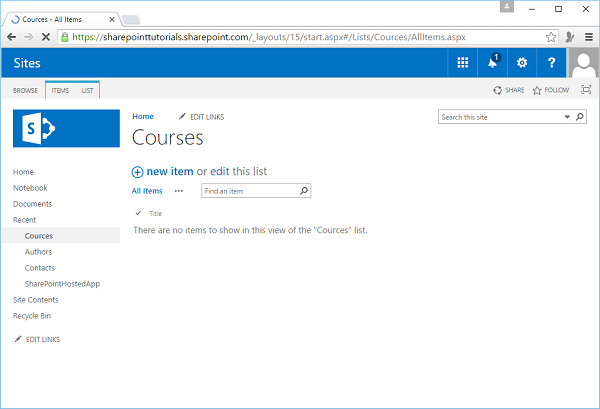
We will take a look at list relations and lookup fields. We will create a new list to hold information about courses.
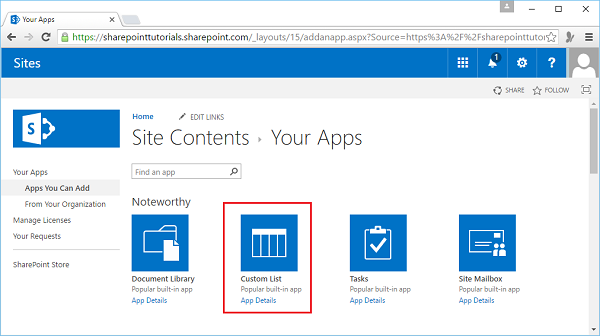
Step 1 − Go to Site Contents → ‘add an app' → Custom List.
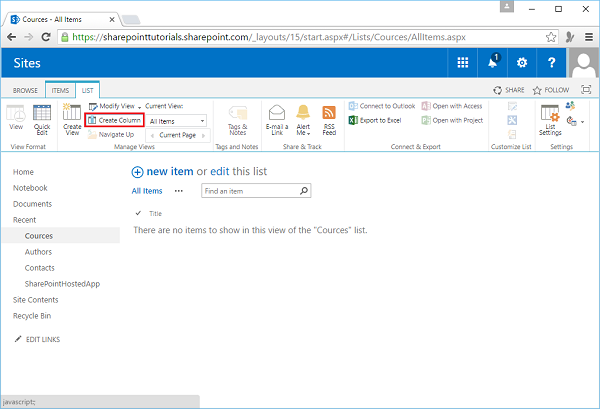
Step 2 − Specify the list Courses and then click Create. Open the Courses list. There is only one column called Title, which will represent title of the course.
Step 3 − Create a second column, which will hold the name of the author. Go to LIST on the Ribbon. Click Create Column.
Step 4 − Name this column as Author. We can just have a single line of text where the user enters the author name. However, we already have the author names in the Authors list, so instead we will present the user a dropdown list, where they can select the author. Hence, instead of creating a Single Line of Text field, we will create a Lookup field.
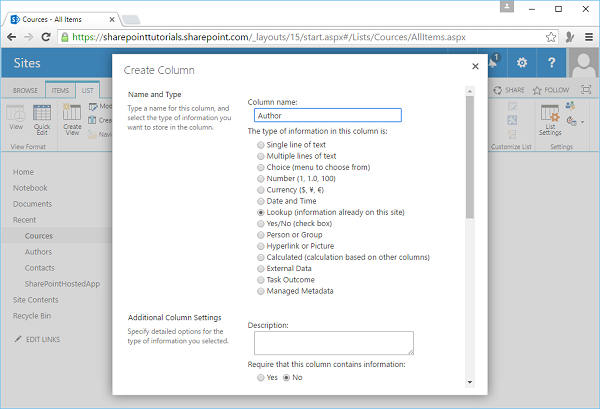
Step 5 − Next, we need to specify which field from which list we would be showing to the user. SharePoint has set the appropriate values by default, but if we want to change the list, we can select if from the dropdown list. When it is done, click OK.
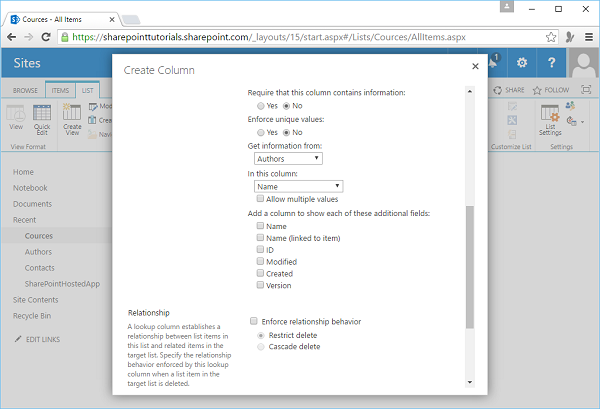
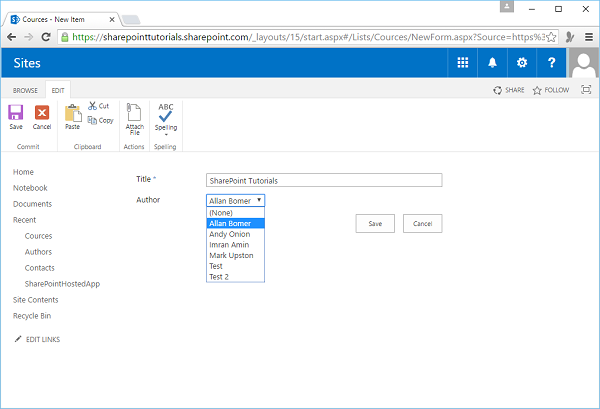
Step 6 − This course is SharePoint Tutorials and you can see that we have a dropdown list for Author.
List Data Storage
The data for lists is stored in rows and columns. For every content database, there is one table, which stores the data for lists. You can relate the lists together, enforce relational integrity and validate.
People quite often assume that many capabilities of a relational database exist with lists and a set of lists becomes almost like a relational database, but this is not the case.
You need to think of lists more like a set of Excel worksheets where you can have one worksheet linked with another worksheet, and you can enforce validation on columns or cells through some simple form. Hence, a set of lists in SharePoint is not like a relational database.
SharePoint - Custom List
Let us have a look at how to create a custom list, where we define the list schema, instead of using a predefined schema like the one we did when we created the Contacts list.
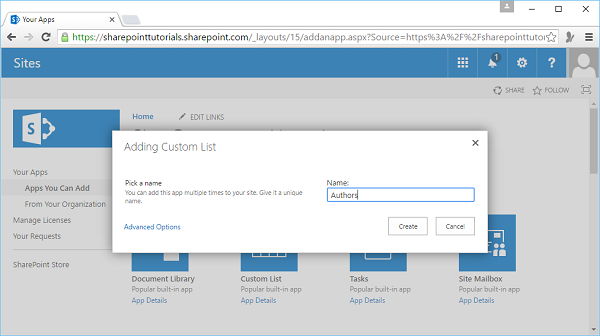
Step 1 − To create a custom list, go to Site Contents and then add an app. Click Custom List.
Step 2 − Enter Authors in the Name field and then click Create.
Step 3 − Now you can see that Authors is added. Let us click the Authors app.
Step 4 − Click new item.

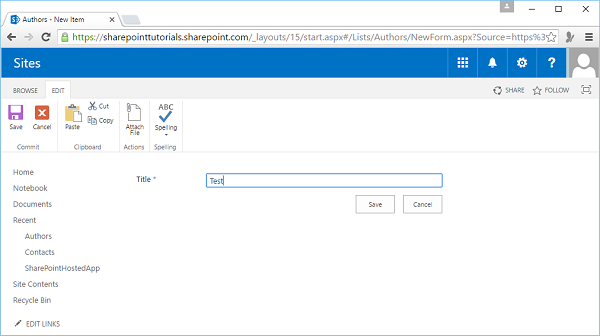
Step 5 − You can see, our list has only one column. The field name is Title and it is a required field, so here, we will set the field value to Test and then click Save.
Note − In SharePoint, columns are also called fields, so these terms are synonymous.
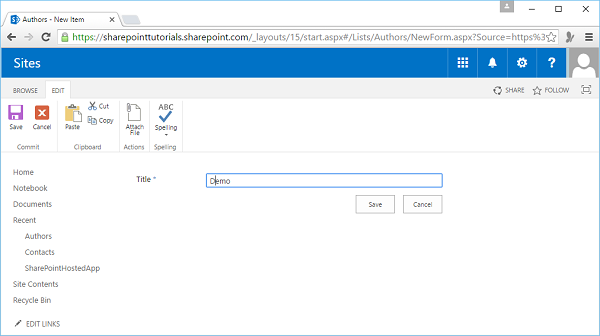
Step 6 − Let us add one more item by clicking on the New Item link.

Step 7 − Set the Title field value to Demo and click Save.
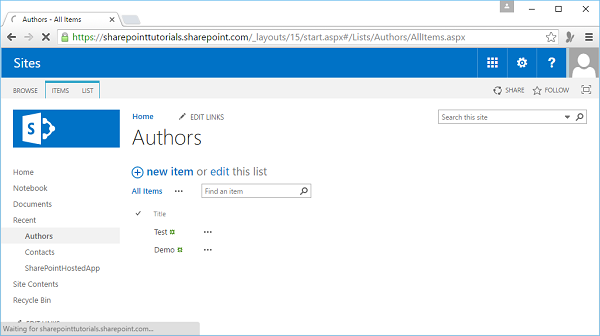
You can see we have two items or two rows and we see the values of the Title field. Notice that beside this value, there is a little ellipse, which is a link to open up a menu.

Note − This menu was traditionally called the Edit Control Block or ECB menu, but you will also hear it referred to as the List Item Contacts menu.
We created the custom list because we wanted to define the schema. There are a couple of ways to do this.
Step 8 − One way is to put the list into Edit mode. Notice that there is an extra column at the end with a + sign above it and here we can add columns to the list.

Step 9 − Click the + sign and we can create a Text column.
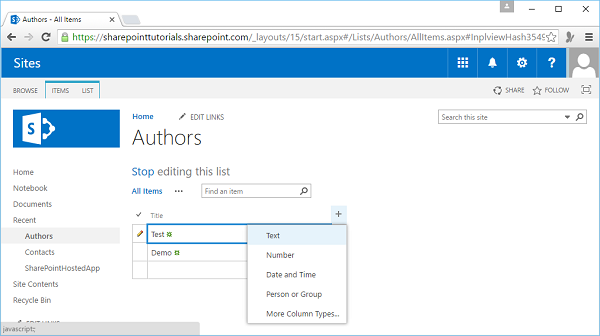
Step 10 − You will see the following page. Call this field- Name.

Step 11 − Enter the names. These will be text.
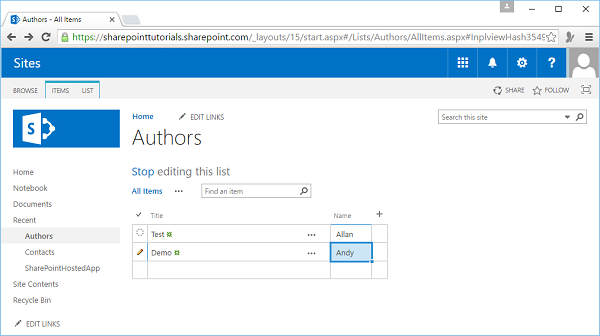
Step 12 − Now add another column and let us make this as a numeric column such that only numbers can be entered as data. Set this to Rate and add some values.

Now this technique is helpful when you are prototyping out a list, but you do not have a lot of control.
So let us take a look at the other way to define the schema for the list. We will do this through the list settings.
Step 13 − Click the Stop editing link get out of the Edit mode. Select List on the Ribbon and then go to List Settings.
Here, we can define the schema for the list. When we created the column, we already had the Title column. You can see two other columns, which we created and a few other columns, which are hidden and used by SharePoint internally.
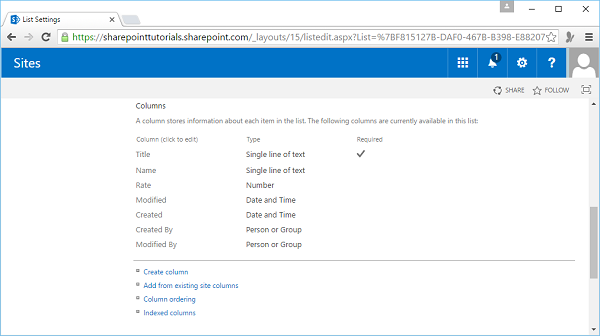
Step 14 − To define the schema of the Author's list, click the Name column and click Delete. Next, delete the Rate column.
Step 15 − Now if we come back to the Author's list, we can see that those columns are gone along with the values we set for them. Go back to List Settings and set the actual schema that you want.
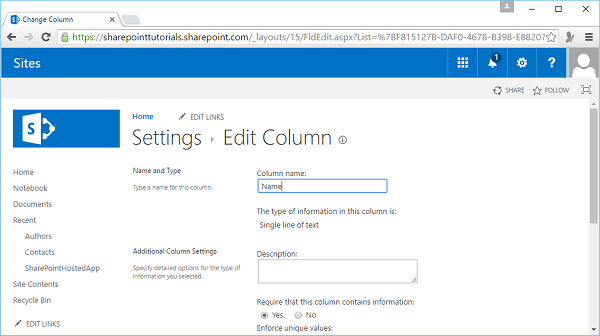
Step 16 − The page shows a column with Title. However, we do not want this column but a column that represents the author’s name. Hence, click Title.
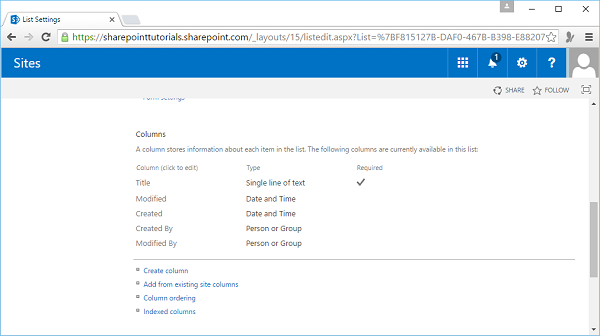
Step 17 − When you click Title, a new page will open. Scroll down to the bottom of the page. There is no option to delete the page.
Note − We cannot delete this page because this column is associated with the ellipse link. however, we can rename it.
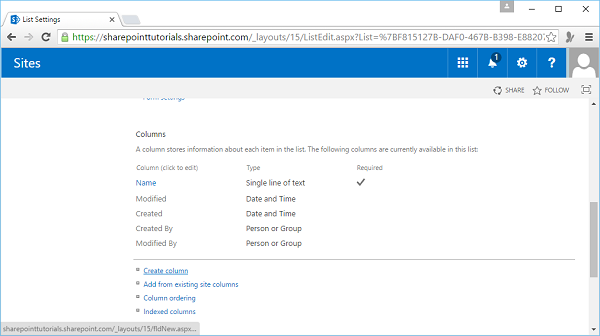
Step 18 − Rename the column. We will use this column to represent the Author Name and click OK.
Step 19 − Next, add another column to represent whether the author is an employee or is a contributor. Click Create Column.
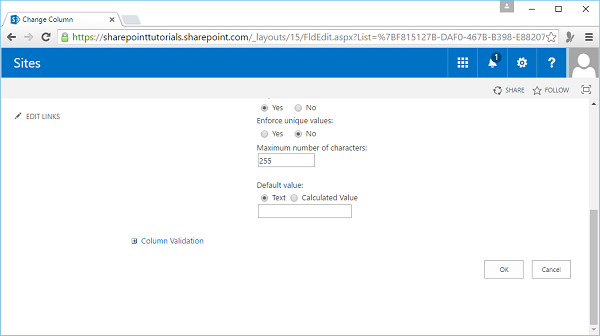
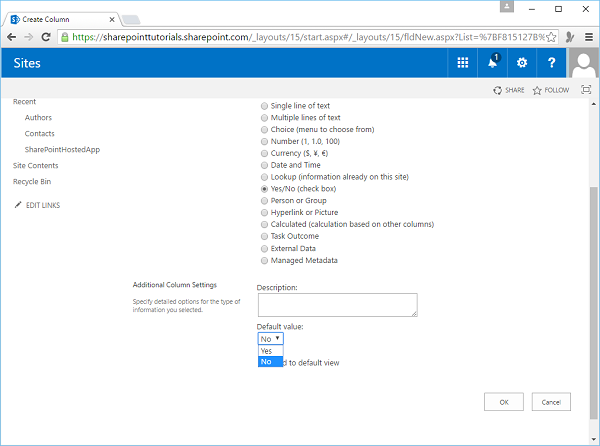
Step 20 − Set the column name to Employee and select the Yes/No field types. Once we have selected the field type that we wanted, scroll down to the bottom of the page and you can see Additional Column Settings.
Note − Several different field types are available. The available field types are different in SharePoint Foundation, SharePoint Server SharePoint Online.
In addition, the kind of site that you are building i.e. a collaboration site or a publishing site will also have an effect on which field types are available.

Step 21 − Set the Default value to No instead of Yes and click OK.
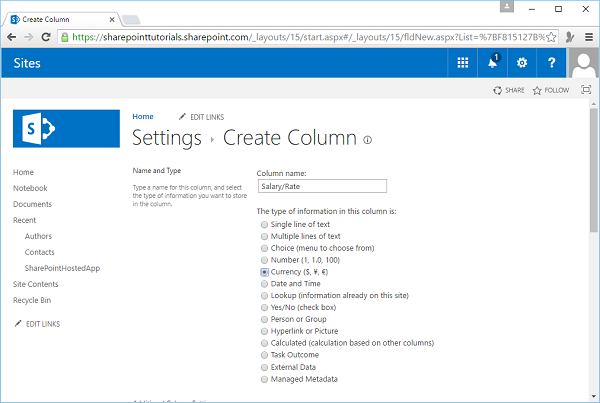
Step 22 − Now let us create another column, by clicking on Create Column. This column will represent either, the salary for our employees or the rate for contributors.
Step 23 − We will call it Salary/Rate and set this to the Currency field.
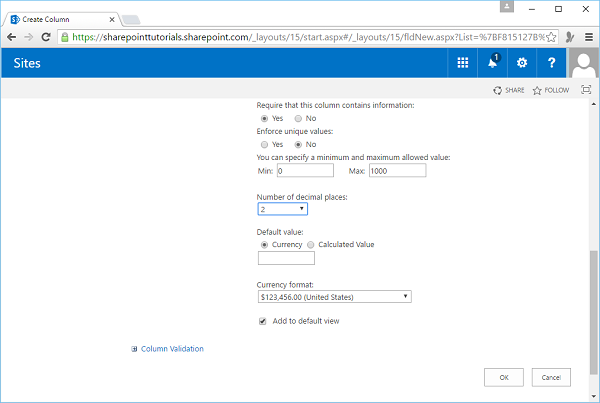
Step 24 − Scroll down and make this a required field and set the Minimum to 0 and the Maximum to 1000. Enter 2 for display of currency upto two decimal places.
Step 25 − Let us add one more column, which will be the biography. We will just call it Bio and set the type to multiple lines of text.
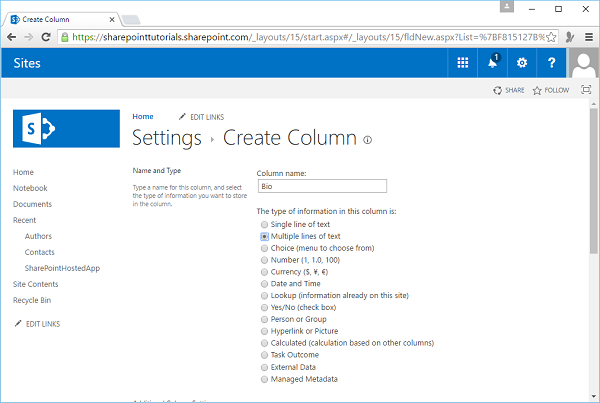
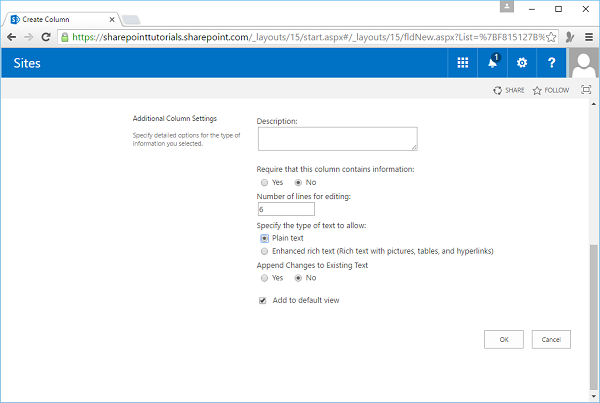
Step 26 − Enter 6 as six lines for editing is fine. We just want plain text in this case and click OK.
Step 27 − We have the schema for our Authors list. Now that our schema is complete, let us add some data. Click Authors under Recent.
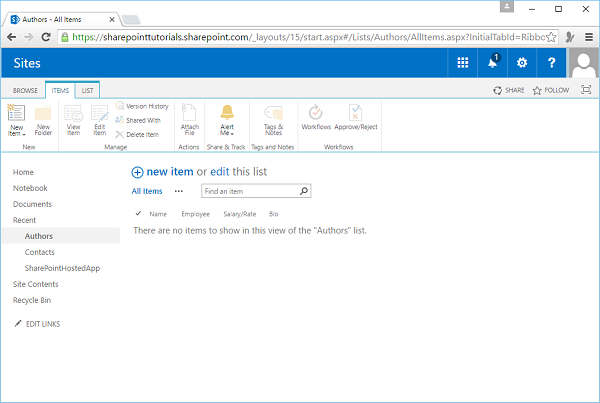
Let us delete the two rows we had previously created by clicking on the little check beside each of them. Next, go to Items on the ribbon and click Delete Item.
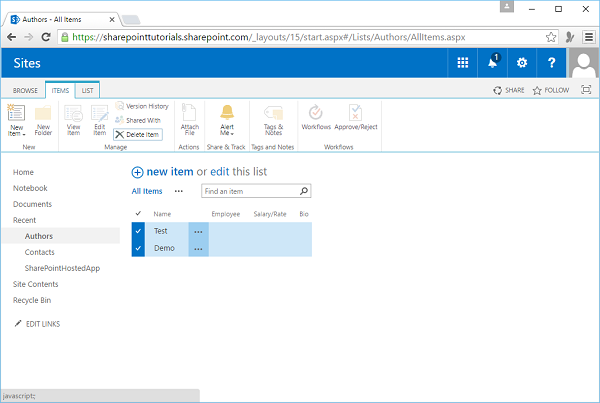
Step 28 − Add the first item by clicking New Item.
Step 29 − Enter some more data as shown in the screenshot below.
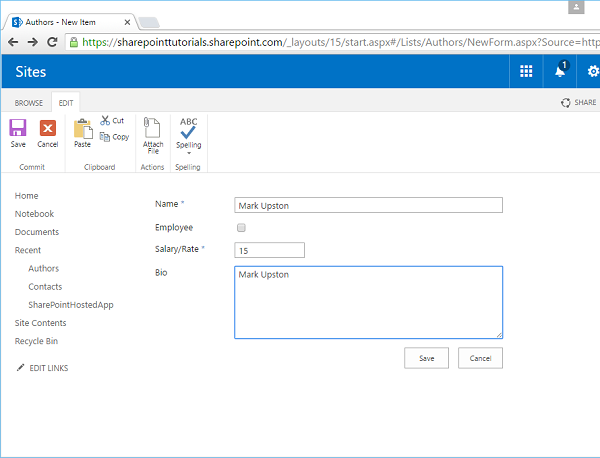
You will see all the data listed.
SharePoint - Libraries
In this chapter will be covering libraries. Libraries are just a special case of a list. They inherit all the characteristics of a list. Therefore, all the characteristics we have seen so far, apply to libraries just as they do to lists.
Difference between List and Library
Though Lists and Libraries exhibit similar characteristics, following are the differences −
The major difference is that in a library, each row is associated with a document. This document can be of any kind. For example, office documents, pictures, web pages, Word Perfect documents etc. The advantage of using Office documents is that there is an integration with the actual Office tools themselves.
The other difference is more a difference in terminology rather than functionality. For example, the columns in a library mean the metadata associated with the document.
Creating a Document Library
In this section, we will see the basics of working with document libraries. You can create a document library in much the same way as you have created a list. Follow the steps given below.
Step 1 − Go to Site Contents and then click “add an app”.
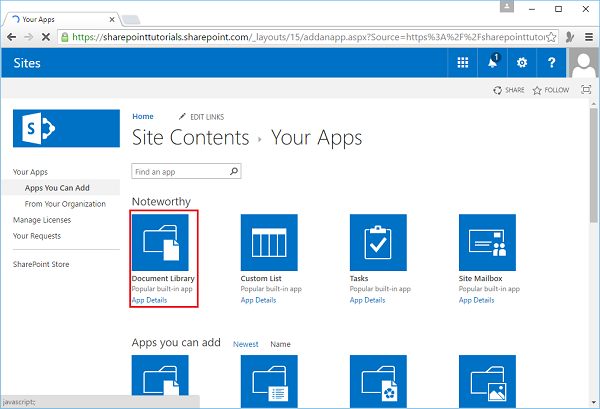
Step 2 − Click Document Library. Give the library a name and click Create.
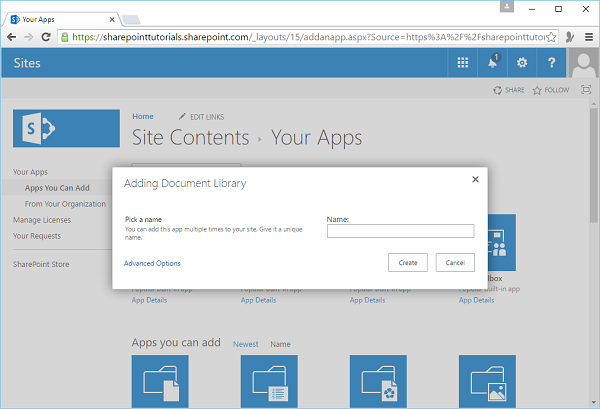
Note − Here, we will learn about advanced options.
Step 3 − Click the Advanced Options and name the document library, Course Documents.
We also have the option to set a version here, but I suggest do not set a version because same options are not available in library settings. However, if you want the version control on, do it in the library settings, not here. Finally, we have the option to say what kind of document we want to be the default template. We will select Word, and click Create.
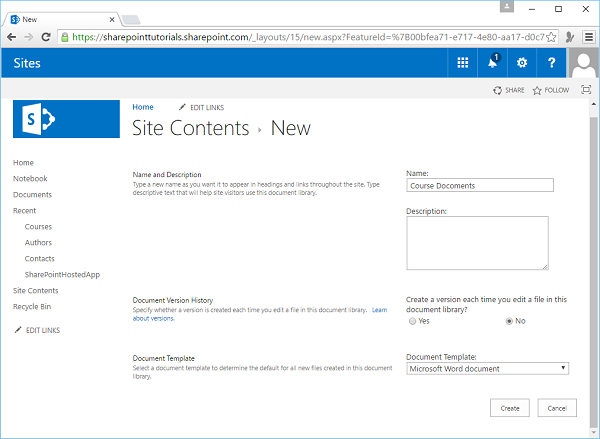
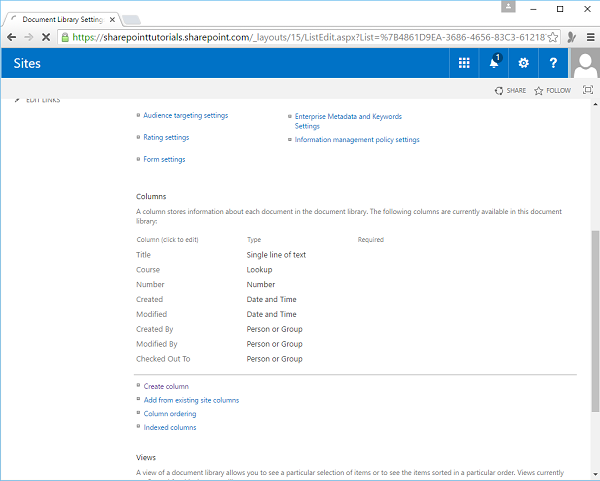
Step 4 − Now before we add documents, we need to add a couple of columns or fields. Go to the Library option on the ribbon and click Library Settings.
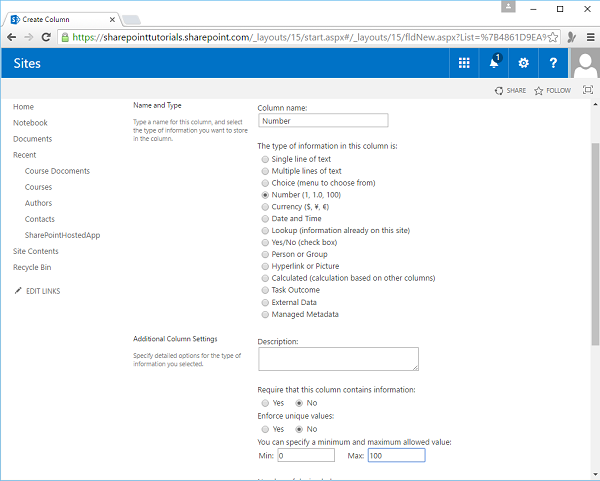
Step 5 − Add a new column and this column will be the course that will appear in the lookup field in the list of Courses. Click OK.
Step 6 − Let us add one more column. We will name this column as Number and set the type to number. Set the minimum and maximum values i.e. 0 and 100 respectively, and click OK.
You can see that the schema is ready.
Add a Document to Library
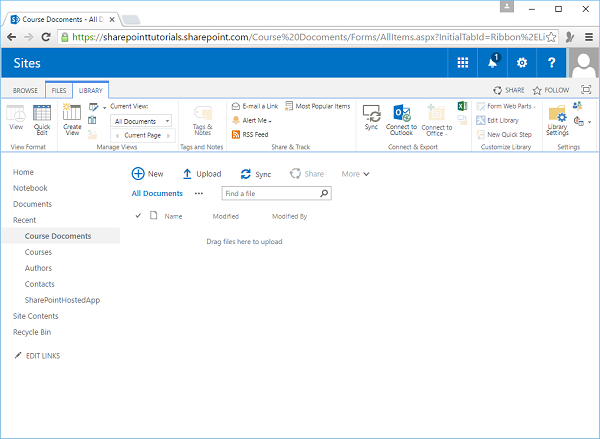
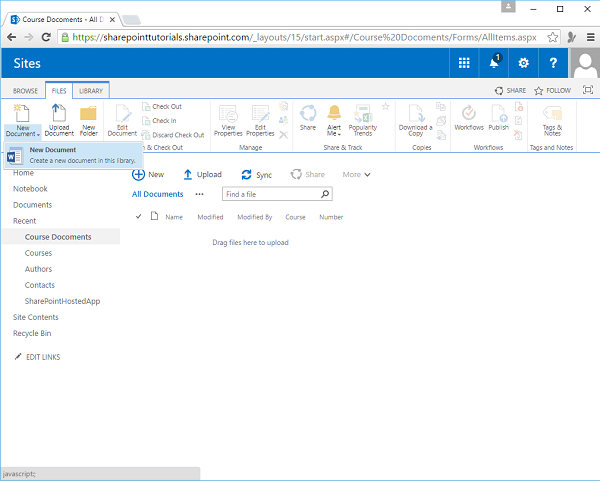
Now that we have the schema ready, we can add some documents. One way to add a document is to create it right here within SharePoint.
Step 1 − Now let us to go to the Files tab in the ribbon. Click New Document.
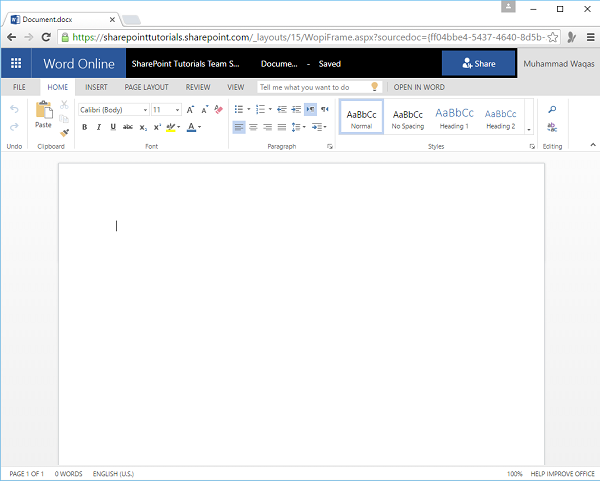
Step 2 − You will see that Word is open and here we are able to edit the contents of the document.
Step 3 − Write some text in the open word page.
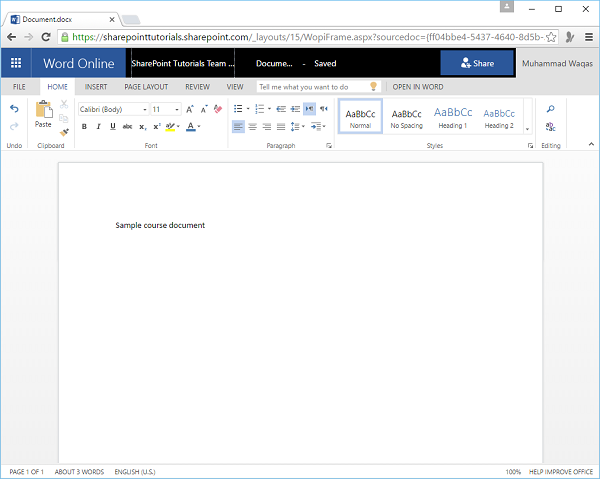
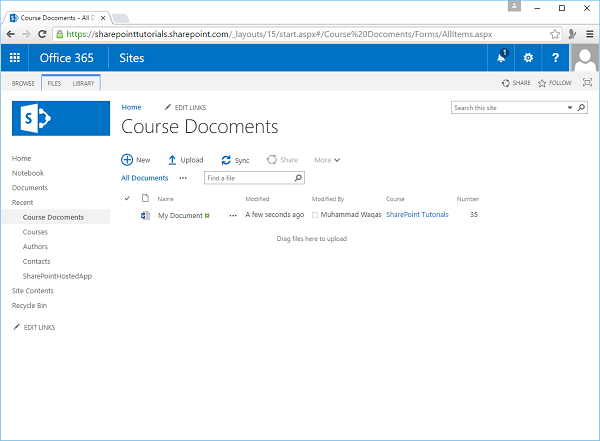
The document is saved automatically, now let us go back to the site and you will see that the word document is created.
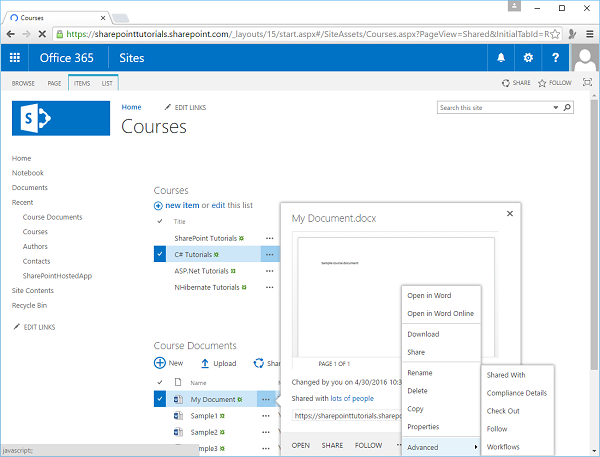
Step 4 − To edit the values of the metadata fields, click the little ellipses. Select the ellipses again on Document.docx dialog box and select Rename from the options.
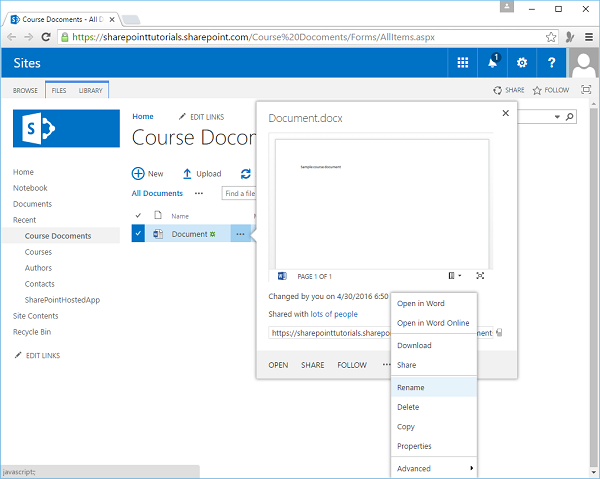
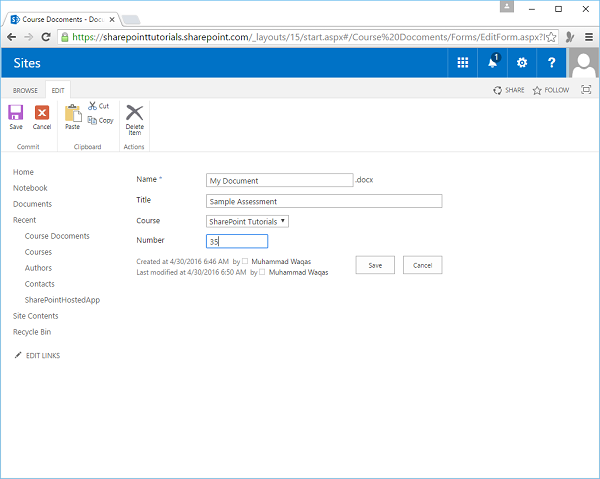
Step 5 − Enter the required information and click Save.
Another way we can add a document to a document library is to upload it.
Step 6 − You can upload it using New Document here.
Step 7 − You can also go to the Files tab on the Ribbon and click Upload Document.
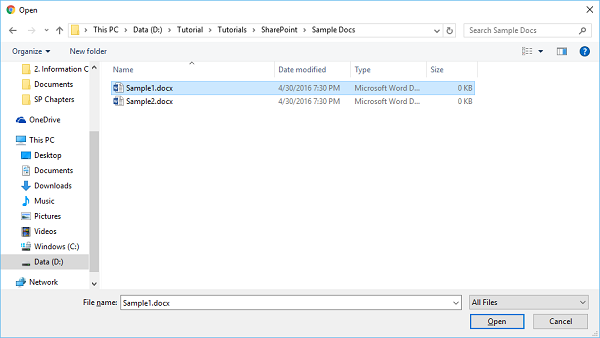
Step 8 − You will see the following dialog box. Click Choose Files.
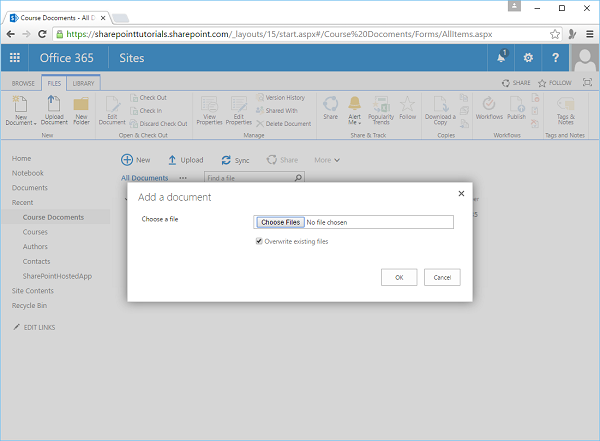
Step 9 − Select a sample file. Click Open.
You will see that the sample document is added to the library list.
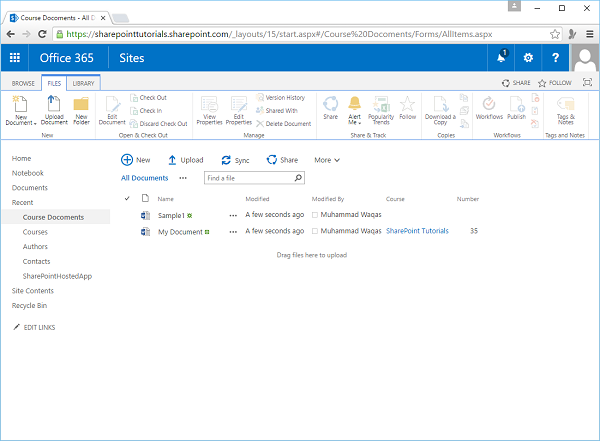
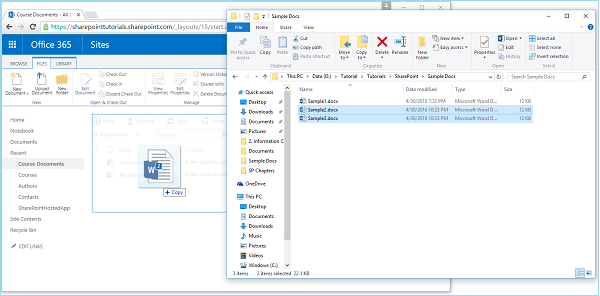
Step 10 − If you want to upload multiple documents, you can drag and drop them. Multiple documents will be uploaded.
Once the uploading is finished, you will see these documents in the list.
Step 11 − Another way to set the metadata is under the Library tab, click the Quick Edit option on the ribbon.
Step 12 − metadata is set, click View on the ribbon to go back to the standard list view.
You will see the document files is the list as seen in the following screenshot.
SharePoint - Web Part
In this chapter, we will be covering the Web Parts. We are going to restrict our view to List View Web Parts because it is the part, which is most closely associated with information collaboration.
Web Parts are small blocks of user interface, which you can compose together to build a page or a site. For example, A News Web Part, an Email Web Part, a Stock Web Part, sports scores, YouTube videos. These are all examples of little pieces of user interface, which you can compose together to get an aggregate view in, a portal style application.
In terms of information collaboration, the Web Parts are called List View Web Parts. They show the information from a list or library and let you add new items or documents. This way you can create a single page, which shows information across lists and libraries in a site, removing the need for the user to navigate to the individual lists and libraries themselves.
In this chapter, we will focus on List View Web Parts. These are Web Parts that let us interact with list or library data, but along the way you will get a general idea of how Web Parts work in SharePoint.
Let us have a look at a simple example by creating a Web Part page, i.e. a page that supports the use of web parts.
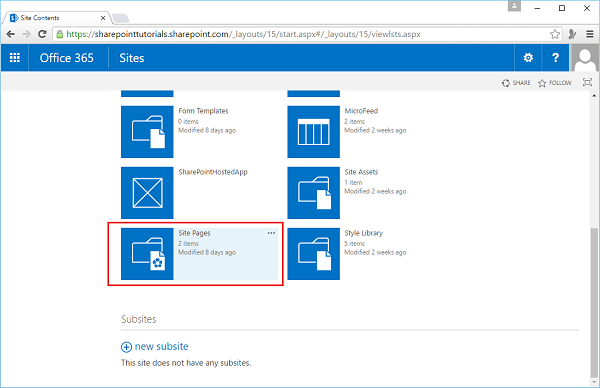
Step 1 − Got to the Site Contents. Scroll down and click the icon- Site Pages.
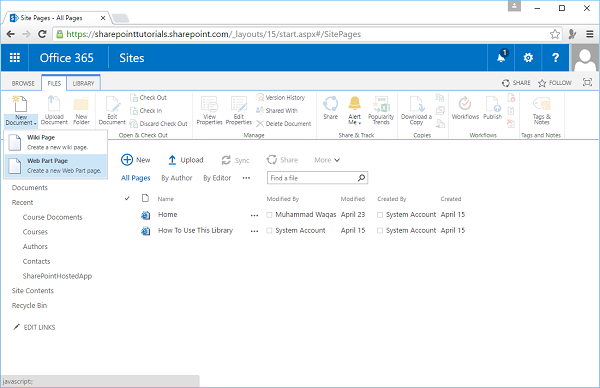
Step 2 − Go to the FILES tab. On the Ribbon, click the dropdown arrow on the New Document button. Select Web Part Page from the options.
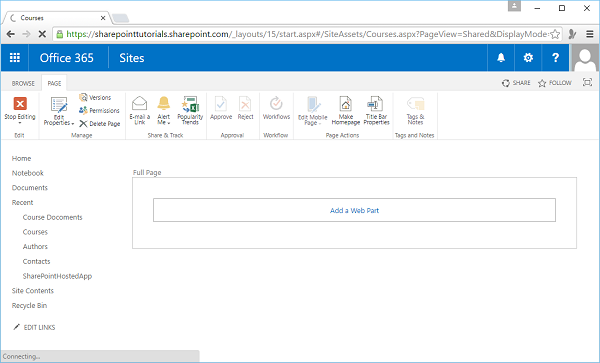
Step 3 − Name this page Courses and then we need to decide the layout of the page. So Web Parts is added into Web Part Zones.
The layout here determines the number and the layout of these zones. We also get an idea of what the zones look like.
We can have just one web part zone that takes up the entire page, a header and a column and a body, or a header and a footer and columns etc.
In this case, we just need one Web Part Zone. Hence, we will select full page vertical, and click Create.

Step 4 − So you can see the Web Part Zone and its inside part. You can see a link that lets us add a Web Part. Click on the link.
Step 5 − The Web Part Gallery will open up.
This page shows us the Web Parts that are available to be added to the page and these are broken down into categories.
The Web Parts we are interested in, for this example are in the Apps category.
You will notice that there is a web part for each of the lists and libraries in our site.
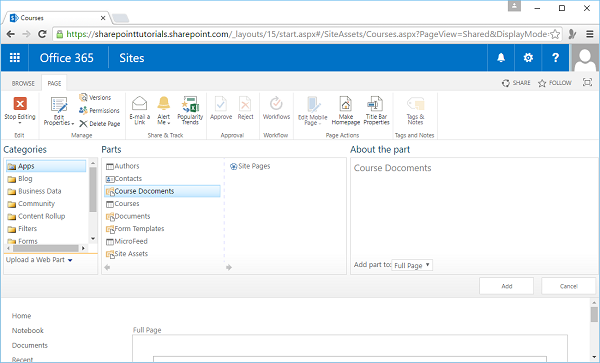
Step 6 − You can see the Course Documents in the Web Part. Now let us add a Web Part one more time and then click the Courses List and click Add.
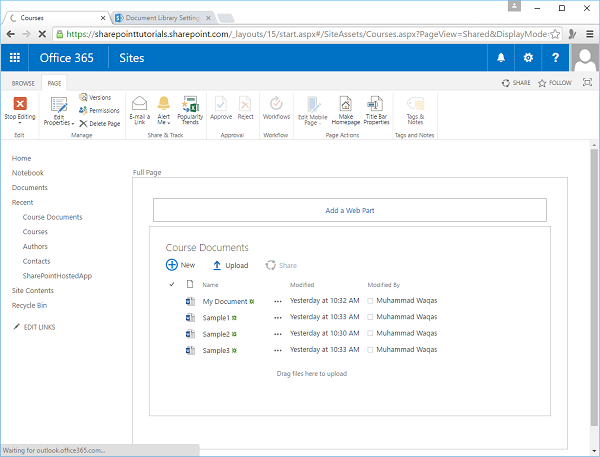
Step 7 − Once you are finished adding the Web Parts, click Stop Editing in the ribbon.
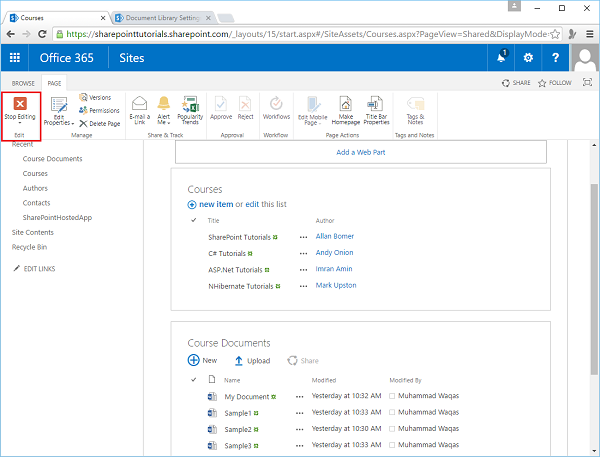
Step 8 − You have a single page where you can interact with both the Courses list and the Course Documents Library.
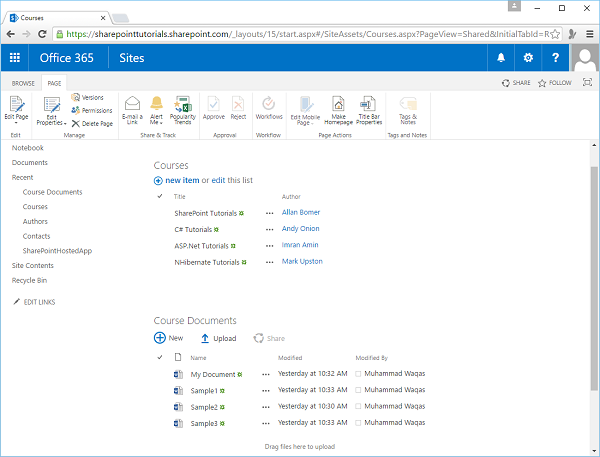
Step 9 − If you want to add a new document, you can upload it or you can drag and drop here, you have access to the Edit Control Block menus for both the library and the list.
You can perform all the main tasks by navigating to the list or the library itself. To maintain the Web Parts once they are on the page, we can put the page into edit mode from the Ribbon by clicking on Edit page.
Step 10 − You can see that for each of the Web Parts there is a little dropdown menu, which we can use to delete the web part. If you want to delete a web part, always click Delete, not Close. Close just hides the web part, but it still remains on the page. Delete removes the web part from the page.
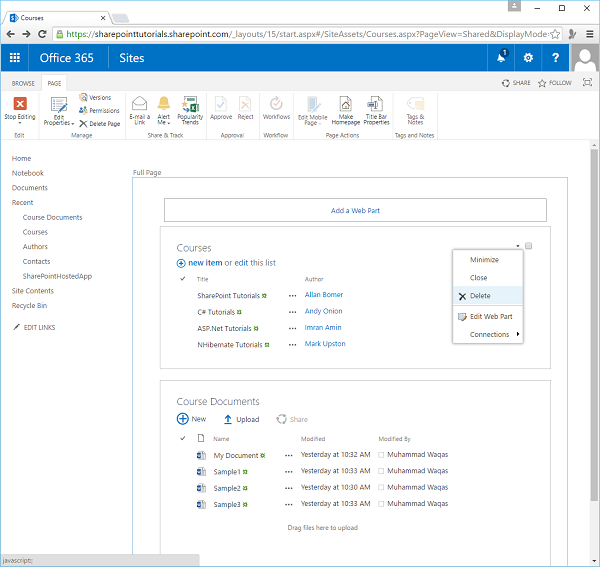
Step 11 − We can edit the web part properties by clicking the Edit Web Part from the menu. You can see in the properties that there are different options, you can say which view do you want to show in the web part, what toolbar you want to have. You can also change the appearance, layout etc.

SharePoint - Site Column and Content Types
In this chapter, we will be covering the Site Columns. So far, we have been defining the list and library schemas on the lists and libraries themselves, but these are not reusable. Therefore, if you want to have two lists with the same schema, we would have to define the same schema twice. SharePoint has a solution for this, which is Site Columns and Content Types.
Site Columns define reusable column definitions and Content Types, which are made up of Site Columns, define reusable schemas for both lists and libraries.
In addition to defining schema, you can also attach workflows and event handlers to a Content Type. Site Columns and Content Types are stored in galleries at the site level and they are available to be used within that site and any of its children.
If you declare a Site Column or a Content Type in a child site, it is only available in the branch underneath that.
Unless there is a specific reason not to do so, the common practice is to declare your Site Columns and Content Types in the site collection root and that way they are available across the entire site collection.
Now let us have a look at a simple example in which we will create and use Site Columns and Content Types. We have already seen Content Types, although it may not have been obvious
Step 1 − Go to our Contacts list through Site Contents.
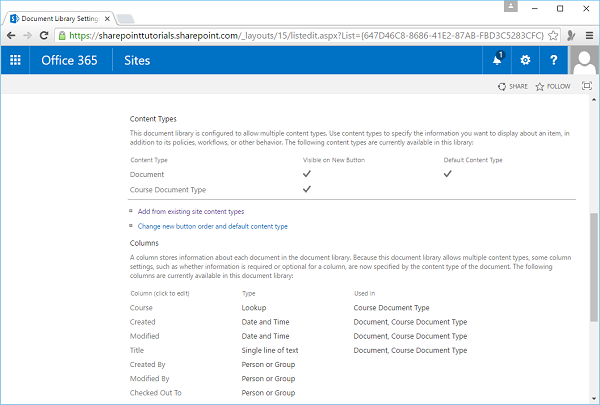
Step 2 − If you scroll down, you will see a section called Columns.

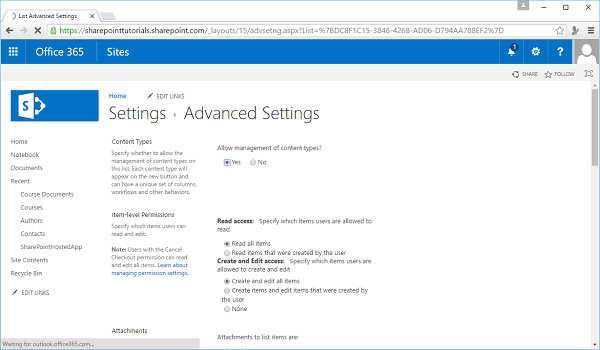
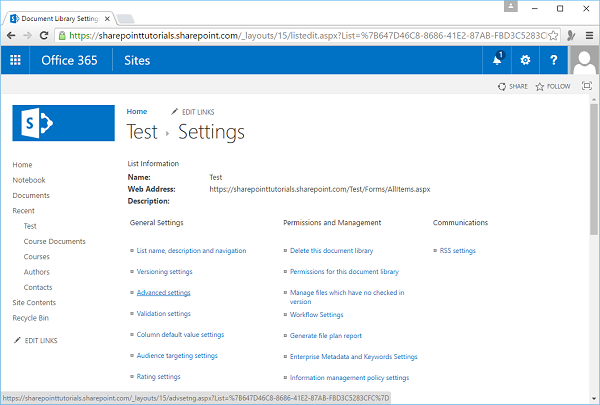
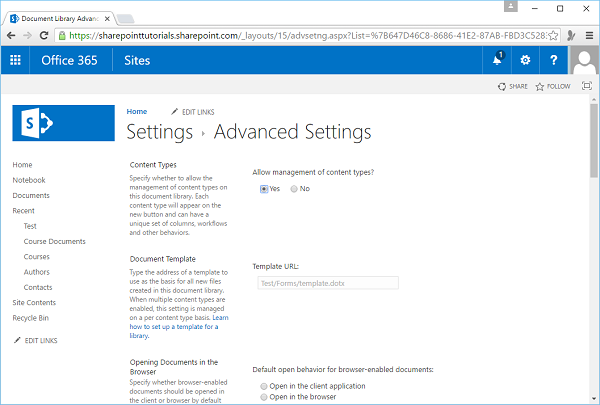
Step 3 − Go up to Advanced Settings. Select Yes for Allow Management of Content Types, and click OK.
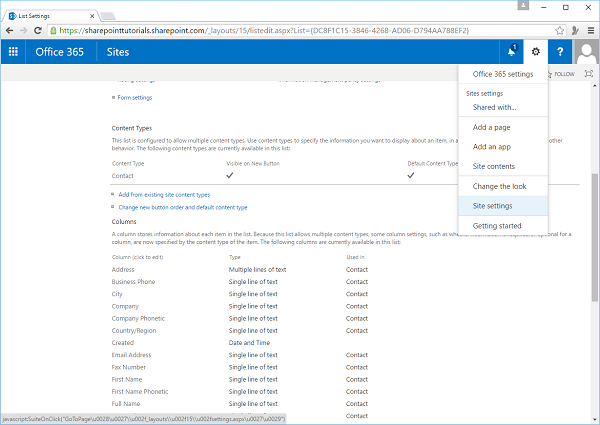
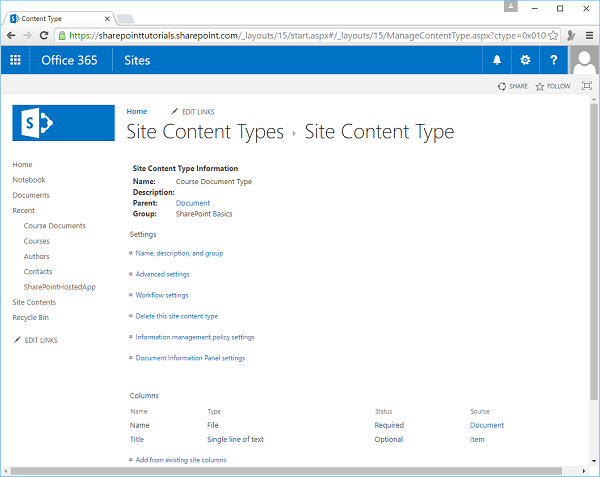
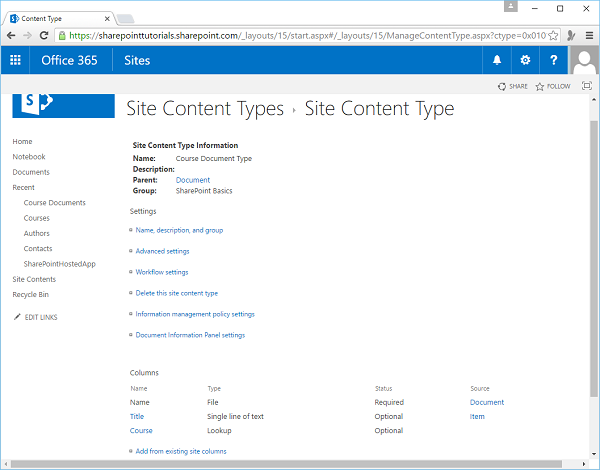
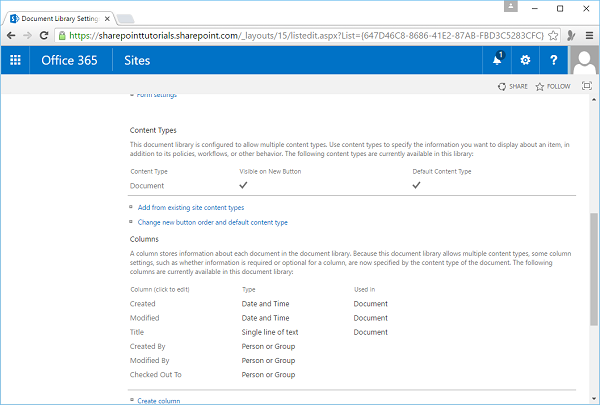
You will see that we have a new section here called Content Types. This indicates that this list is based on the Contact Content Type.
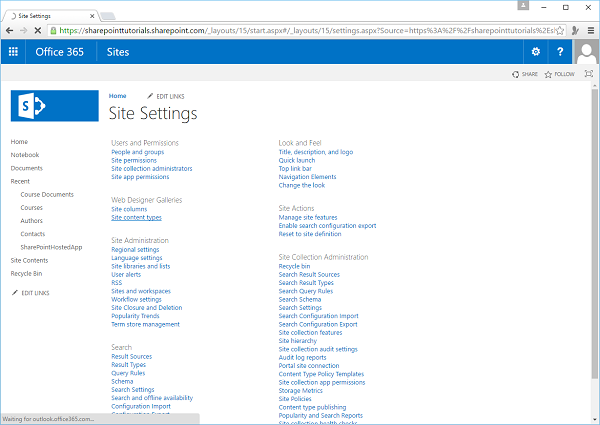
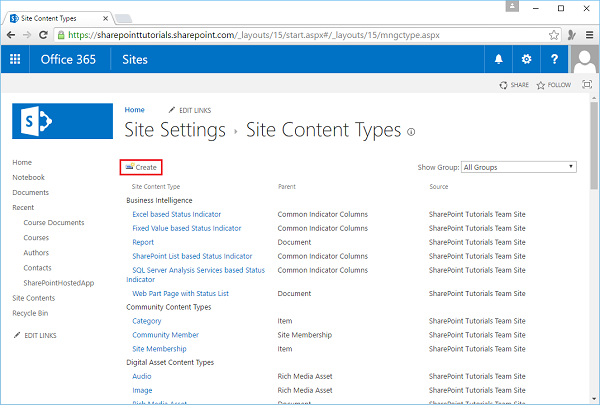
Step 4 − Go to Site Settings.
Step 5 − Under Web Designer Galleries, click Site Content Types.
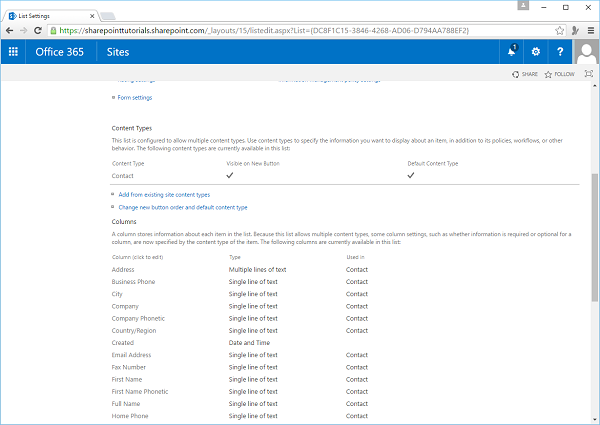
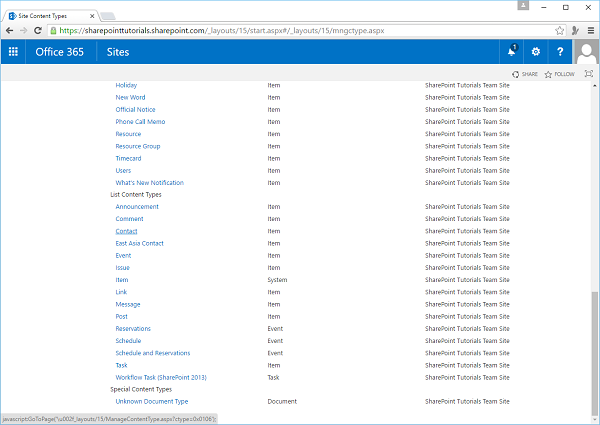
Step 6 − Scroll down the page and you will find the Contact Content Type, which is right there under List Content Types and then click the Contact link.
Step 7 − If you take a look at the columns then you will see that it matches the columns in our list. Basically, when you create a list of the Contacts list template, it associates this content type with the list and that is why you get all of these fields.
Now the fields here that make up the definition of a Content Type are known as Site Columns.
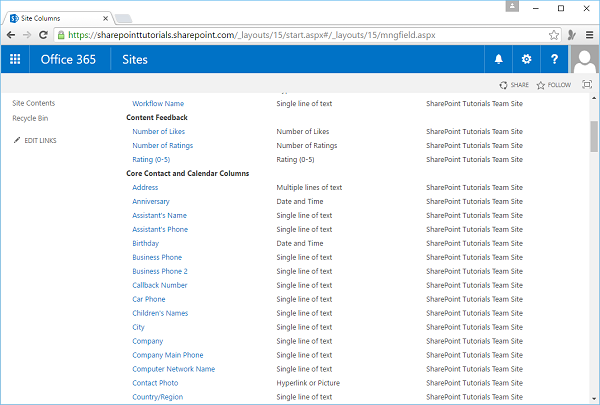
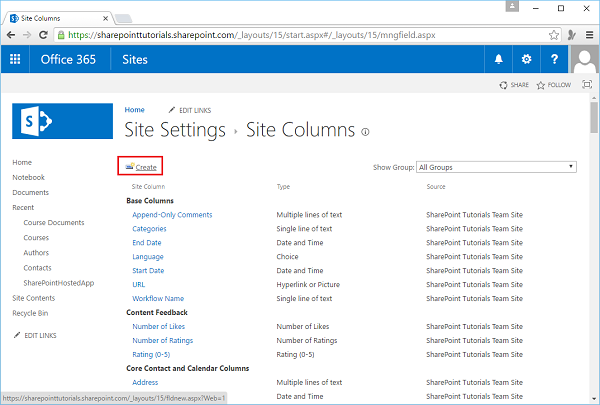
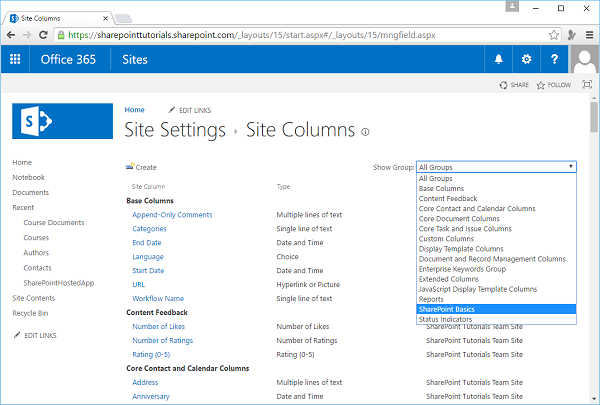
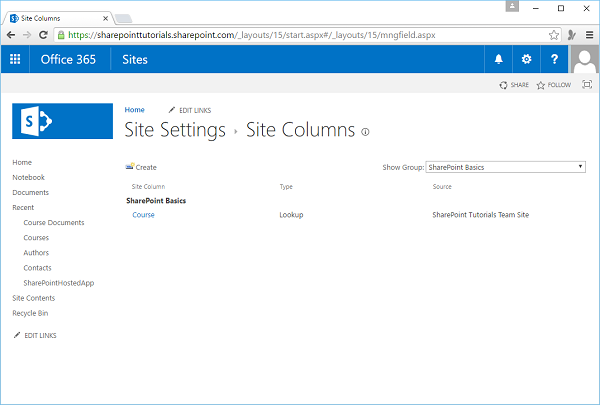
To see the Site Columns, let us go to Site Settings and select Site Columns under Web Designer Galleries,

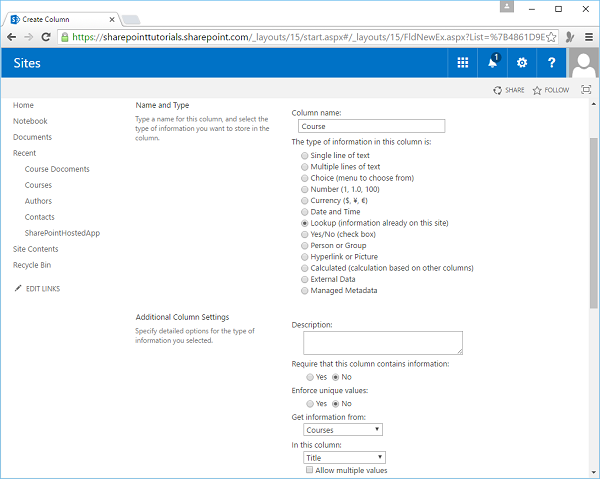
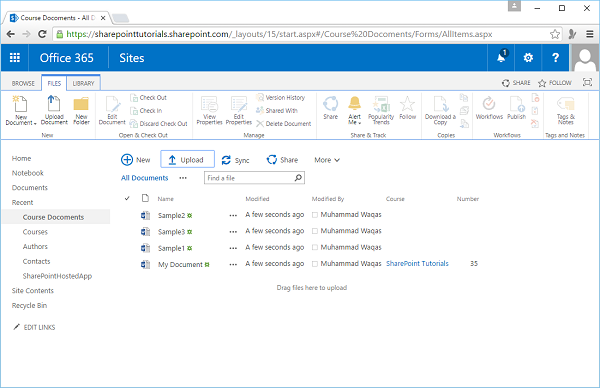
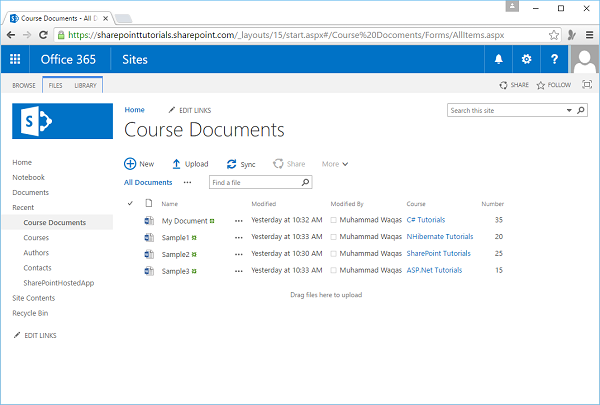
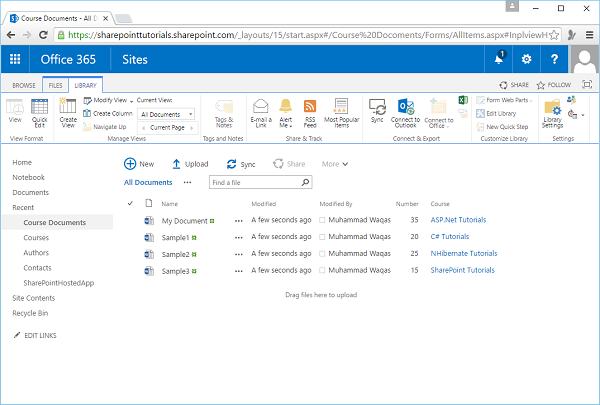
Step 8 − You can see the columns that are associated with Contacts. So let us explore this a little bit further by creating our own custom site column and our own custom content type and then using those in lists. In our Course Documents Library, we have a column for the course and we defined this column in the library itself.
Step 9 − Maybe while building out your site, you realize that you want to have a course column in a few lists and libraries and you want to reuse that definition. Hence, what we can do is create the course column as a site column and then use it in different lists and libraries.
Let us go to the Site Column from the Site Settings.
Step 10 − Click the Create link.
Step 11 − Name this as the Course column and it will be a lookup field.
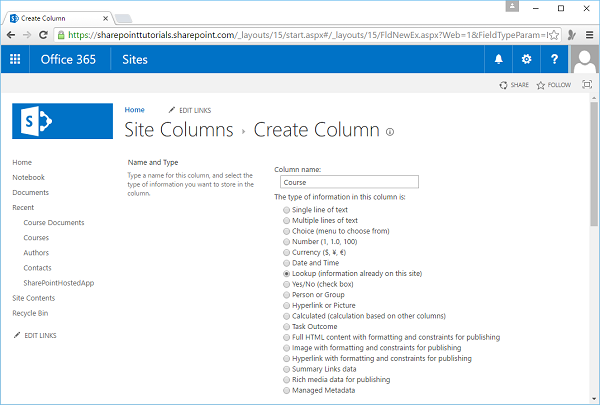
Step 12 − Put this into a group called “SharePoint Basics” so that we can find it easily later. It will look up on the Courses list, and the field we want to look up is the Title. Click OK.

Step 13 − You will see that a new group SharePoint Basics is created.
Step 14 − Our new site column is created in the “SharePoint Basics” group.
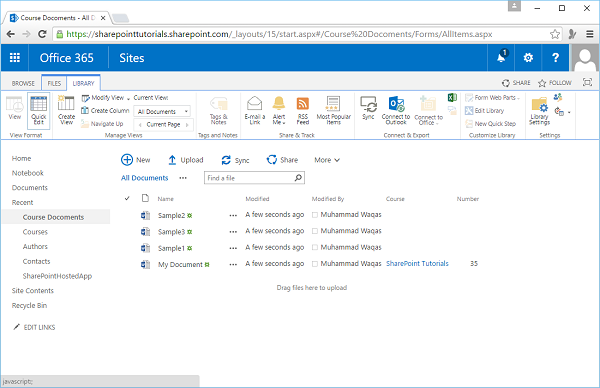
Step 15 − Let us go back to Course Documents and then go to the Library Settings. Go to Columns.
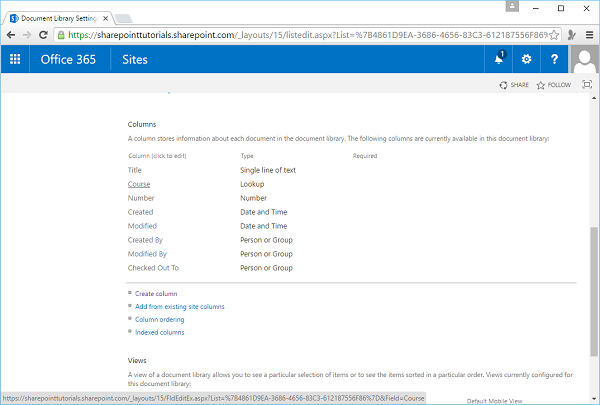
Remove the Course column, which we created in the library itself.
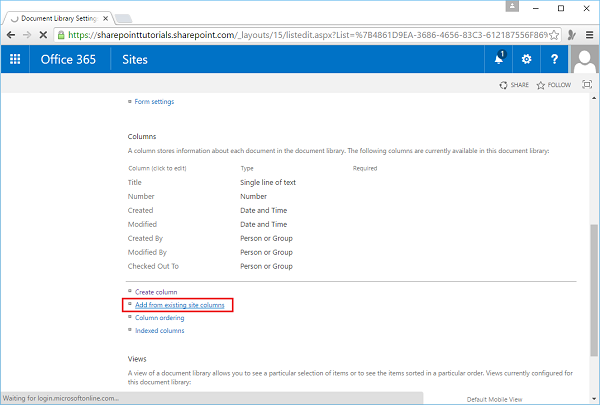
Step 16 − Let us add the new course column from the site columns. Therefore, instead of clicking Create Column, click Add from existing site columns.
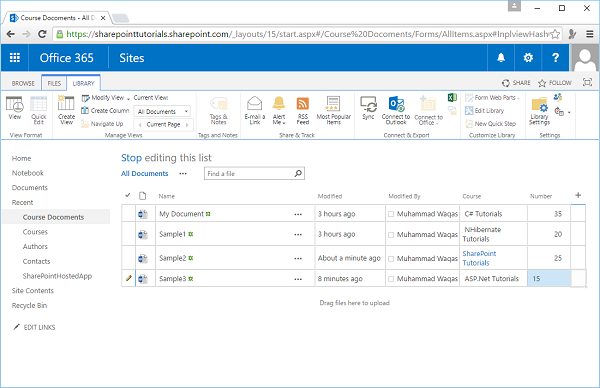
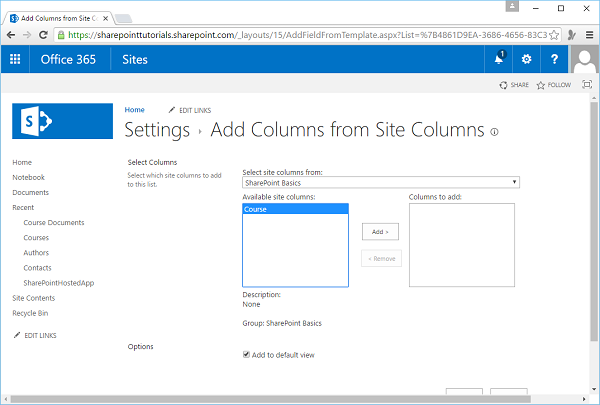
Step 17 − Change the group to “SharePoint Basics” and Select Course on the left side. Click Add to add that column to the list and then click OK.
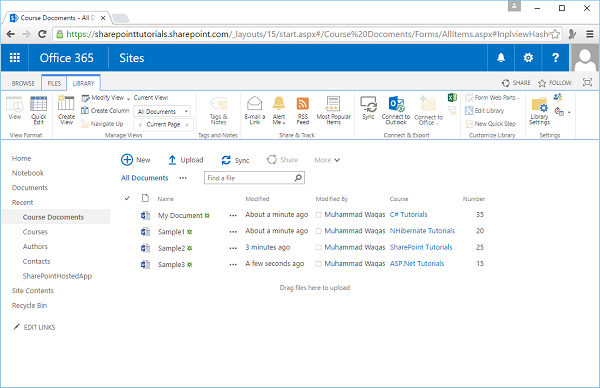
Step 18 − Let us go back to Course Documents.

Step 19 − You can see our new Course column, but it is empty because the information that was here previously was deleted when we deleted the original course column. Hence, let us add that back as shown below.
If this list had hundreds of items, it would turn a task that could take hours into a task that could take minutes.
Content Types
In this section, we will take a look at creating a custom content type.
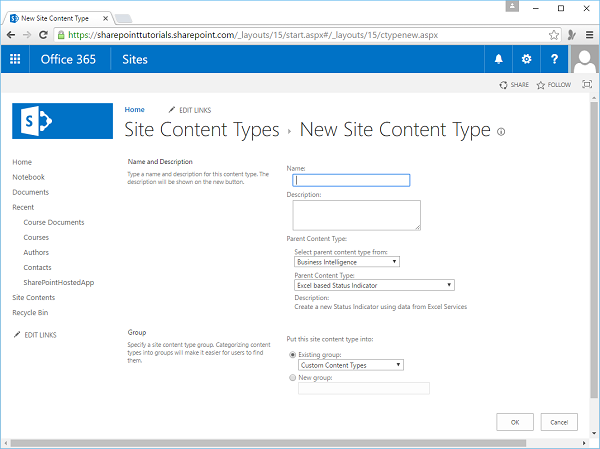
Step 1 − Let us go to the Site Settings, and then go to Site Content Types. Click the Create link.
There are two key things to consider here when we are creating a content type.
The first is that all content types are based on another content type or you could think of it as all content types inherit from another content type.
The second is that a content type will either work with lists or it will work with libraries. Whether it works with lists or libraries depends on the type you inherit from.
For example, if we want to create a custom contacts list, we would go to the List Content Types and then find Contact. We would create the content type, add things we need that were not already part of Contact, or remove things that were part of Contact that we do not want.
One strategy you can use while creating content types is to find a content type that already has most of the things that you need, inherit from it, and then customize it.
The other strategy is to start with a base content type and you just build on top of it.
In case of lists, that is the Item Content type. For Libraries, you want to inherit from Document, so we will go to Document Content Types.
Step 2 − Our content type is going to be for document libraries related to Courses. This is what we want here in terms of inheritance.
Step 3 − Let us call this Course Documents Type. Just as we did with site columns, we will put this into a group so we can easily identify it and that group name will be “SharePoint Basics”. Click OK.
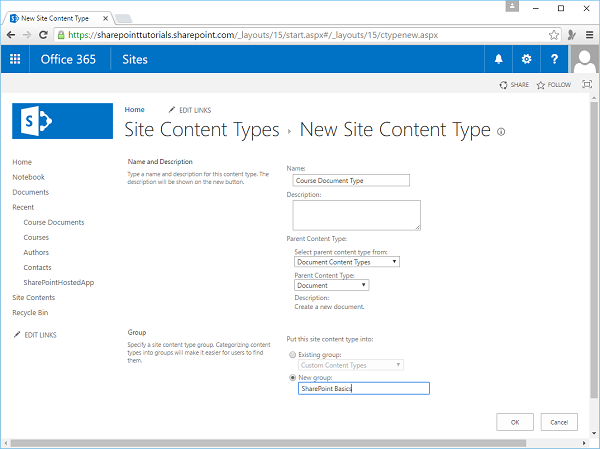
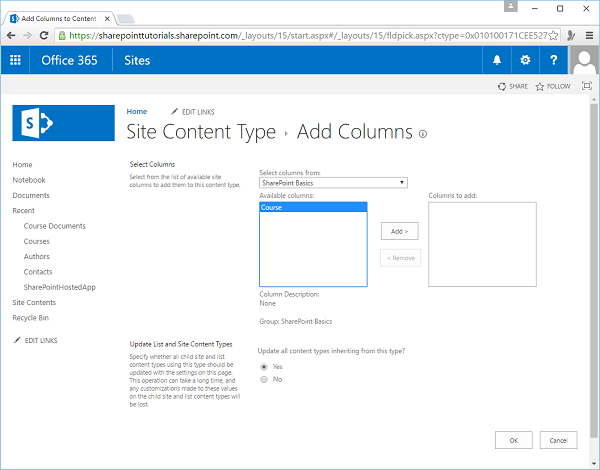
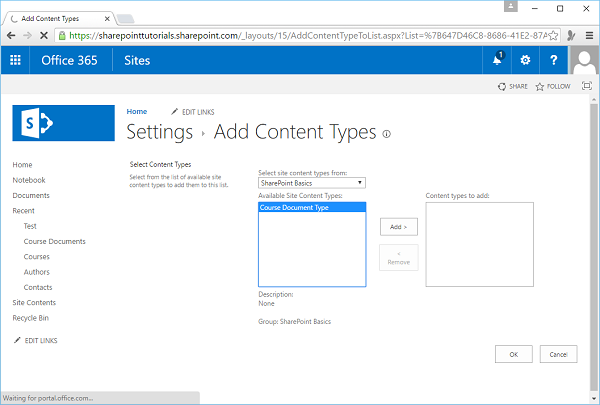
Step 4 − You can see in the following screenshot that a couple of fields already exist from the Document Content Type, File Name and Title. We will add the Course field. Now, here we cannot just add a column to a content type, the column has to be a site column. Hence, we are going to choose Add from existing site columns and then apply filter on the “SharePoint Basics” group.
Step 5 − Select the Course column, click Add, and then click OK.
In this case, this is all the customization we want to do to our content type, so now we are ready to use it.
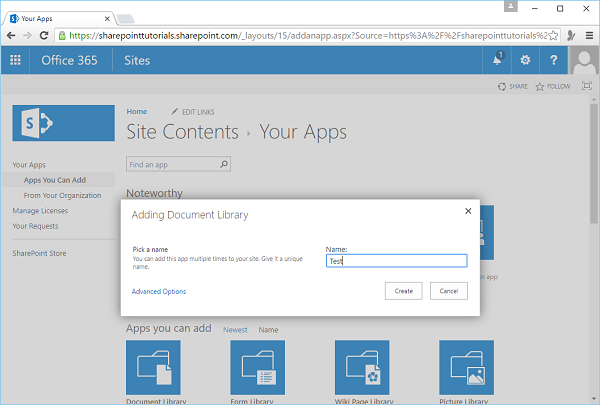
Step 6 − Let us create a new document library by clicking Site Contents → add an app and create a document library.
Step 7 − We will call this Library Test, and click Create. Open the test library and set the course document type to content type for this library. Go to Library on the Ribbon and then go to Library Settings.
Step 8 − To manage content types, go to Advanced Settings.
Step 9 − Set Allow Management of Content Types to Yes and then click OK.
Step 10 − You can see that this library is currently associated with the Document content type. We need to add our Course content type, by clicking Add from existing site content types.
Step 11 − Filter it again in “SharePoint Basics”. Select Course Documents Type, click Add, and then click OK.
So now, our library is associated with two content types, the Document content type and the Course documents type.
Step 12 − Next, go to the Test library and then click New Document.
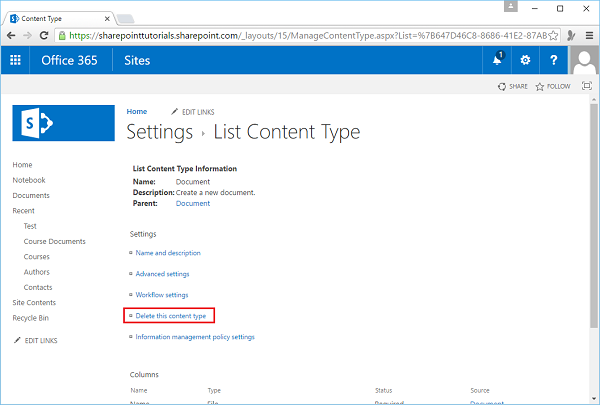
When you click New Document or the dropdown arrow, you can see that we can create a document of either type. Now if you only want people to be able to create course documents, then just go back to the Library Settings. Remove the Document content type association by clicking on the Document in Content types section.
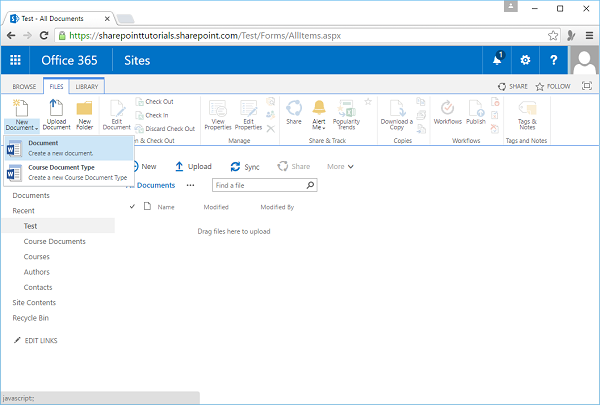
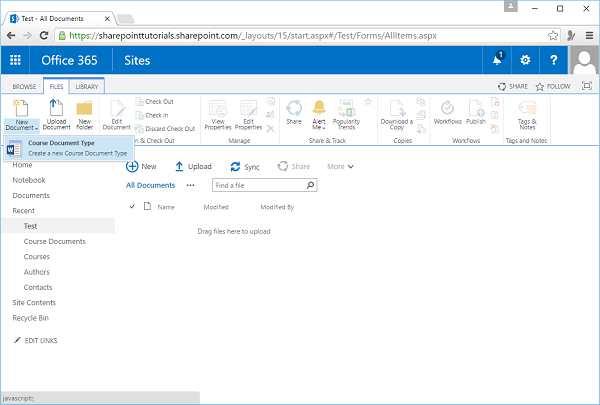
Step 13 − Click Delete This Content Type. Go back to the Library and click Files, and then click New Document.
Now you can see that only the Course Document Type option is available. These are the basics of working with content types in SharePoint.
SharePoint - Data
In this chapter, we will be covering one of the most common tasks of SharePoint i.e. interacting with the various data sources such as lists or document libraries. A great thing about SharePoint is that you have a number of options available for interacting with data. Some examples are Server Object Model, Client-Side Object Model, REST services etc.
Before you can do anything with SharePoint programmatically, you need to establish a connection and context with your SharePoint site. However, for this we need SharePoint on Premises, which can be installed on Window Server.
You need to add reference in your project to Microsoft.SharePoint.dll or Microsoft.SharePoint.Client.dll. With the appropriate references added to your project, you can then begin to set the context and code within that context.
Let us have a look at a simple example.
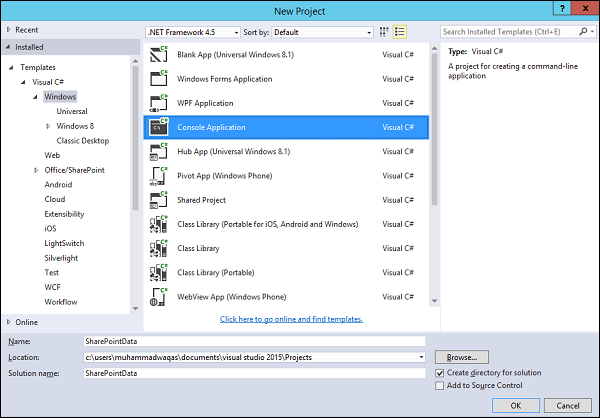
Step 1 − Open Visual Studio and create a new project from File → New → Project menu option.
Step 2 − Select Windows from Templates → Visual C# in the left pane and choose Console Application in the middle pane. Enter the name of your project and click OK.
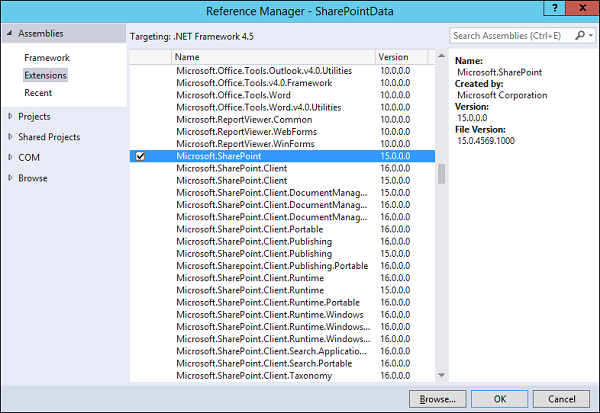
Step 3 − Once the project is created, right-click the project in Solution Explorer and select Add → References.
Step 4 − Select Assemblies → Extensions in the left pane and check Microsoft.SharePoint in the middle pane and click OK.
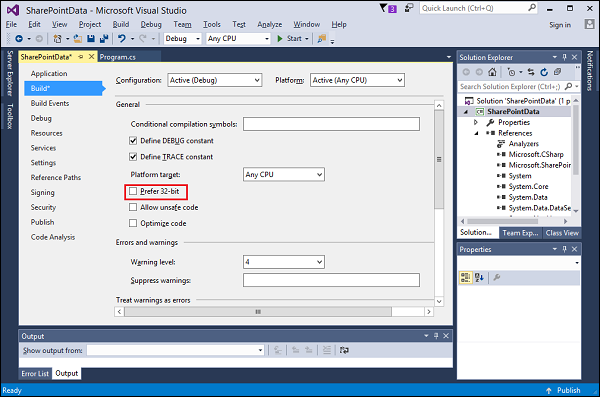
Now right-click the project again in Solution Explorer and select Properties.
Step 5 − Click the Build Tab in the left pane and uncheck the Prefer 32-bit option.
Step 6 − Now go back to the Program.cs file and replace it with the following code.
using Microsoft.SharePoint;
using System;
using System.Collections.Generic;
using System.Linq;
using System.Text;
using System.Threading.Tasks;

namespace SharePointData {
   class Program {
      static void Main(string[] args) {
         using (var site = new SPSite("https://waqasserver/sites/demo")) {
            var web = site.RootWeb;
            Console.WriteLine(web.Title);
            var lists = web.Lists;

            foreach (SPList list in lists) {
               Console.WriteLine("\t" + list.Title);
            }
            Console.ReadLine();
         }
      }
   }
}
Note − In the above code first created a new SPSite object. This is a disposable object, so it is created within a using statement. The SPSite constructor takes in the URL to the site collection, which will be different in your case.
The var web = site.RootWeb will get the root of the site collection.
We can get the lists using web.Lists and print the title of the list items.
When the above code is compiled and executed, you will see the following output −
SharePoint Tutorials
   appdata
   Composed Looks
   Documents
   List Template Gallery
   Master Page Gallery
   Site Assets
   Site Pages
   Solution Gallery
   Style Library
   Theme Gallery
   User Information List
   Web Part Gallery
SharePoint - Server Object Model
In this chapter, we will take a look at the SharePoint Server Object Model. You use the SharePoint Server Object Model when you are writing code that will run inside the context of SharePoint. Some common examples would be the code-behind in a page or a web part, event handlers behind a feature or a list, timer jobs etc.
Features of Server Object Model
Following are the key features of Server Object Model
You can use the Server Object Model if you are programming an ASP.NET application inside the same application pool that is used by SharePoint.
Server Object Model can be used if you are developing a client application such as console or Windows forms or a WPF app that will run on a SharePoint server.
You cannot use the Server Object Model to connect remotely to a SharePoint Server.
When you want to use the Server Object Model, you refer to the Microsoft.SharePoint assembly. There are other assemblies, which make up the Server Object Model, but Microsoft.SharePoint is the main one.
The core types that you will use most commonly map to the components that you use as an end user, so things like site collections, sites, list, libraries, and list items are represented by the types SPSite, SPWeb, SPList, SPDocumentLibrary, and SPListItem.
The type and the Server Object Model that represents a site collection is SPSite and the type that represents a SharePoint site in the Server Object Model is SPWeb. Therefore, when you go from the end user terms to the developer terms, you will just have to do that mental mapping.
Now when you first start using SharePoint, it can be confusing because site is so overloaded and it means opposite things in the end user and developer vocabularies, not to mention the web vocabulary.
Let us have a look at a simple example of Server Object Model.
Step 1 − Open Visual Studio and create a new project from File → New → Project menu option.
Step 2 − Select Windows from Templates → Visual C# in the left pane and choose Console Application in the middle pane. Enter the name of your project and click OK.
Step 3 − Once the project is created, right-click the project in Solution Explorer and select Add → References.
Step 4 − Select Assemblies → Extensions in the left pane and check Microsoft.SharePoint in middle pane and click Ok button.
Now right-click again the project in Solution Explorer and select Properties.
Step 5 − Click the Build Tab in the left pane and uncheck the Prefer 32-bit option.
Step 6 − Now go back to the Program.cs file and replace it with the following code.
using Microsoft.SharePoint;
using System;
using System.Collections.Generic;
using System.Linq;
using System.Text;
using System.Threading.Tasks;

namespace SharePointData {
   class Program {
      static void Main(string[] args) {
         using (var site = new SPSite("https://waqasserver/sites/demo")) {
            var web = site.RootWeb;
            Console.WriteLine(web.Title);
            var lists = web.Lists;

            foreach (SPList list in lists) {
               Console.WriteLine("\t" + list.Title);
            }
            Console.ReadLine();
         }
      }
   }
}
Note − In the above code first created a new SPSite object. This is a disposable object, so it is created within a using statement. The SPSite constructor takes in the URL to the site collection, which will be different in your case.
The var web = site.RootWeb will get the root of the site collection.
We can get the lists using web.Lists and print the title of the list items.
When the above code is compiled and executed, you will see the following output −
SharePoint Tutorials
   appdata
   Authors
   Composed Looks
   Contacts
   Course Documents
   Courses
   Documents
   List Template Gallery
   Master Page Gallery
   Site Assets
   Site Pages
   Solution Gallery
   Style Library
   Theme Gallery
   User Information List
   Web Part Gallery
You can see that these titles are Solutions Gallery, the Style Library, Form Templates. These are lists that are used internally by SharePoint. Therefore, instead of displaying all the lists, maybe you only want to show the lists that the users would normally see.
Hence, instead of getting the entire list collection, we want to get all the lists that are not hidden. We can do that using a link query as given below.
using Microsoft.SharePoint;
using System;
using System.Collections.Generic;
using System.Linq;
using System.Text;
using System.Threading.Tasks;

namespace ServerObjectModel {
   class Program {
      static void Main(string[] args) {
         using (var site = new SPSite("https://waqasserver/sites/demo")) {
            var web = site.RootWeb;
            Console.WriteLine(web.Title);
            var lists = from SPList list in web.Lists
            where list.Hidden == false
            select list;

            foreach (SPList list in lists) {
               Console.WriteLine("\t" + list.Title);
            }
            Console.ReadLine();
         }
      }
   }
}
When the above code is compiled and executed, you will see the following output −
SharePoint Tutorials
   Authors
   Contacts
   Course Documents
   Courses
   Documents
   Site Assets
   Site Pages
   Style Library
You can see that this will give us back all the lists that are not hidden.
Let us have a look at another simple example in which we will also display some information about the list items.
using Microsoft.SharePoint;
using System;
using System.Collections.Generic;
using System.Linq;
using System.Text;
using System.Threading.Tasks;

namespace ServerObjectModel {
   class Program {
      static void Main(string[] args) {
         using (var site = new SPSite("https://waqasserver/sites/demo")) {
            var web = site.RootWeb;
            Console.WriteLine(web.Title);
            var lists = from SPList list in web.Lists
            where list.Hidden == false
            select list;

            foreach (SPList list in lists) {
               Console.WriteLine("\t" + list.Title);
               var items = list.Items.OfType<SPListItem>().Take(5);
               var isDocLib = list is SPDocumentLibrary;

               foreach (SPListItem item in items) {
                  var value = isDocLib ? item.Name : item.Title;
                  Console.WriteLine("\t\t" + value);
               }
            }
            Console.ReadLine();
         }
      }
   }
}
When the above code is compiled and executed, you will see the following output −
SharePoint Tutorials
   Authors
      Muhammad Waqas
      Mark Upston
      Allan Bommer
      Andy Onian
   Contacts
      Waqas
      Upston
      Bommer
   Course Documents
      Sample1.docx
      Sample2.docx
      Sample3.docx
   Courses
      SharePoint Tutorials
      C# Tutorials
      ASP.Net Tutorials
      NHibernate Tutorials
   Documents
   Site Assets
   Site Pages
      Home.aspx
      How To Use This Library.aspx
   Style Library
List Data
When you first create a list, it always has a title column. This Title column gives access, by default, to the List Item context or edit control block menu.
Since, every list starts with a column- Title, the SPListItem type exposes that as a property. For the columns that are not common to every single list, you can access them via the indexer on SpListItem type.
You can pass a couple of pieces of information to the indexer, but the most common one is the Column. The end users in the list settings can change this name. You do not want to use this name because again, it can change.
The second is the InternalName, which is set at the point this list is created and it never changes. This is the name you want to use when you are accessing the column value.
Let us have a look at simple example in which we will retrieve the Authors list as shown below −
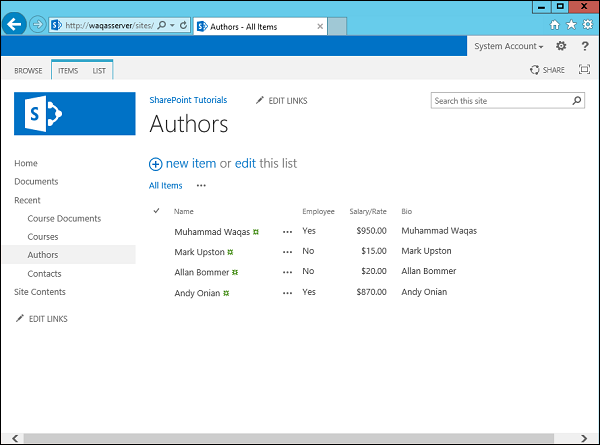
In this example, we will get the Authors list and then raise the Salary/Rate by some value. Therefore, for Salary/Rate column we will be using the InternalName.
Step 1 − Go to the Server Explorer; right-click SharePoint Connections and select Add Connection... Specify the URL and click OK.
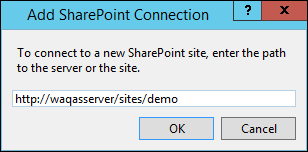
Step 2 − Expand SharePoint Tutorials → List Libraries → Lists → Authors → Fields → Salary/Rate field. Right-click Salary/Rate and select Properties. You will see the InternalName in the Properties window.
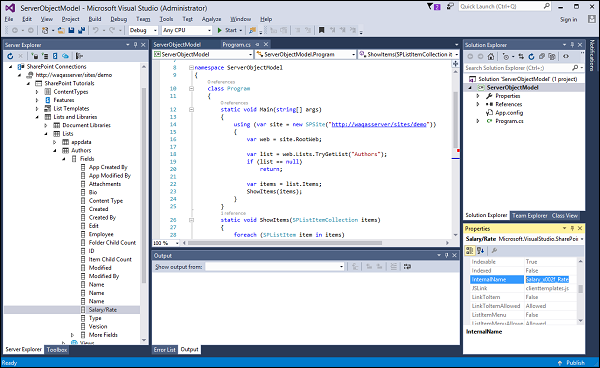
Step 3 − Given below is a simple example of retrieving the Authors based on Salary/Rate and raise their Salary/Rate.
using Microsoft.SharePoint;
using System;
using System.Collections.Generic;
using System.Linq;
using System.Text;
using System.Threading.Tasks;

namespace ServerObjectModel {
   class Program {
      static void Main(string[] args) {
         using (var site = new SPSite("https://waqasserver/sites/demo")) {
            var web = site.RootWeb;
            var list = web.Lists.TryGetList("Authors");
            if (list == null)
            return;
            var items = list.Items;
            ShowItems(items);
            RaiseRates(items);
            Console.WriteLine("\nAfter Raise\n");
            ShowItems(items);
            Console.ReadKey();
         }
      }
      static void RaiseRates(SPListItemCollection items) {
         foreach (SPListItem item in items) {
            var employee = Convert.ToBoolean(item["Employee"]);
            var rate = Convert.ToDouble(item["Salary_x002f_Rate"]);
            var newRate = employee ? rate + 1 : rate + 0.1;
            item["Salary_x002f_Rate"] = newRate;
            item.Update();
         }
      }
      static void ShowItems(SPListItemCollection items) {
         foreach (SPListItem item in items) {
            Console.WriteLine("Salary or rate for {0} is {1:c}", item.Title,
            item["Salary_x002f_Rate"]);
         }
      }
   }
}
In the above code you can see that we have two methods −
One is retrieving the list which is called ShowItems and
The other method is raising the Rates which is called RaiseRates().
When the above code is compiled and executed, you will see the following output −
Salary or rate for Muhammad Waqas is $950.00
Salary or rate for Mark Upston is $15.00
Salary or rate for Allan Bommer is $20.00
Salary or rate for Andy Onian is $870.00

After Raise

Salary or rate for Muhammad Waqas is $951.00
Salary or rate for Mark Upston is $15.10
Salary or rate for Allan Bommer is $20.10
Salary or rate for Andy Onian is $871.00
CAML Queries
In the above examples, we have always iterated through the items using a foreach loop many times iterating through all of the items and we have always brought back all of the columns or at least all the columns have been accessible.
It is really analogues to doing a select* from table name in a SQL query.
We can address this issue by using what are called CAML queries. When doing a CAML query you have two options −
If you want to query just a single list, you can use the SPQuery object.
If you want to query multiple lists in a site collection, then you can use the SPSiteDataQuery.
Generally, when you are doing the SPSiteDataQuery, you are querying all the lists of a specific type.
For example, I want to query all of the contact lists etc. SPSiteDataQuery allows you to determine the scope, so you can indicate that you want to query the entire site collection, an individual site, or the site and all of its children.
The syntax for CAML queries is basically described in XML format and it takes a little bit of time to get used to constructing these kinds of queries.
Let us have a look at a simple example of CAML Queries. Here, we will create a CAML query to query the data in our Authors list.
using Microsoft.SharePoint;
using System;
using System.Collections.Generic;
using System.Linq;
using System.Text;
using System.Threading.Tasks;

namespace ServerObjectModel {
   class Program {
      static void Main(string[] args) {
         using (var site = new SPSite("https://waqasserver/sites/demo")) {
            var web = site.RootWeb;
            var list = web.Lists.TryGetList("Authors");
            if (list == null)
            return;
            var items = QueryItems(list);
            ShowItems(items);

            //RaiseRates(items);
            //Console.WriteLine("\nAfter Raise\n");
            //ShowItems(items);
            Console.ReadKey();
         }
      }
      static SPListItemCollection QueryItems(SPList list) {
         var query = new SPQuery();

         query.ViewFields =
            "<FieldRef Name='Title' />" +
            "<FieldRef Name='Employee' />" +
            "<FieldRef Name='Salary_x002f_Rate' />";

         query.Query =
            "<OrderBy>" +
            " <FieldRef Name='Salary_x002f_Rate' />" +
            "</OrderBy>" +
            "<Where>" +
            " <Eq>" +
            " <FieldRef Name='Employee' />" +
            " <Value Type='Boolean'>False</Value>" +
            " </Eq>" +
            "</Where>";
         return list.GetItems(query);
      }
      static void RaiseRates(SPListItemCollection items) {
         foreach (SPListItem item in items) {
            var employee = Convert.ToBoolean(item["Employee"]);
            var rate = Convert.ToDouble(item["Salary_x002f_Rate"]);
            var newRate = employee ? rate + 1 : rate + 0.1;
            item["Salary_x002f_Rate"] = newRate;
            item.Update();
         }
      }
      static void ShowItems(SPListItemCollection items) {
         foreach (SPListItem item in items) {
            Console.WriteLine("Salary or rate for {0} is {1:c}",
            item.Title,
            item["Salary_x002f_Rate"]);
         }
      }
   }
}
We have used a CAML query to get some of the items. In the QueryItems method, you can see that we have retrieved only those items which are not Employee.
Salary or rate for Mark Upston is $15.10
Salary or rate for Allan Bommer is $20.10
SharePoint - Client Object Model
In this chapter, we will take a look at the Client Object Model or CSOM. This was one of the two APIs, for building remote applications that were added to SharePoint 2010.
One of the design goals of the Client Object Model was to mimic the Server Object Model as much as possible, so there would be a shorter learning curve for developers already familiar with doing development on the Server side.
The heart of the Client Object Model is a web service called Client.svc, which lives in the _vti_bin virtual directory. We are not supposed to communicate directly with Client.svc, but we are given three proxies or entry points, which we can use. They are −
- .NET Managed code.
- JavaScript.
- JavaScript.
The code communicates with these proxies and then these proxies eventually communicate with the web service.
Since this is a remote API and communication is done with SharePoint via web service calls, the Client Object Model is designed to allow us to batch up commands and requests for information.
.NET Managed code
The two core assemblies for the .NET Manage Implementation are −
Microsoft.SharePoint.Client.dll and Microsoft.SharePoint.Client.Runtime.dll.
Silverlight code
The assemblies for the Silverlight implementation live in TEMPLATE\LAYOUTS\ClientBin. The assembly names also start with Microsoft.SharePoint.Client. For all assemblies but one, the assembly name ends in Silverlight.
The two core assemblies for the Silverlight implementation are −
- Microsoft.SharePoint.Client.Silverlight.dll
- Microsoft.SharePoint.Client.Silverlight.Runtime.dll
JavaScript
The JavaScript implementation on the Client Object Model lives in the TEMPLATE\LAYOUTS folder underneath the SharePoint System Root. The JavaScript library names all start with SP. The three core libraries are SP.js, Sp.Runtime.js, and SP.Core.js.
The Client Object Model is expanded in SharePoint 2013.
Retrieve Resources with Load using .NET
Let us look at a simple example in which we will use the managed implementation of the Client Object Model using Windows forms application. Therefore, first we need to create a new project.
Step 1 − Select Windows Forms Application in the middle pane and enter name in the Name field. Click OK.
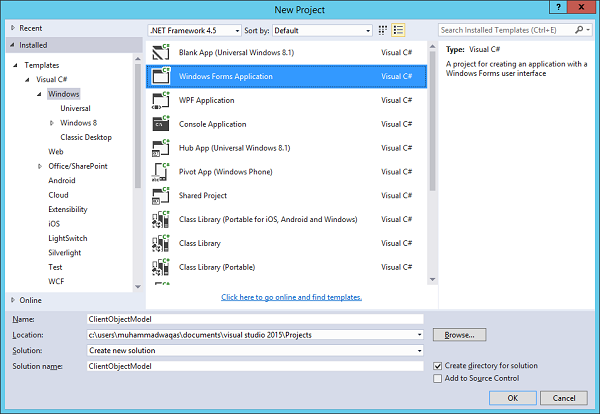
Step 2 − Once the project is created, let us add one list box and one button as shown below. To use the Client Object Model, we need to add a couple of assembly references. Right-click on the References and choose Add Reference.
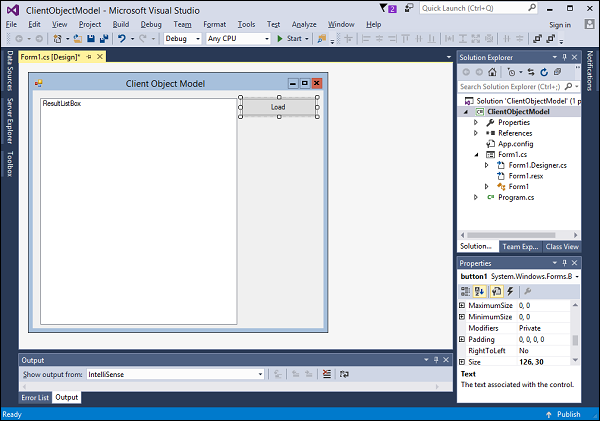
Step 3 − Select Extensions in the left pane under Assemblies.
The two core assemblies for the managed implementation of the Client Object Model are Microsoft.SharePoint.Client and Microsoft.SharePoint.Client.Runtime. Check these two options and click OK.
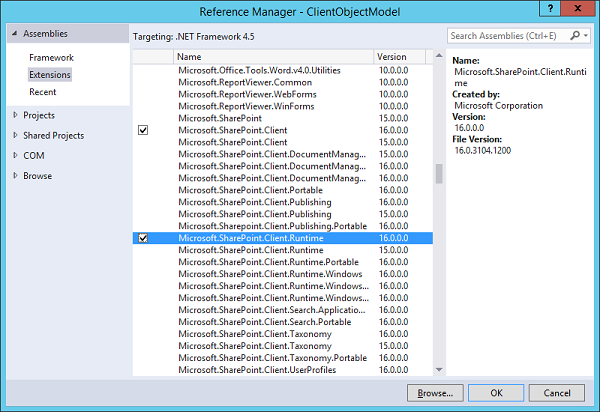
Now double-click the Load button to add the event handler as given below.
using Microsoft.SharePoint.Client;
using System;
using System.Collections.Generic;
using System.ComponentModel;
using System.Data;
using System.Drawing;
using System.Linq;
using System.Text;
using System.Threading.Tasks;
using System.Windows.Forms;

namespace ClientObjectModel {
   public partial class Form1 : Microsoft.SharePoint.Client.Form {
      public Form1() {
         InitializeComponent();
      }
      private void loadBtn_Click(object sender, EventArgs e) {
         using (var context = new ClientContext("https://waqasserver/sites/demo")) {
            var web = context.Web;
            context.Load(web);
            context.Load(web.Lists);
            context.ExecuteQuery();
            ResultListBox.Items.Add(web.Title);
            ResultListBox.Items.Add(web.Lists.Count);
         }
      }
   }
}
The entry point into the Client Object Model is the client context. It is the remote of client version of the SPContext object. This is a disposable type, so it is wrapped in a using statement. We pass the URL the SharePoint site in ClientContext.
So now, we have our context. We need an object to represent the current site so that is var web = context.web.
Note − Remember, this object is just an empty shell, so we need to load the web objects by using context.load and pass the web object. This indicates that we want web objects properties to be populated in the next batch retrieval.
Next, we need to call context.ExecuteQuery and that actually kicks off the batch retrieval. We retrieve the property values from the server and add to list box.
When the above code is compiled and executed, you will see the following output −
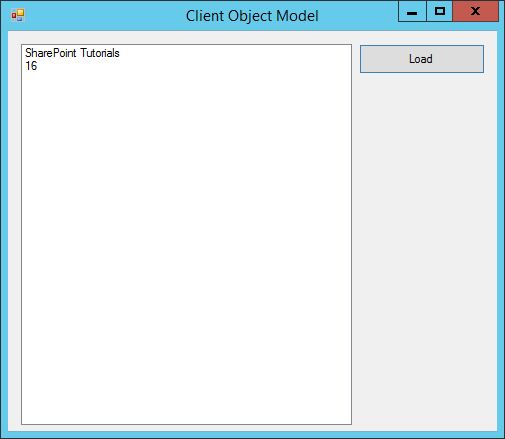
Click the Load button and you will see that we get both, the title and count of the lists.
It enables our project setup to use the Client Object Model to check the loading resources using the load method.
SharePoint - REST APIs
In this chapter, we will be covering the REST APIs. This is not a traditional API, where we have a set of libraries that contain types and those types contain properties and methods.
The REST API is implemented as Data-centric web service based on the Open Data Protocol or OData. The way these web services work, use each resource in the system is addressable by a specific URL that you pass off to the server.
Let us look at this in Internet Explorer in which SharePoint site is open.
Step 1 − If you are using Internet Explorer, go to Internet Explorer settings and on Content tab, select the settings for Feeds and Web Slices as shown in the screenshot below.
You will see the following dialog box. Make sure feed reading view is off and click OK.
Step 2 − Now let us change the URL to the site URL +/_api/web and press Enter.
Now you should get a view that looks like the following screenshot.
We want information about the current web or the current site. Therefore, the site URL +/_api is the base URL for the SharePoint 2013 REST API and web is our query. We want information about the current web.
We get an XML document back and if we scroll down, we will get information about our current web.
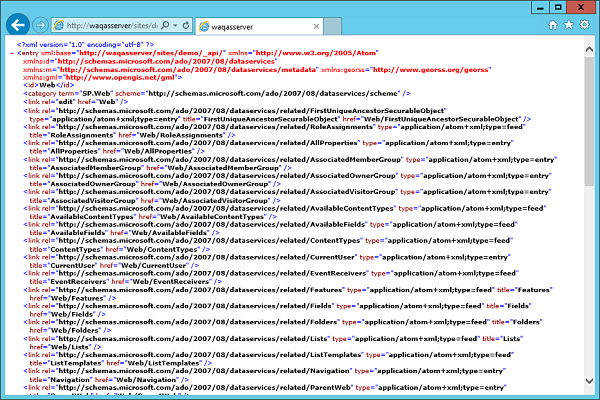
Next, if you want to know about the lists in the web, you can append the lists to your URL. Instead of information about an individual object, we will get a collection of information about all of the lists in the current site.
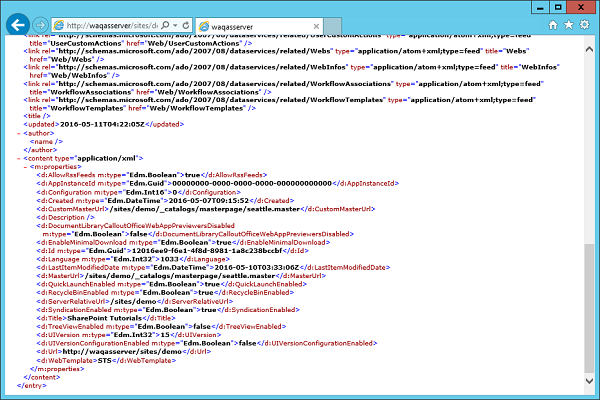
When we were using the browser, we were issuing get requests to the server, which means we want to retrieve information. However, we can also do the rest of the standard CRUD operations.
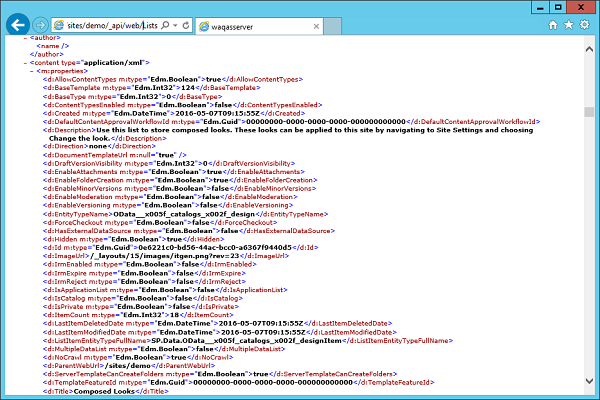
Retrieve Resources using REST API
The SharePoint 2013 REST API does not expose metadata. Therefore, when we are working with it in Managed Code, we cannot use Visual Studio to generate a service proxy using the service reference dialog. Instead, we can use a type like the web client of the http web request object to send a request up to the server and just get the raw results back.
Whether those results are returned as XML or JSON are determined by the accept header we send along with the request.
If we get back XML then we can use LINQ to XML to retrieve the information out of the response we need for our application.
If we get back JSON, then we can use one of the various JSON serializes to parse the JSON into .NET objects and then use that to retrieve the information we need.
When working with the REST API in JavaScript, we can use jQuery or the SP.RequestExecutor object to make the call up to the service. Just as in the Managed Code example, we can control whether we get back XML or JSON using the accept header. Since, we are working in JavaScript majority of times, we are going to want to get back JSON.
The one other thing to note is when you are building the URL to the service, we can use the _spPageContextInfo object to get the absolute URL from the site and then just append the service URL plus the query to it. This is because the REST API service does not expose metadata and you cannot create a service reference in Visual Studio, using the REST API in Managed Code is really a non-starter.
Let us take a look at calling the REST API from JavaScript by creating a new project.
Step 1 − Select App for SharePoint in middle pane and enter name for your project. Click OK.
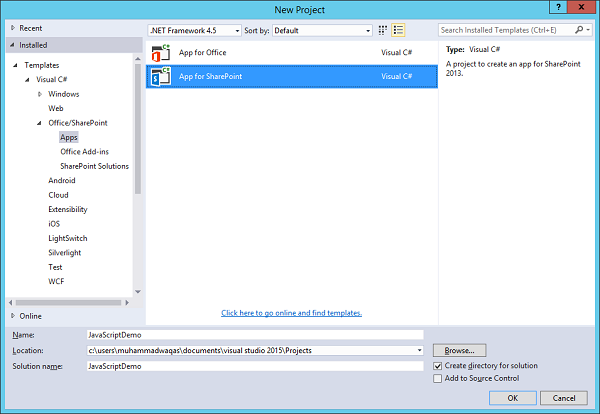
Step 2 − Enter your site URL and select the SharePoint – hosted option and click Next. Click Finish.
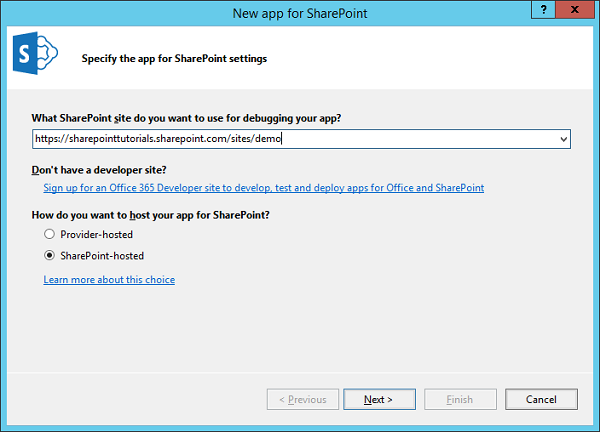
Step 3 − Once the project is created, let us open the Default.aspx page, which is under Pages in Solution Explorer and add one button.
Here is the complete implementation of the Default.aspx file.
<%-- The following 4 lines are ASP.NET directives needed when using SharePoint
   components --%>

<%@ Page Inherits = ”Microsoft.SharePoint.WebPartPages.WebPartPage,
   Microsoft.SharePoint, Version = 15.0.0.0, Culture = neutral,
   PublicKeyToken = 71e9bce111e9429c” MasterPageFile = ”~masterurl/default.master”
   Language = ”C#” %>

<%@ Register TagPrefix = ”Utilities” Namespace = ”Microsoft.SharePoint.Utilities”
   Assembly = ”Microsoft.SharePoint, Version = 15.0.0.0, Culture = neutral,
   PublicKeyToken = 71e9bce111e9429c” %>

<%@ Register TagPrefix = ”WebPartPages”
   Namespace = ”Microsoft.SharePoint.WebPartPages” Assembly = ”Microsoft.SharePoint,
   Version = 15.0.0.0, Culture = neutral, PublicKeyToken = 71e9bce111e9429c” %>

<%@ Register TagPrefix = ”SharePoint” Namespace = ”Microsoft.SharePoint.WebControls”
   Assembly = ”Microsoft.SharePoint, Version = 15.0.0.0, Culture = neutral,
   PublicKeyToken = 71e9bce111e9429c” %>

<%-- The markup and script in the following Content element will be placed in
   the <head> of the page --%>

<asp:Content ContentPlaceHolderID = ”PlaceHolderAdditionalPageHead”
   runat = ”server”>
   <script type = ”text/javascript” src = ”../Scripts/jquery-1.9.1.min.js”></script>
   <SharePoint:ScriptLink name = ”sp.js” runat = ”server” OnDemand = ”true”
      LoadAfterUI = ”true” Localizable = ”false” />
   <meta name = ”WebPartPageExpansion” content = ”full” />
   <!–Add your CSS styles to the following file ->
   <link rel = ”Stylesheet” type = ”text/css” href = ”../Content/App.css” />
   <!–Add your JavaScript to the following file ->
   <script type = ”text/javascript” src = ”../Scripts/App.js”></script>
</asp:Content>

<%-- The markup in the following Content element will be placed in the TitleArea
   of the page --%>

<asp:Content ContentPlaceHolderID = ”PlaceHolderPageTitleInTitleArea”
   runat = ”server”>
   Page Title
</asp:Content>

<%-- The markup and script in the following Content element will be placed in
   the <body> of the page --%>

<asp:Content ContentPlaceHolderID = ”PlaceHolderMain” runat = ”server”>
   <div>
      <p id = ”message”>
         <!–The following content will be replaced with the user name when
            you run the app – see App.js -> initializing…
      </p>
      <input id = ”loadButton” type  = ”button” value = ”Load” />
   </div>
</asp:Content>
Step 4 − Open the App.js file, which is under Script in Solution Explorer and replace it with the following code.
JQuery(document).ready(function () {
   JQuery("#loadButton").click(usingLoad)
});

function usingLoad() {
   var context = SP.ClientContext.get_current();
   var web = context.get_web();
   context.load(web);
   context.executeQueryAsync(success, fail);

   function success() {
      var message = jQuery("#message");
      message.text(web.get_title());
      message.append("<br/>");
      message.append(lists.get_count());
   }
   function fail(sender, args) {
      alert("Call failed. Error: " + args.get_message());
   }
}
We are using jQuery to create the document.ready function. Here, we just want to attach the click event handler to the button. Hence, we have used the selector to get the loadButton and then we have added the click event-handler using Load.
So when we click the button, we want to do the same thing we did in the managed version of the demo, we want to show the Title of the web.
Step 5 − Publish your application and you will see the following file −
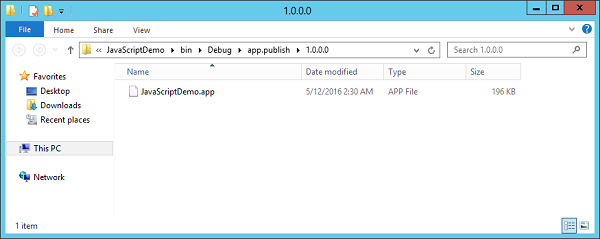
Step 6 − Drag this file to your SharePoint site apps page.
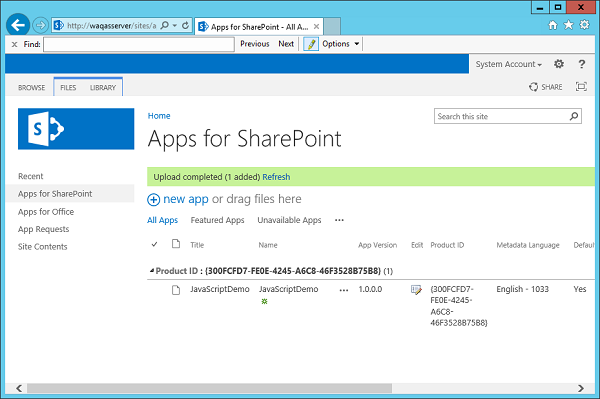
You will see the file JavaScriptDemo in the list.
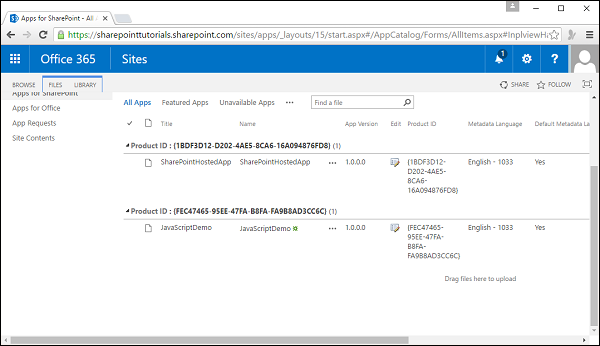
Step 7 − Click on the Site Contents in the left pane and then select add an app. Click the JavaScriptDemo icon.
Step 8 − Click Trust it.
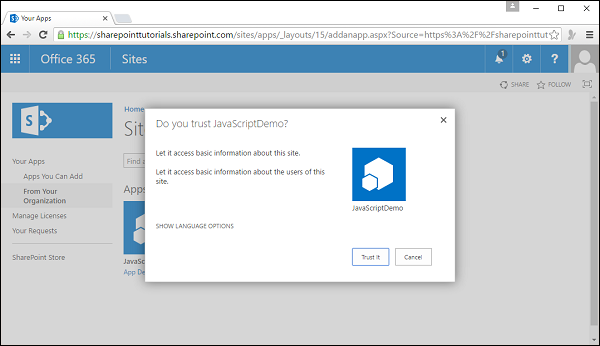
Step 9 − Now you will see your app. Click the app icon.
Step 10 − When you click the Load button, it will update the text.
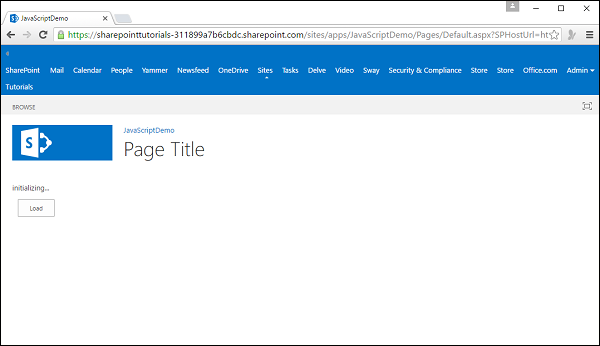
You can see the updated text.
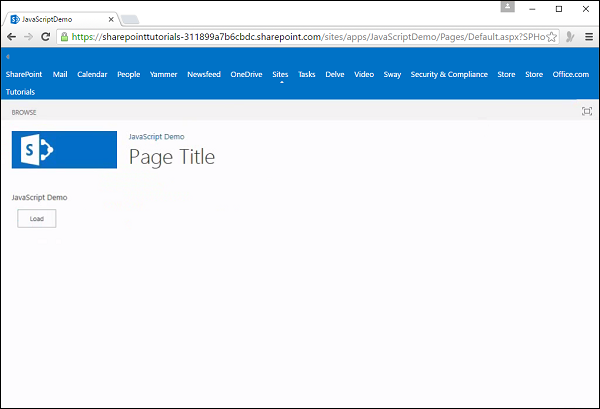
SharePoint - Features & Elements
In this chapter, we will take a look at features and elements. Features are in some ways the component model in SharePoint. They allow you to define logical units of functionality.
For example, you might want to have the ability within a site −
To create a list with a specific schema,
Have a page that will show the data from that list, and then
Have a link or a menu option somewhere within the site to navigate to that page.
You could create a feature, which defines that logical grouping of functionality. The individual pieces of functionality are defined by elements.
So there would be an element which −
Creates the list and sets the schema.
Provisions the page into your SharePoint site, and
Creates the menu option or the link.
The feature defines the unit and then the elements define the individual pieces of functionality inside of that unit. We discussed about the three kinds of elements −
A list instance to create a list.
A module to provision a page.
A custom action to create a menu option or a link.
However, there are many other kinds of elements that can be created within SharePoint. Another important concept to understand about features is that of activation and deactivation.
For example, if an end user wants the above-mentioned functionality to be added to his site, he would activate the corresponding feature that would create the list, add the menu option or link, and provision the page into their site. Later he could deactivate the feature to remove the functionality.
It is important to note that on deactivation of a feature, some elements are automatically removed. For example, SharePoint would automatically remove the menu option or link, which is defined by a custom action.
Others are not removed automatically. Therefore, in our case, the list instance and the page would not be removed automatically.
Hence, as a developer, you need to understand what elements get removed automatically and which ones do not. If you want to remove the ones that do not get removed automatically, you can write in code in a feature receiver.
Let us look at the working with features and elements. We will start with the end users view of features.
Step 1 − Open your SharePoint site.
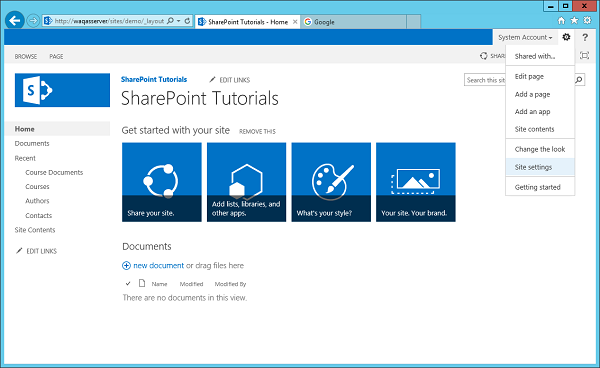
Step 2 − To go to the Site settings, you have two links that enable you to manage features.
The first link Manage Site features is under Site Actions, which enables you to manage site scope features.
The other link Site collection features under Site Collection Administration, which enables you to manage site collection scope features.
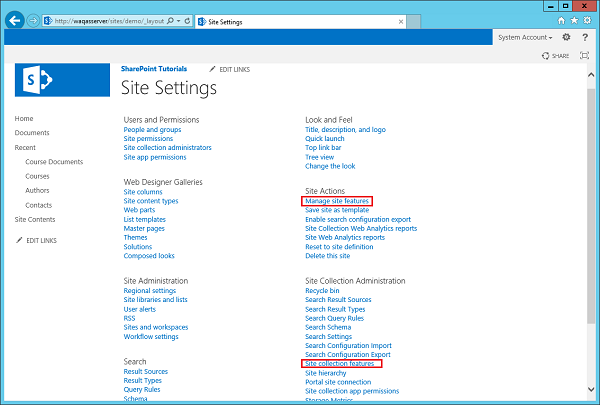
Step 3 − If you click on either of these links, you will be taken to a page, which shows the currently active and inactive features. For each of the features, you have an option to activate or deactivate the feature.
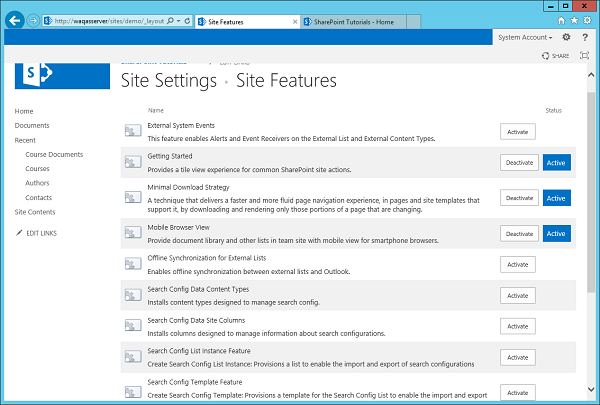
Let us look at a simple example by creating a new SharePoint Solutions Empty Project.
Step 1 − Let us call this FeaturesAndElements and click OK.
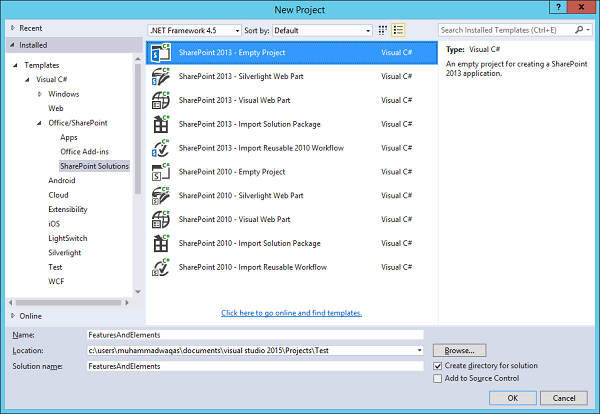
Step 2 − Specify the site you want to use and select the Deploy as a farm solution option and then click Finish.
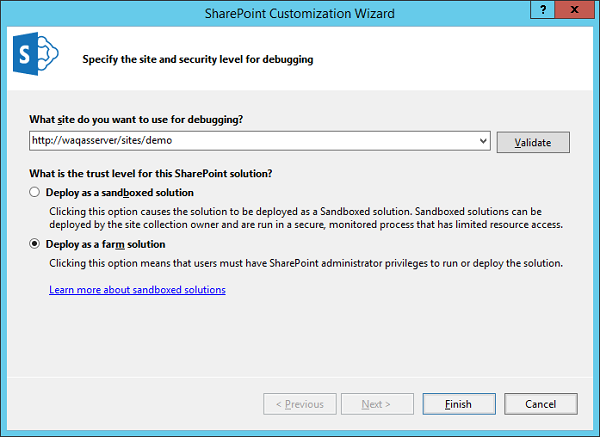
The first thing we want to create is the feature. In the Solution Explorer, you can see a Features folder, which is currently empty.
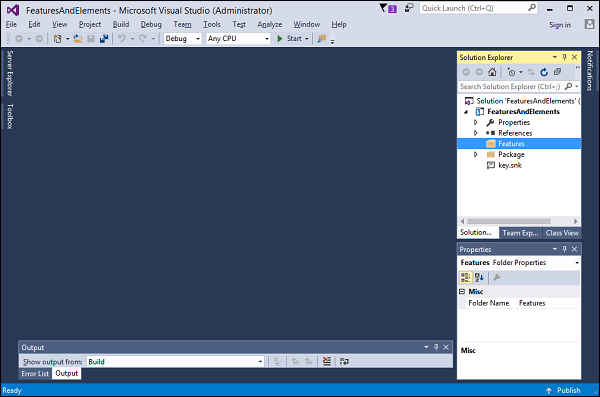
Step 3 − Right-click on the Features folder and choose Add Feature. It creates a Feature named Feature1, and it opens up the Feature designer. The default Title is the title of project, plus the title of the feature.
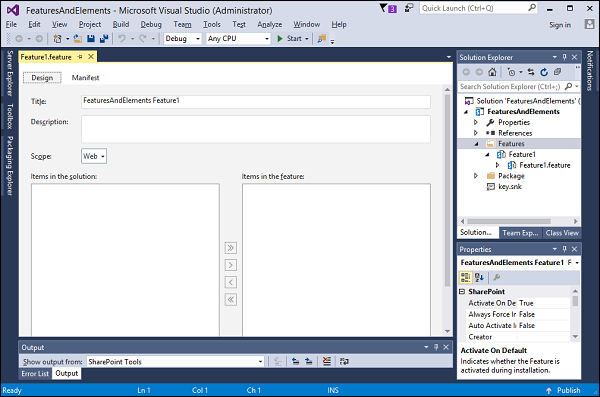
Step 4 − Rename the feature from Feature1 to Sample.
Title and Description are what the user sees in the page where they activate and deactivate the features.
Set the Title to Sample Feature and the Description to Adds the Contacts list and the page is used to view the list. The other thing we need to set is the Scope of the feature, which is the activation scope.
It can be Farm, a WebApplication, a Site collection or a Site. In this case, we are going to provision a list and a page. Since, both live in a SharePoint site, so we will pick Web here.
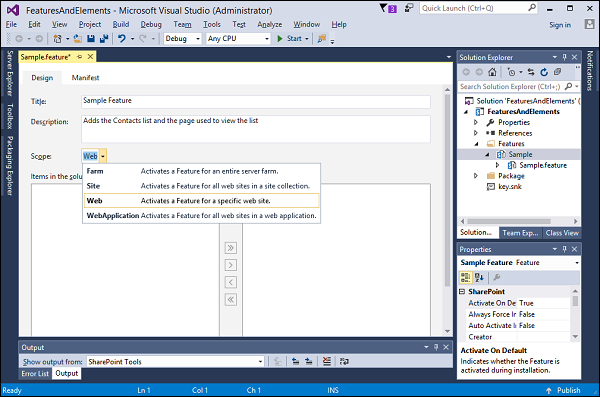
Step 5 − Let us start adding features in our elements. The first element will be the list and we will create a contacts list. Right-click on your project and choose Add → New Item...
Step 6 − Select List in the middle pane and enter Contacts in the name field. Click Add.
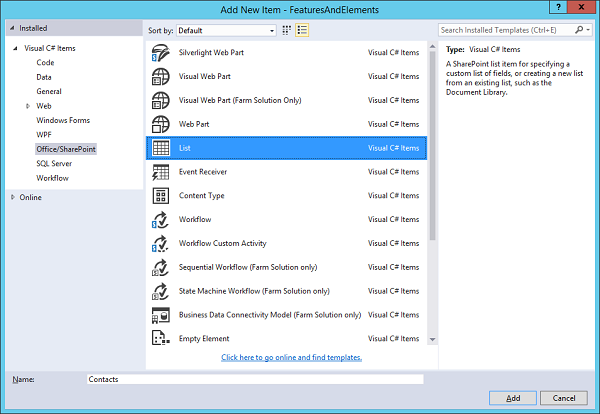
Step 7 − You will see the List Creation Wizard. Create a list called Contacts based on the Contacts list. Click Finish to create the list or at least create the element, which will eventually create the list.
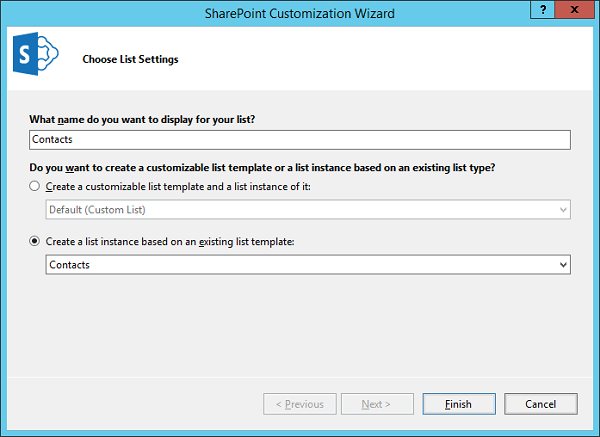
Given below is the screenshot of the list designer.
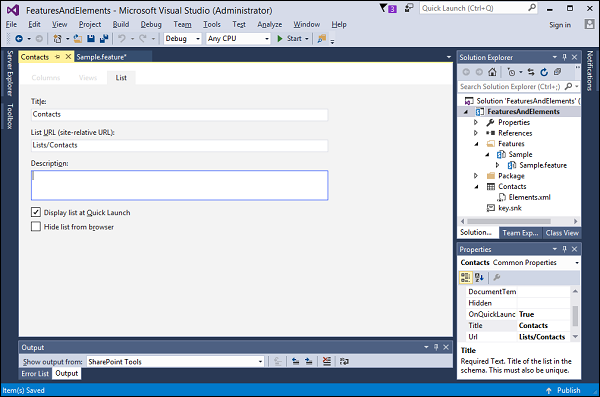
Step 8 − This designer is just an XML editor. Open the file Elements.xml under Contacts and add the following data.
<?xml version = "1.0" encoding = "utf-8"?>

<Elements xmlns = "https://schemas.microsoft.com/sharepoint/">
   <ListInstance Title = "Contacts" OnQuickLaunch = "TRUE" TemplateType = "105"
      FeatureId = "00bfea71-7e6d-4186-9ba8-c047ac750105"
      Url = "Lists/Contacts" Description = "">
      <Data>
         <Rows>

            <Row>
               <Field Name = "ID">1</Field>
               <Field Name = "Last Name">Anders</Field>
               <Field Name = "First Name">Maria</Field>
               <Field Name = "Company">Alfreds Futerkiste</Field>
               <Field Name = "Business Phone">030-0074321</Field>
            </Row>

            <Row>
               <Field Name = "ID">2</Field>
               <Field Name = "Last Name">Hardy</Field>
               <Field Name = "First Name">Thomas</Field>
               <Field Name = "Company">Around the Horn</Field>
               <Field Name = "Business Phone">(171) 555-7788</Field>
            </Row>

            <Row>
               <Field Name = "ID">3</Field>
               <Field Name = "Last Name">Lebihan</Field>
               <Field Name = "First Name">Laurence</Field>
               <Field Name = "Company">Bon app'</Field>
               <Field Name = "Business Phone">91.24.45.40</Field>
            </Row>

            <Row>
               <Field Name = "ID">4</Field>
               <Field Name = "Last Name">Ashworth</Field>
               <Field Name = "First Name">Victoria</Field>
               <Field Name = "Company">B's Beverages</Field>
               <Field Name = "Business Phone">(171) 555-1212</Field>
            </Row>

            <Row>
               <Field Name = "ID">5</Field>
               <Field Name = "Last Name">Mendel</Field>
               <Field Name = "First Name">Roland</Field>
               <Field Name = "Company">Ernst Handel</Field>
               <Field Name = "Business Phone">7675-3425</Field>
            </Row>

         </Rows>
      </Data>
   </ListInstance>
</Elements>
Note the following −
Inside the ListInstance element, we have an element called Data and it has some rows inside it.
ListInstance will have attributes Contacts, whether or not we show in the quick launch.
We want a list based on contact template. Here, TemplateType is set to 105. This is not a random number but a number with a meaning.
Each of the default kinds of list you can have in SharePoint such as an Announcements list, a Task list, a Contacts list and so on, has a number associated with it. Therefore, if you change 105 to 107, you will get a different kind of list.
FeatureId is the guide associated with the definition of contacts list.
Step 9 − Now we want to have a page, which shows data from this list. Right-click on your project and choose Add → New Item... Choose Module in the middle pane, enter SitePage in the name field, and click Add.
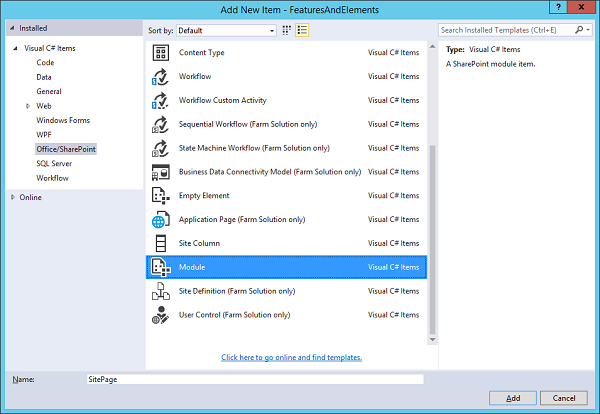
You will see a node called SitePage, which has two files, Elements.xml and Sample.txt file. We do not want to provision this sample.txt file, but we want to provision a SitePage.
Step 10 − Rename the text file to Contacts.aspx and replace the following code −
<%@ Assembly Name = "Microsoft.SharePoint, Version = 14.0.0.0, Culture = neutral,
   PublicKeyToken = 71e9bce111e9429c" %>

<%@ Page MasterPageFile = "~masterurl/default.master"
   meta:progid = "SharePoint.WebPartPage.Document" %>

<%@ Register TagPrefix = "SharePoint"
   Namespace = "Microsoft.SharePoint.WebControls"
   Assembly = "Microsoft.SharePoint, Version = 14.0.0.0, Culture = neutral,
   PublicKeyToken = 71e9bce111e9429c" %>

<asp:Content ID = "Content2" runat = "server" ContentPlaceHolderID = "PlaceHolderMain">
   <SharePoint:SPDataSource runat = "server"
      ID = "ContactsDataSource" DataSourceMode = "List"
      UseInternalName = "false">
      <SelectParameters>
         <asp:Parameter Name = "ListName" DefaultValue = "Contacts" />
      </SelectParameters>
   </SharePoint:SPDataSource>

   <SharePoint:SPGridView runat = "server"
      ID = "ContactsGridView" DataSourceID = "ContactsDataSource"
      AutoGenerateColumns = "false" RowStyle-BackColor = "#DDDDDD"
      AlternatingRowStyle-BackColor = "#EEEEEE">
      <Columns>
         <asp:BoundField HeaderText = "Company"
            HeaderStyle-HorizontalAlign = "Left" DataField = "Company" />
         <asp:BoundField HeaderText = "First Name"
            HeaderStyle-HorizontalAlign = "Left" DataField = "First Name" />
         <asp:BoundField HeaderText = "Last Name"
            HeaderStyle-HorizontalAlign = "Left" DataField = "Last Name" />
         <asp:BoundField HeaderText = "Phone"
            HeaderStyle-HorizontalAlign = "Left" DataField = "Business Phone" />
      </Columns>
   </SharePoint:SPGridView>
</asp:Content>

<asp:Content ID = "PageTitle" ContentPlaceHolderID = "PlaceHolderPageTitle"
   runat = "server">
   Contacts
</asp:Content>

<asp:Content ID = "PageTitleInTitleArea"
   ContentPlaceHolderID = "PlaceHolderPageTitleInTitleArea" runat = "server" >
   Contacts
</asp:Content>
The SitePage has an SP.DataSource file, which we will use to make the Contacts list data, something we can bind to in our page. The SP.GridView will show the Contacts information.
That is our SitePage and now let us look at the Feature.

Notice, in Items in the Feature, Contacts list instance and Module provision on our SitePage have been added as elements.
Visual Studio understands that elements on their own cannot do anything. Elements need to be a part of a Feature. Hence, when you add an element, you need to add it into the feature.
Step 11 − Go to your project and right-click, and choose Add → New Item...
Here we want to add a CustomAction, so select Empty Element in the middle pane, call this Action and then click Add.
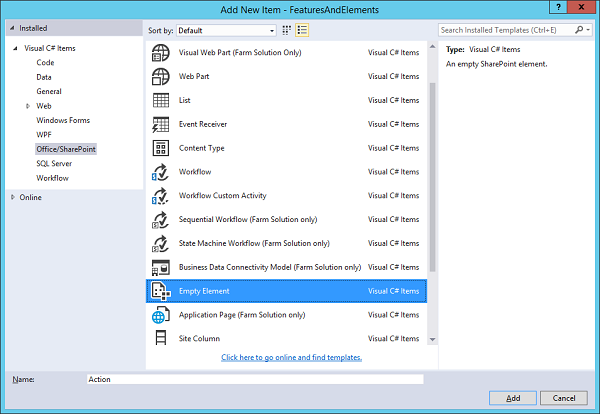
If you come back to your Feature, you can see that the element has now been added to Feature as shown in the screenshot given below.
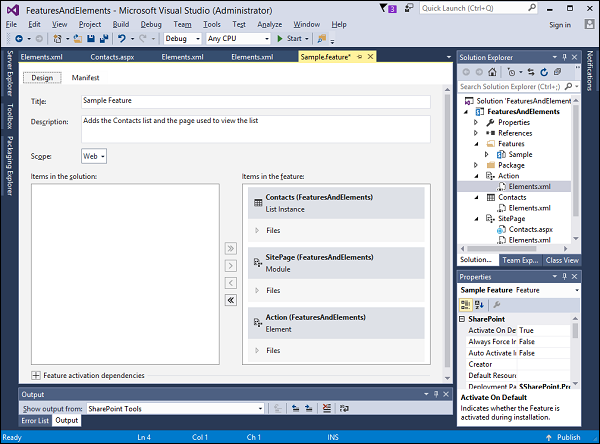
Step 12 − Come back to Elements.xml under Action and replace the following code −
<?xml version = "1.0" encoding = "utf-8"?>

<Elements xmlns = "https://schemas.microsoft.com/sharepoint/">
   <CustomAction
      Id = "SiteActionsToolbar"
      GroupId = "SiteActions"
      Location = "Microsoft.SharePoint.StandardMenu"
      Sequence = "100"
      Title = "Contacts"
      Description = "A page showing some sample data">
      <UrlAction Url = "~site/SitePages/Contacts.aspx"/>
   </CustomAction>
</Elements>
Now if you want to add a link or a menu option, you need to define where you are going to add it and it is a combination of the Location and GroupId, which define them. This combination of values indicates that the menu option should be added to the SiteActions menu.
There are many other combinations of values, which add the link or the menu in other places within our SharePoint site. This is something you would have to research to find out what is the proper combination of values that you need when you want to add a menu option somewhere within SharePoint.
Step 13 − Double click on the Feature, you will see the Feature designer. Feature designer is a fancy editor of the Feature Manifest, which is an XML document.
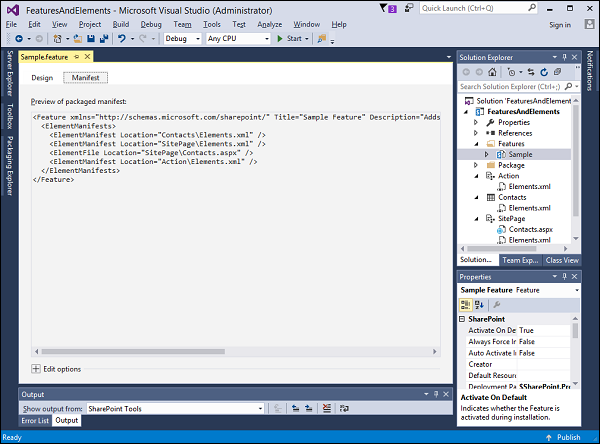
Important points −
The feature defines the logical grouping of elements. Here, our Feature is referring to our three Element manifests that we have just created.
When you activate the Feature, SharePoint will look at the individual Element manifest and add the list, the page, and the link into our SharePoint site.
When you deploy using Visual Studio, it automatically activates any Features in your project. Since, we want to go through the process of activating the Feature, we are going to tell Visual Studio not to do that.
Step 14 − Go to the Project Properties by going to the SharePoint tab. Change the Deployment Configuration to No Activation.
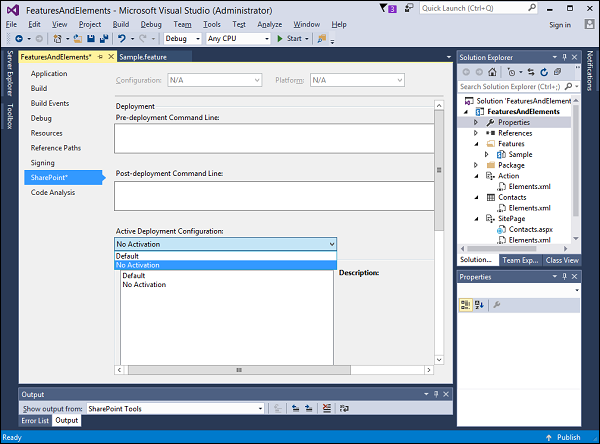
Let us test this.
Step 15 − Right-click on your project in Solution Explorer and choose Deploy. It will package up all the stuff in your project and deploy it out to your SharePoint Development Farm.
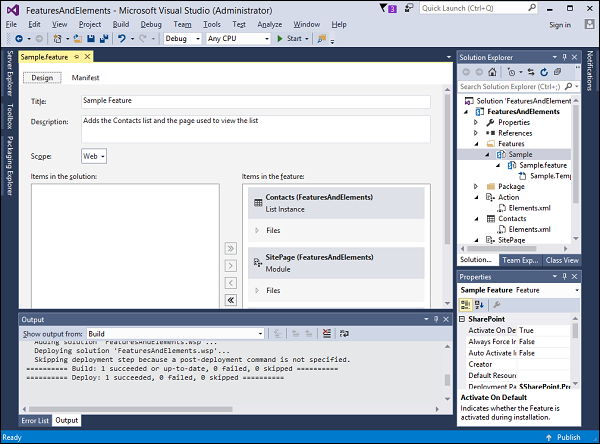
Once it is deployed successfully, you will see it in the Output window.
Step 16 − Go to the SharePoint site and Refresh it. Go to the Site Settings → Site Actions.
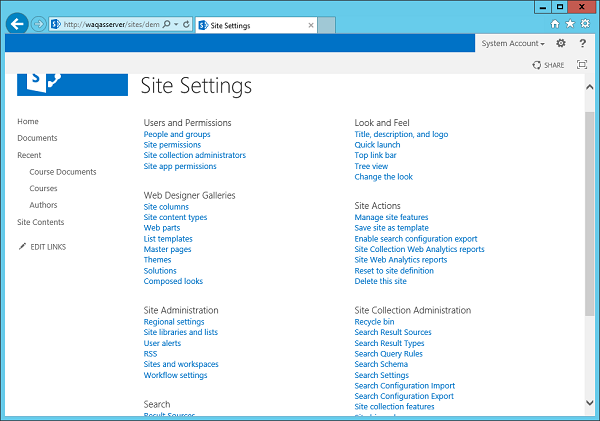
Step 17 − Select the Manage site features because your Custom Feature was Web scoped and you will see your Sample Feature. You can see that this feature has not been activated, so let us go ahead and activate it.
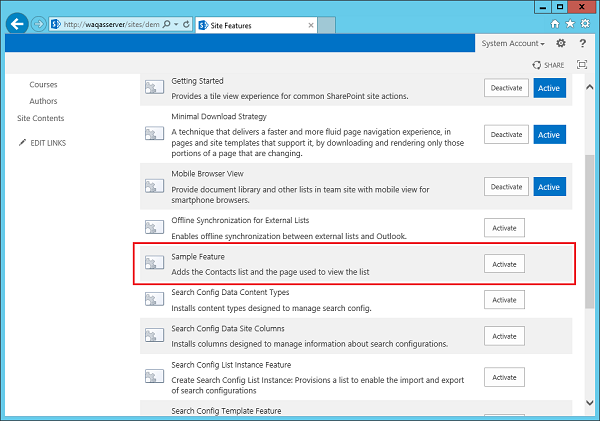
You will see the Contacts list in the left pane.
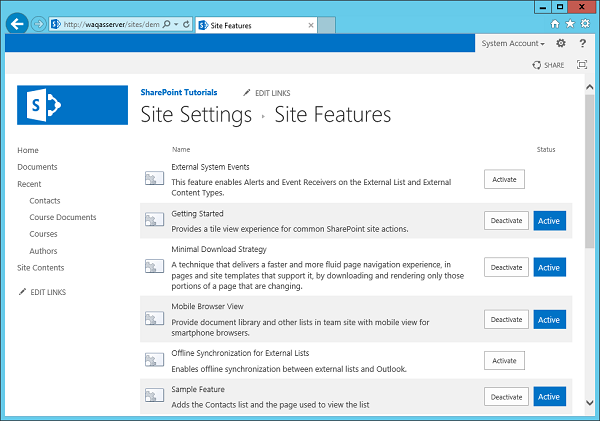
Step 18 − Click Contact and the data that we had in the list will be displayed.
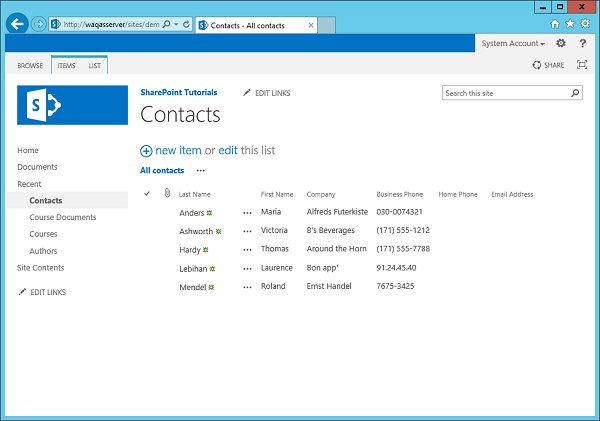
Step 19 − Go to Site actions menu. There is an option to navigate to the Contacts page. That is our CustomAction.
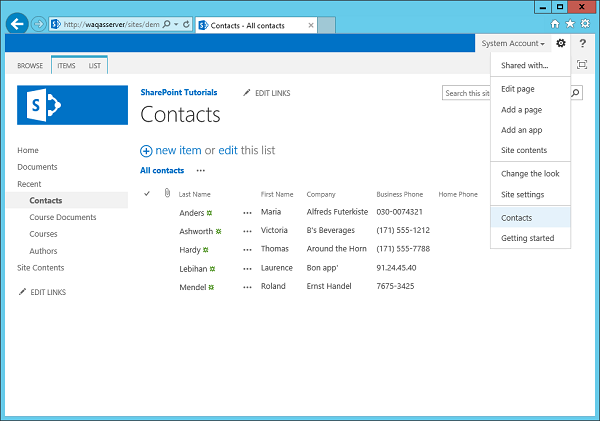
Step 20 − If you click Contacts, then you will see your SitePage, showing the data from the Contacts list.
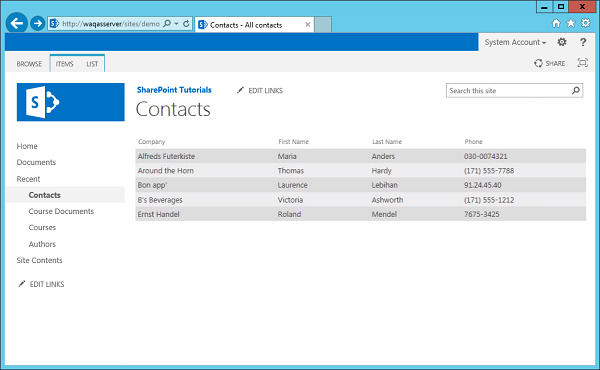
SharePoint - Feature\Event Receiver
In this chapter, we will learn to add code handle. Code handles are events that are raised when a Feature is activated or deactivated. In other words, we will be examining Feature Receivers.
The Visual Studio project that we created in the last chapter had one Feature and when it was activated, it provisioned our Contacts list, our SitePage, and the link to the SitePage.
However, when the Feature is deactivated, SharePoint only removes the link, the SitePage and the Contacts list still remain.
We can write the code when the Feature is deactivated to remove the list and the page, if we want to. In this chapter, we will learn how to remove content and elements, when a Feature is deactivated.
To handle the events for a Feature, we need a Feature Receiver.
Step 1 − To get Feature receiver, right-click on the Feature in the Solution Explorer and then choose Add Event Receiver.
using System;
using System.Runtime.InteropServices;
using System.Security.Permissions;
using Microsoft.SharePoint;

namespace FeaturesAndElements.Features.Sample {
   /// <summary>
      /// This class handles events raised during feature activation, deactivation,
         installation, uninstallation, and upgrade.
   /// </summary>
   /// <remarks>
      /// The GUID attached to this class may be used during packaging and should not be modified.
   /// </remarks>
   [Guid("e873932c-d514-46f9-9d17-320bd3fbcb86")]

   public class SampleEventReceiver : SPFeatureReceiver {
      // Uncomment the method below to handle the event raised after a feature has been activated.
      //public override void FeatureActivated(SPFeatureReceiverProperties properties)//{
         //
      }
      // Uncomment the method below to handle the event raised before a feature is deactivated.
      //public override void FeatureDeactivating(SPFeatureReceiverProperties properties)// {
         //
      }
      // Uncomment the method below to handle the event raised after a feature has been installed.
      //public override void FeatureInstalled(SPFeatureReceiverProperties properties)// {
         //
      }
      // Uncomment the method below to handle the event raised before a feature is uninstalled.
      //public override void FeatureUninstalling(SPFeatureReceiverProperties properties)// {
         //
      }
      // Uncomment the method below to handle the event raised when a feature is upgrading.
      //public override void FeatureUpgrading(SPFeatureReceiverProperties
         properties, string upgradeActionName,
         System.Collections.Generic.IDictionary<string, string> parameters) // {
         //
      }
   }
}
You can see what we get is a class that inherits from SPFeatureReceiver.
In SharePoint, there are different classes for different kinds of events you can handle. For example, events on lists, events on list items, events on sites. You can create a class that is derived from a specific event receiver and then you can override methods inside of that class to handle the events.
The Events of a Feature are used when it is being −
- Activated
- Deactivated
- Installed
- Uninstalled
- Upgrading
Next, you need to attach that class as the event handler for the specific item. For example, if there is an event handler that handles list events, you need to attach that class to the list.
Therefore, we will handle two Features −
When the feature is activated and
When it is being deactivated.
Step 2 − We will implement the FeatureActivated and FeatureDeactivated methods as shown below −
using System;
using System.Runtime.InteropServices;
using System.Security.Permissions;
using Microsoft.SharePoint;

namespace FeaturesAndElements.Features.Sample {
   /// <summary>
      /// This class handles events raised during feature activation, deactivation,
         installation, uninstallation, and upgrade.
   /// </summary>
   /// <remarks>
      /// The GUID attached to this class may be used during packaging and should
         not be modified.
   /// </remarks>

   [Guid("e873932c-d514-46f9-9d17-320bd3fbcb86")]
   public class SampleEventReceiver : SPFeatureReceiver {
      private const string listName = "Announcements";

      public override void FeatureActivated(SPFeatureReceiverProperties properties) {
         var web = properties.Feature.Parent as SPWeb;

         if (web == null) return;
         var list = web.Lists.TryGetList(listName);

         if (list != null) return;
         var listId = web.Lists.Add(listName, string.Empty,
         SPListTemplateType.Announcements);
         list = web.Lists[listId];
         list.OnQuickLaunch = true;
         list.Update();
      }
      public override void FeatureDeactivating(SPFeatureReceiverProperties properties) {
         var web = properties.Feature.Parent as SPWeb;

         if (web == null) return;
         var list = web.Lists.TryGetList(listName);

         if (list == null) return;
         if (list.ItemCount == 0) {
            list.Delete();
         }
      }
   }
}
Note −
When the feature is activated, we will create an Announcements list.
When the feature is deactivated, we will check to see if the Announcements list is empty and if it is, we will delete it.
Step 3 − Now right-click on the Project and choose deploy. You will see the following Deployment Conflict warning.
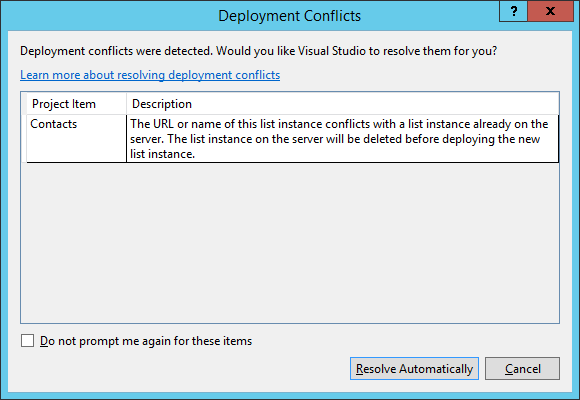
Visual Studio is telling us that we are trying to create a list called contacts, but there is already a list in the site called Contacts. It is asking us if we want to overwrite the existing list, and in this case click Resolve.
Step 4 − Go back to SharePoint and then refresh your site and go to Site Actions → Site settings → Manage site features → Sample feature.
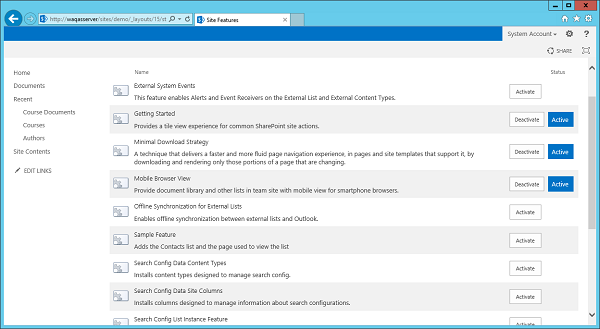
You can see that there are no announcements list in the left pane.
Step 5 − Let us Activate Sample feature and you will see the Announcements list, but it is empty right now.
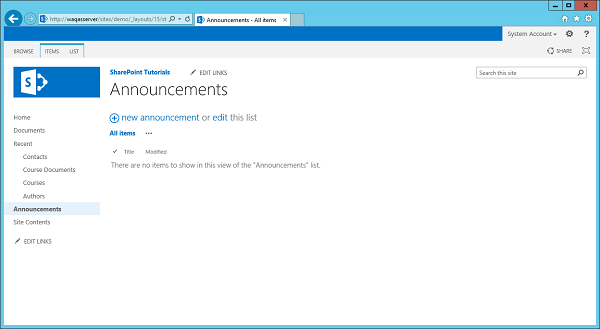
Note − If you deactivate your Sample Feature then you will notice that the Announcements list goes away.
Step 6 − Let us reactivate the feature. Go to Announcements and then Add a new announcement. We will call this Test and then click Save.
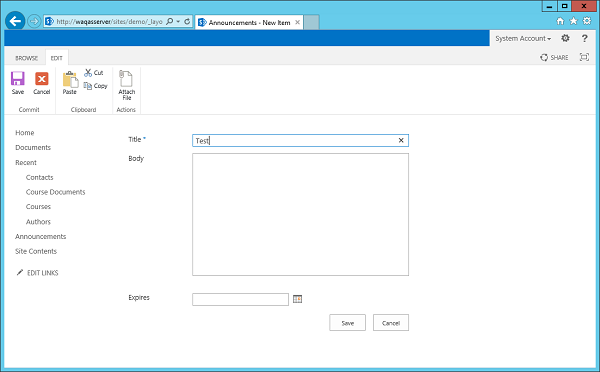
You will see the Test file under Announcements.
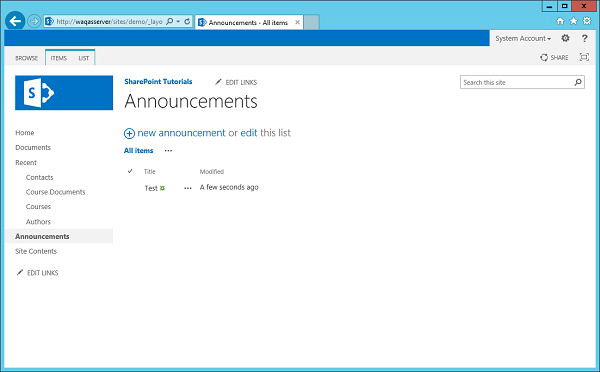
Now when you Deactivate Announcements, you will see that the Announcements list stays because it was not empty.
SharePoint - Azure Platform
In this chapter, we will be covering the Microsoft Azure Platform. Microsoft Azure is Microsoft’s cloud platform technology, which is in itself a very powerful technology. It is not just a place to deploy your code, but it is a whole set of services exists that you as a developer can use in your SharePoint solution development.
Cloud Computing
To understand Microsoft Azure, you must first know a bit about the cloud. Cloud computing is all about leveraging the Web as a set of resources for the development and deployment of your solutions. Traditionally, cloud computing has been defined as categories of services. They are −
- Infrastructure as a Service (IAAS)
- Platform as a Service (PAAS)
- Software as a Service (SAAS)
Each one of these categories is different in the context of development. For instance, you might think −
IAAS as hosted virtual machines (VMs) you manage remotely.
PAAS as where you deploy code, data, binary large objects (BLOBs), web apps, and other application artifacts to a cloud-based environment (such as Windows Server 2012 R2 and IIS).
SAAS as subscription-based services that you can sign up to use, for example, Office 365.
Although these three categories of services dominate the way in which the cloud is characterized, the cloud has four generally accepted pillars −
Pool resources with other cloud users.
Manage your own services and apps through the management portal.
Apps and services can grow and contract with your business needs.
Pay for only what you use in regards to the cloud.
Azure Platform Overview
The Microsoft Azure platform is composed of many different services. You can leverage them in your application design, deployment, and management such as Data, Service, and Integration, which is the Client layer in any application that consumes the services within Microsoft Azure.
Data Layer
In Data layer there are number of different types of data storage mechanisms or features that map directly to data storage which contains both non-relational and relational.
Non-relational Feature
The non-relational storage features enable you −
To store assets such as virtual machine images or images or videos in Blobs
Create non-relational tables
Manage message queues along a service bus, and manage data caching in your distributed applications
Relational Feature
The relational data features are as follows −
The core Azure SQL Database, which is the cloud version for the on-premises SQL Server
Reporting services (SQL Reporting)
The ability to stream near real-time data streams from data transactions (Stream Insight)
Services Layer
The Services layer contains a number of default services that you can use when building your solutions, ranging from Media Services to core Cloud Services such as −
Creating websites
Worker role classes
Leveraging Hadoop on Microsoft Azure to process Big Data requests
For many of these services, you can use baked-in functionality and a set of APIs within your application. For example, if you want to build a multimedia learning solution, you could leverage the Media Services −
To upload WMVs
Transcode them to MP4s
Save them to BLOB storage
Create a public URL for access and then stream them from Microsoft Azure
Integration Layer
The Integration layer contains some fundamental services such as −
Geo-replicated content delivery network (CDN)
Traffic Manager
Virtual Private Network, which enables you to connect a virtual machine to your on-premises system
Workflow and business process and integration services
All of these capabilities enable you to integrate systems or secure them.
Azure Apps
Microsoft Azure is not just about services. Azure is an ever-evolving cloud platform that has a set of tools and SDKs that enable you to get started with the developing of cloud applications quickly.
To start with Microsoft Azure you need the following −
- Visual Studio latest
- Microsoft Azure subscription
- Microsoft Azure subscription
Step 1 − Let us have a look at a simple example in which we will deploy our web application to Microsoft Azure by creating a new ASP.NET MVC application.
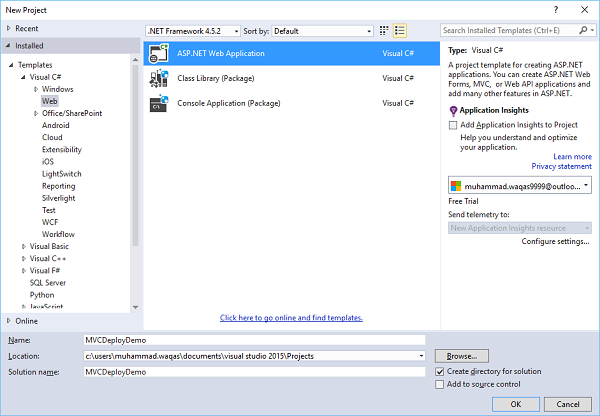
Step 2 − Click Ok and you will see the following dialog box. Select MVC template, check Host in the Cloud checkbox and then click OK.
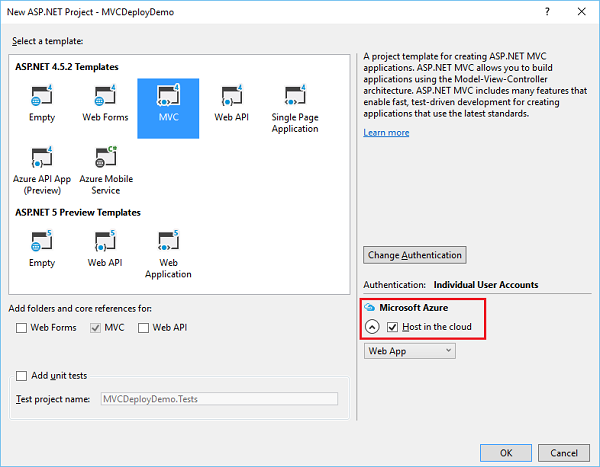
Step 3 − When the Configure Microsoft Azure Web App Settings dialog appears, make sure that you are signed in to Azure. If you are not signed in, then first sign in.
You can see the default name, but you can change the Web App name.
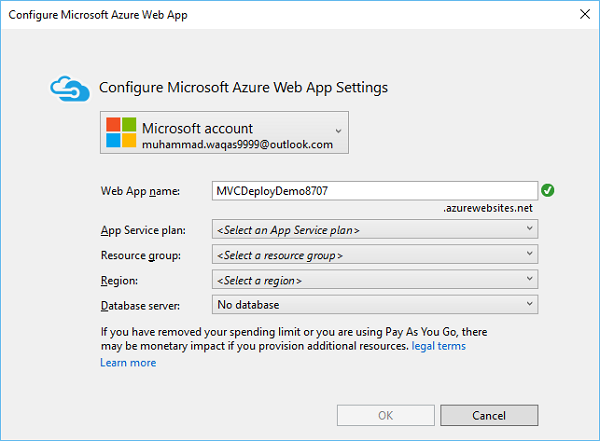
Step 4 − Enter the desired information as shown below. Select Create new server from the Database server dropdown list.

Step 5 − You will see the additional field. Enter the Database server, username and password and click Ok.
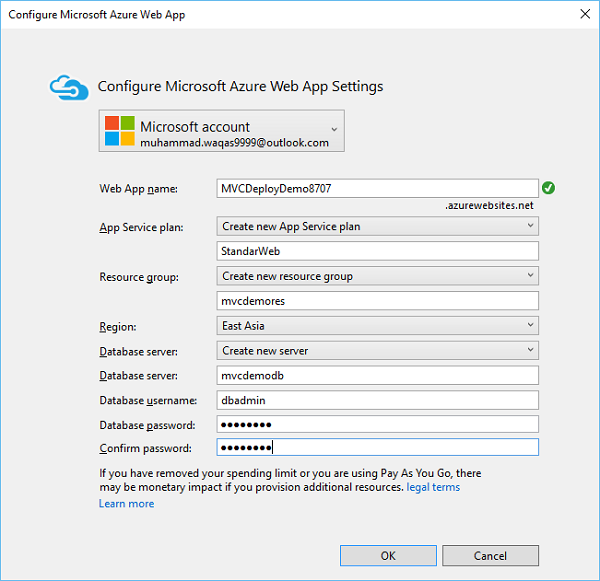
Once the project is created, run you application and you will see that it is running on localhost.
Step 6 − To deploy these applications to Azure, right-click on the project in solution explorer and select Publish.
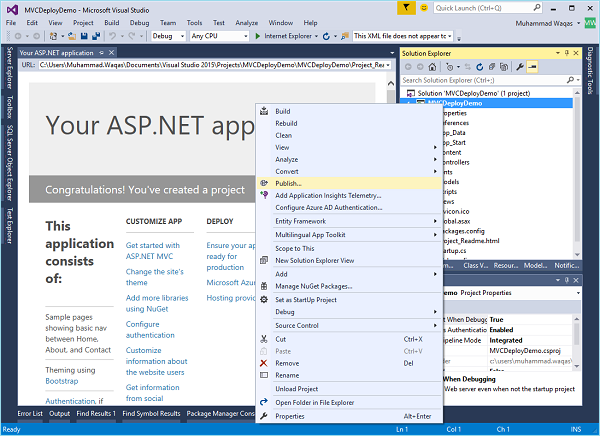
Step 7 − You will see the following dialog box. Click the Microsoft Azure Web Apps.

Step 8 − Select your application name from the Existing Web Apps and click OK.
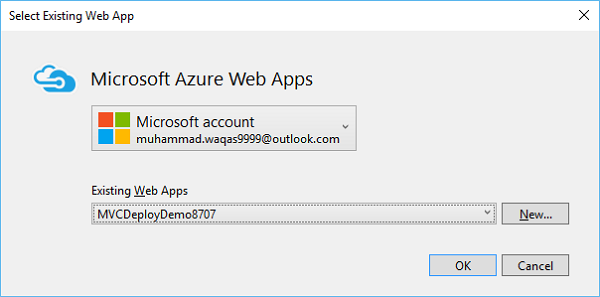
Step 9 − Click the Validate Connection button to check for the connection on Azure.
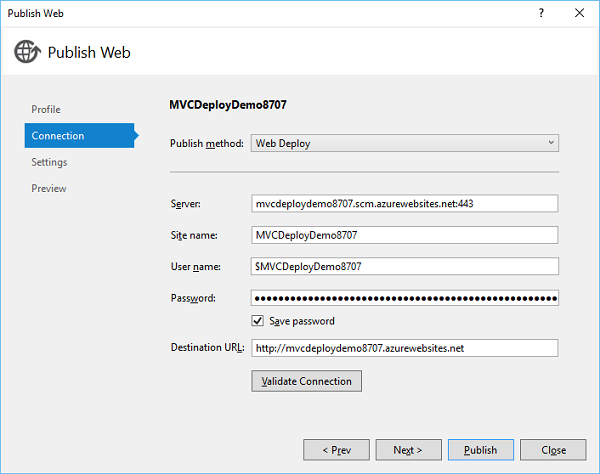
Step 10 − Click Next to continue.

Now you will see that the connection string is generated for you already, by default.
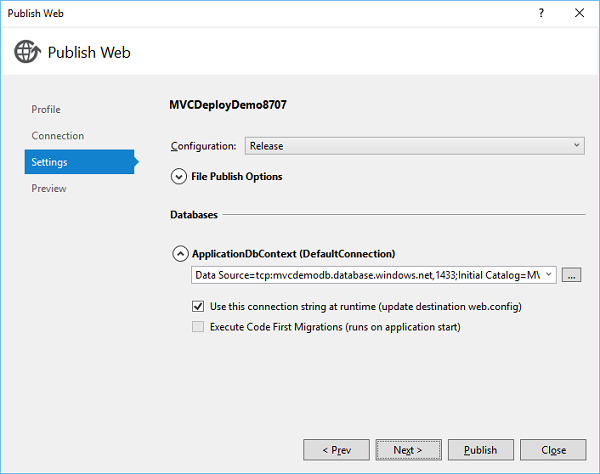
Step 11 − Click Next to continue.
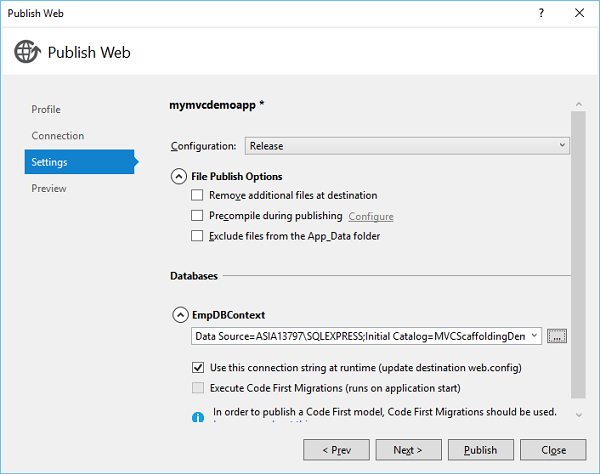
Step 12 − To check all the files and dlls, which we will be publishing to Azure, click Start Preview.

Step 13 − Click Publish to publish your application.
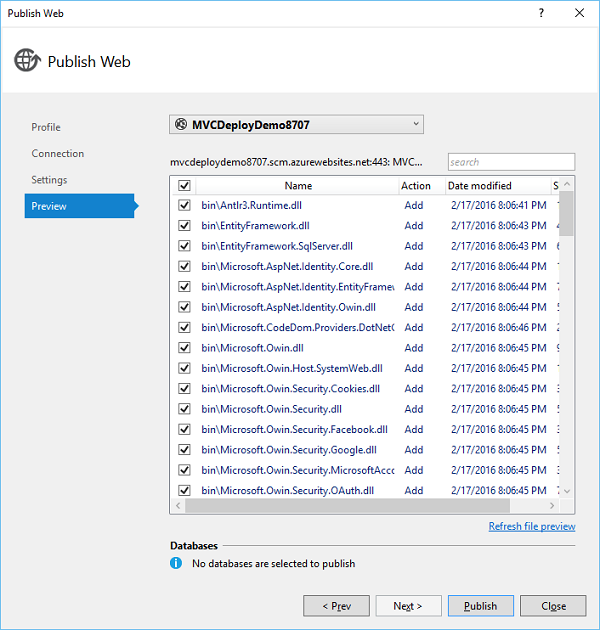
Once the application is successfully published to Azure, you will see the message in output window.
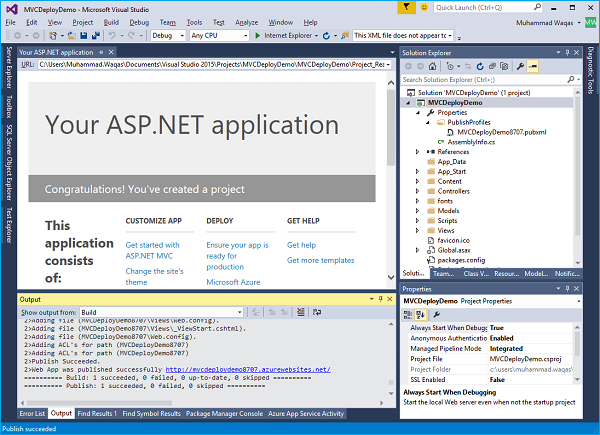
You will also see that your application is now running from the cloud.
Now let us go to the Azure portal again and you will see the app here as well.
SharePoint Apps and Microsoft Azure
SharePoint and Microsoft Azure are two sizeable platforms unto themselves. SharePoint is one of Microsoft’s leading server productivity platforms or the collaborative platform for the enterprise and the Web.
Microsoft Azure is Microsoft’s operating system in the cloud. Separately, they have their own strengths, market viability, and developer following.
Together, they provide many powerful benefits. They are −
They help expand how and where you deploy your code and data.
They increase opportunities to take advantage of the Microsoft Azure while at the same time reducing the storage and failover costs of on-premises applications.
They provide you with new business models and offerings that you can take to your customers to increase your own solution offerings.
In SharePoint 2010, Azure and SharePoint were two distinct platforms and technologies, which could be integrated easily enough, but they were not part of the same system. However, in SharePoint 2013 this has changed.
SharePoint 2013 introduces different types of cloud applications. In fact, you can build two types of Azure integrated applications.
The first type of application is Autohosted, and the second is Provider-hosted (sometimes referred to as self-hosted).
The major difference between the two is −
Autohosted applications natively support a set of Azure features such as Web Sites and SQL Database with the SharePoint development and deployment experience.
Provider-hosted applications are meant to integrate with a broader set of web technologies and standards than Autohosted applications, one of which is Microsoft Azure.
Thus, you can take advantage of the entire Microsoft Azure stack when building Providerhosted apps that use Azure.
SharePoint - Packaging & Deploying
In this chapter, we will be covering packaging and Deploying of SharePoint solution. The first step in the deployment of a SharePoint solution is the creation of a Solution Package.
A Solution Package is a CAB file with WSP extension, which contains all the files required to implement the Features in your Visual Studio project.
The files required to implement the Features include −
The feature manifest.
Any element manifests.
The dll, which contains the compiled managed code.
Associated files like web pages, user controls, and web paired files.
Another file contained in the solution package is the solution manifest. The solution manifest is a catalog of the files contained in the package. For Farm solutions, it also contains deployment instructions.
Just like with the Feature manifest, Visual Studio automatically creates and maintains the solution manifest as you modify your project. You can see the solution manifest using the solution designer.
In addition to creating and maintaining the solution manifest, Visual Studio is also automatically creating the solution package for our project. It does this behind the scenes every time you deploy your work for debugging.
The generated solution package is placed in the same folder as the dll, so that will be the bin debug or the bin release folder. To view the contents of this file in Windows Explorer, just change the extension from WSP to CAB and then doubleclick on the file.
Let us have a look at a simple example in which we will examine the solution packages associated with the SharePoint solution projects we have created in the previous chapter. Let us start with the features and elements project we have created earlier.

As you know that in the project, we have one Feature, called Sample. This Feature references three element manifests Contacts, SitePage, and Action.
You can also see that Action has the Element manifest, Contacts has its Element manifest, SitePage has the Element manifest, and a web page, which provisions this web page into the site. Hence, we should expect the solution package to contain the Feature manifest, the three Element Manifests, the web page and also the assembly that is created when we build the project.
Step 1 − Right-click on your project in solution explorer and choose Open Folder in File Explorer.
Step 2 − Go to bin and open the Debug folder. You will see the solution package.
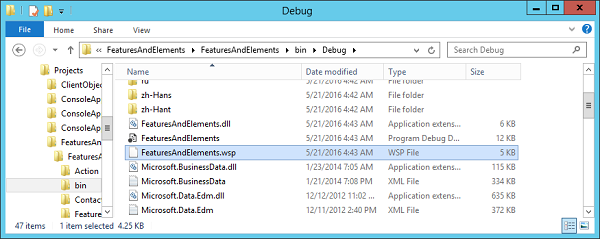
Step 3 − Make a copy of it and then change the extension of the Copy file from wsp to cab.
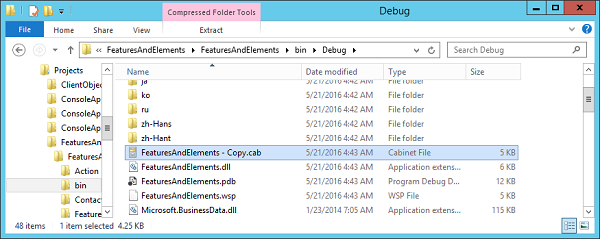
Step 4 − Now double-click the cab file to open it and you will see the files. You will see the Feature manifest, three Element manifests, the aspx page, the dll, and one additional file, which is the Solution manifest.
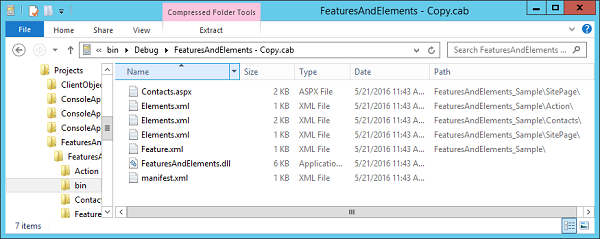
Step 5 − In the Solution Explorer, you will see a folder called Package and if you expand it, you will see a file called Package.package. Double-click that file and you will see the solution designer.
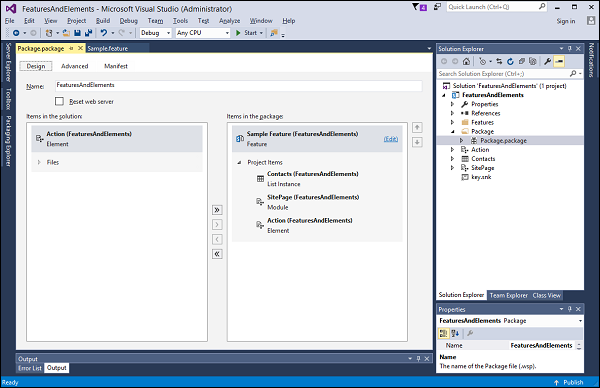
This designer is showing that currently there is only one feature in the Solution and that feature references three Element manifests, Contacts, SitePage, and Action.
This designer is an editor of an XML document just like feature designer.

The solution manifest for this proxy is simple. It just indicates that here is an Assembly that needs to be deployed called FeaturesandElemenest.dll and we will be deploying that to the GlobalAssemblyCache.
It also indicates we have one feature with this Feature Manifest. If we navigate back to the Feature and look at its Manifest, it indicates there are the three Element manifest, and our aspx page.
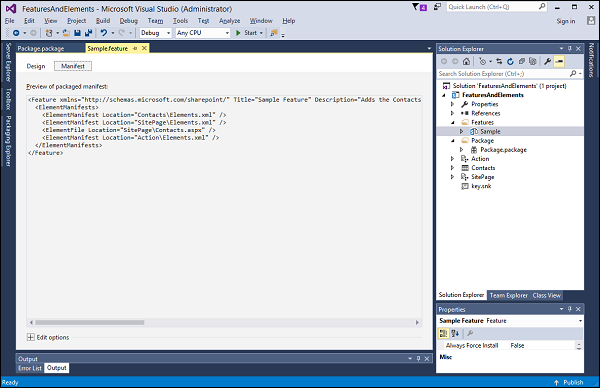
Farm Solution Deployment
Now that we know, what solution packages are and what they contain, we need to learn how to deploy them.
To deploy a Farm solution, you give the solution package created by Visual Studio to your SharePoint administrator. They will use either PowerShell or Central Administration or a combination of both tools to deploy the package.
Let us look at Farm solution deployment.
Step 1 − Go to Features and elements in Visual Studio project.
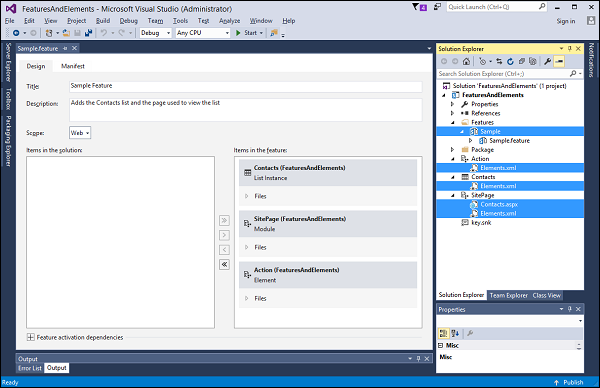
This project has one feature with three Elements. When you deploy a Farm solution, the contents of the solution are copied into the SharePoint system folders as shown below −
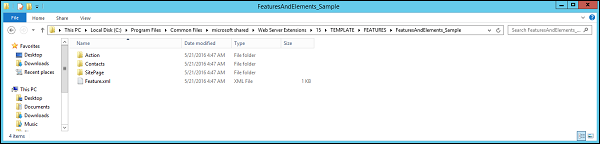
Step 2 − Now let us go to the List Designer and then change the Title to Contacts-Change 1 and then click the Save button.
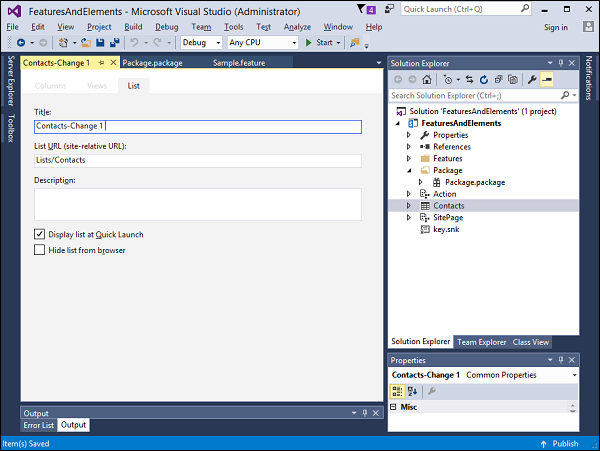
Step 3 − Now go to the project properties and then select SharePoint in the left pane. In the Active Deployment Configuration option, choose the Default option from the dropdown list.
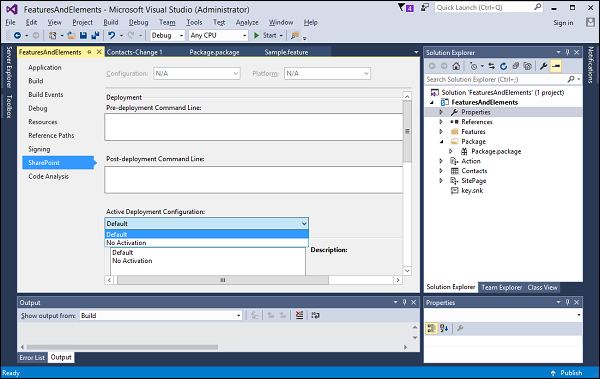
Step 4 − In Solution Explorer, right-click the project and choose Deploy. Once the deployment is finished, refresh your site and you will see the change.
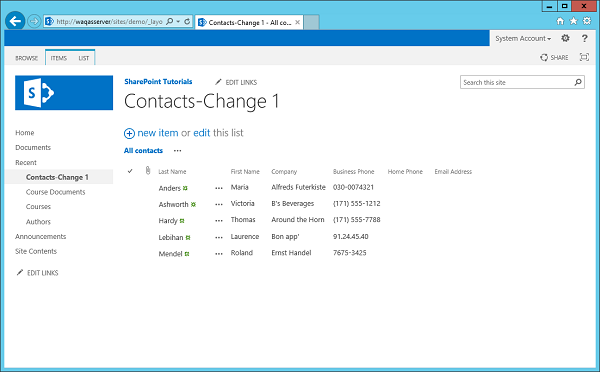
SharePoint - Sandbox Solutions
In this chapter, we will be covering the deployment of Sandbox Solutions. Deployment of a Sandbox Solution is quite simpler than deployment of a Farm solution.
It is similar to uploading a document to a document library. When you finish your development, you are going to take the solution package and instead of giving it to your SharePoint administrator, you will give it to an end user, someone with site-collection owner privilege. Then they will take the package and upload it to the site-collection solution gallery.
Just like with Farm solutions, the tools in Visual Studio automate this deployment process, during development.
Let us have a look into a simple example of Sandbox Solution Deployment. It is quite simpler than Farm solution deployment.
Step 1 − Here we need to create a new site collection and call it Demo 1.
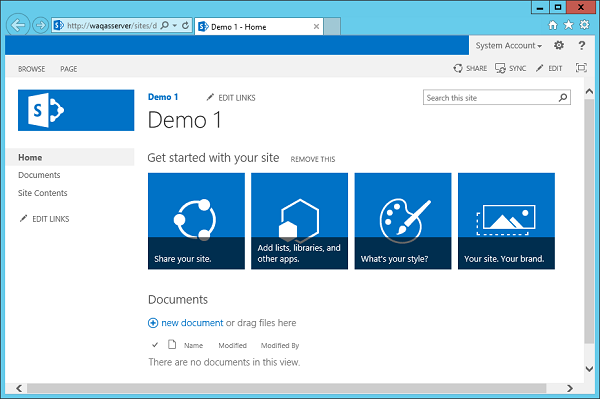
Step 2 − Change Contacts list name back to just Contacts in FeaturesAndElements project.
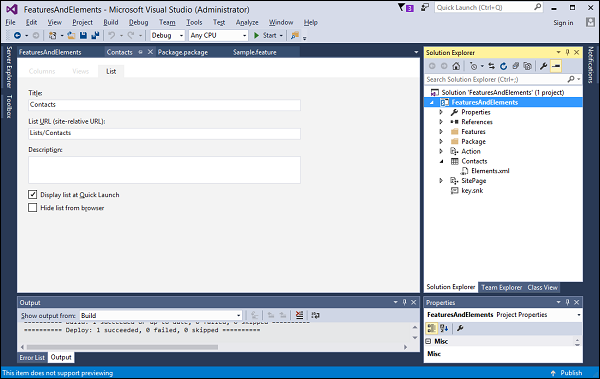
Step 3 − Retract the solution by right-clicking on the project and choosing Retract. If we come back to the SharePoint system folders, you will notice that our Feature folder is absent.
Next, if we go to Manage site features, we should not see Sample Feature.
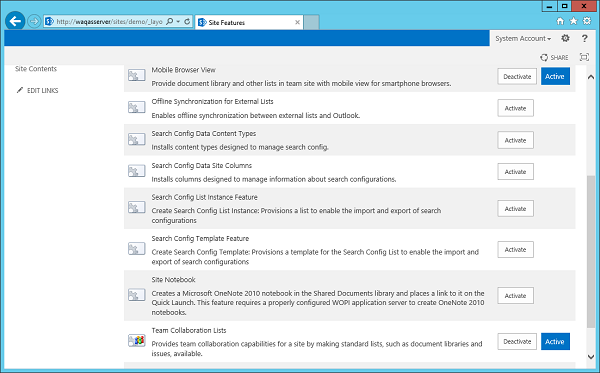
Step 4 − Go back to Visual Studio project, click the project in the Solution Explorer and then go to the properties window. Change Sandbox Solution from False to True.

A warning dialogue is displayed.
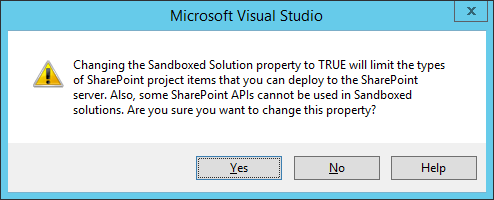
This gives us an indication that some of the items you added to the Visual Studio project will not work with Sandbox solutions and some of the SharePoint APIs. Some of the types within the SharePoint Server Object Model, are not compatible with Sandbox solutions.
Click Yes to make the change. In this case, building a sandbox solution is the same as building a farm solution, but the deployment process is completely different.
With the sandbox solution, instead of deploying files up into the SharePoint system folders, we deploy into the SharePoint content database.
Step 5 − Go to the Site settings. Under the Web Designer Galleries, there is Solutions gallery.
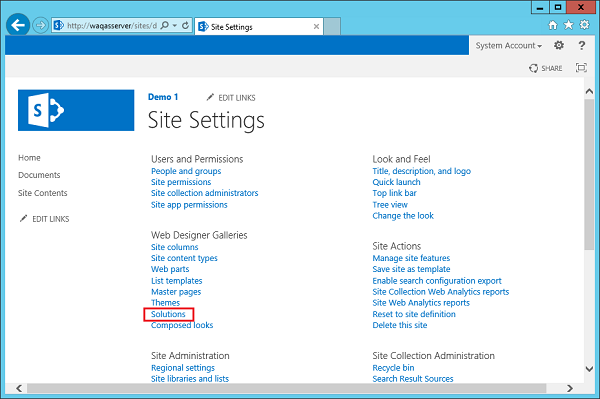
Step 6 − Click the Solutions link and you will see the following page where we deploy our sandbox solutions.
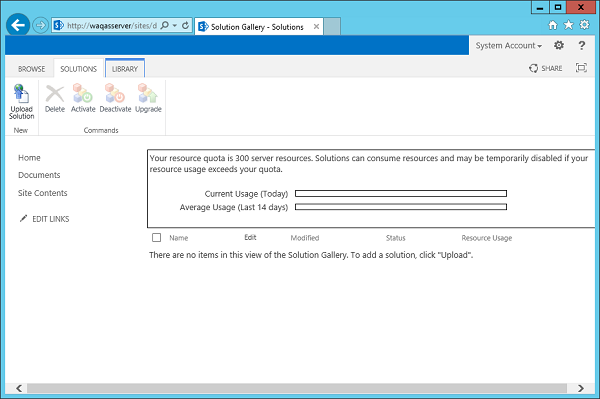
You are done with the development. Instead of giving the solution package to the SharePoint administrator and then having them use PowerShell or Central Admin to deploy the Farm solution, you can give your package to an end user, someone with site-collection owner privilege and then they can upload the solution into the Solution gallery.
Step 7 − Go back to Visual Studio, right-click and select Publish to File System.
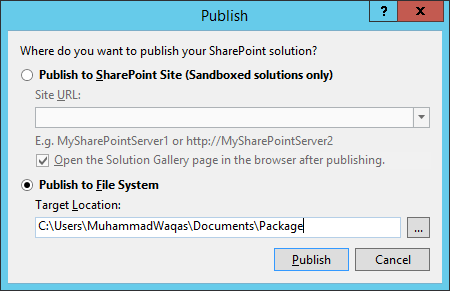
Click the Publish button to publish the New Solution Package to the package folder.
You will see the package in the Package folder.
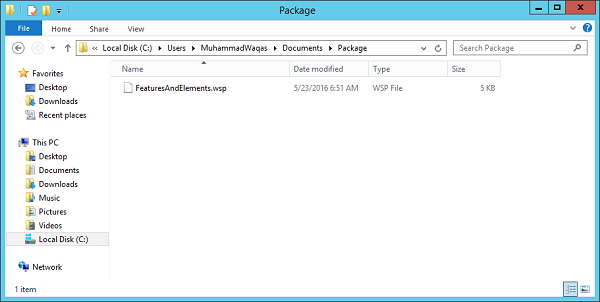
Step 8 − Now go to the SharePoint site. Click the Upload Solution button option on the Ribbon.
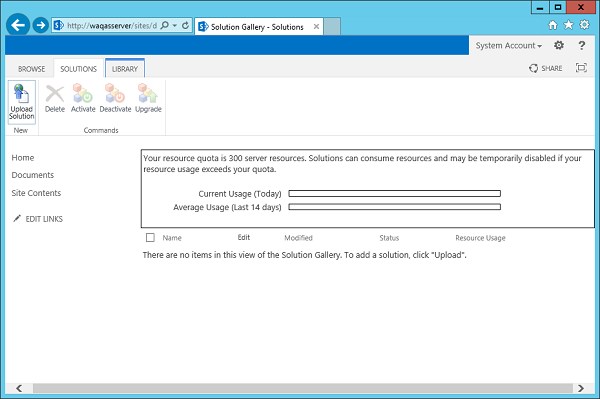
Step 9 − Browse to your FeaturesAndElements solution. Click OK.
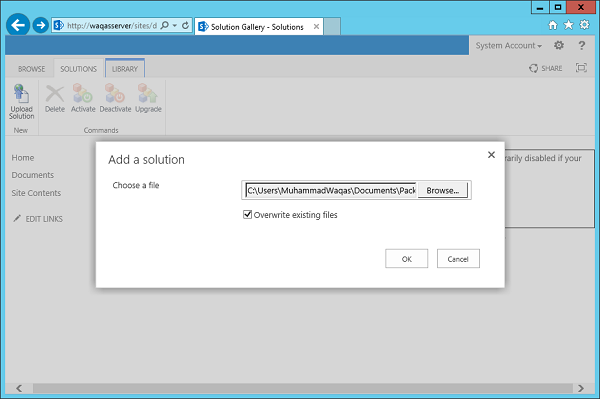
You will see the following dialogue.
Step 10 − You just need to click the Activate button to activate the sandbox solution
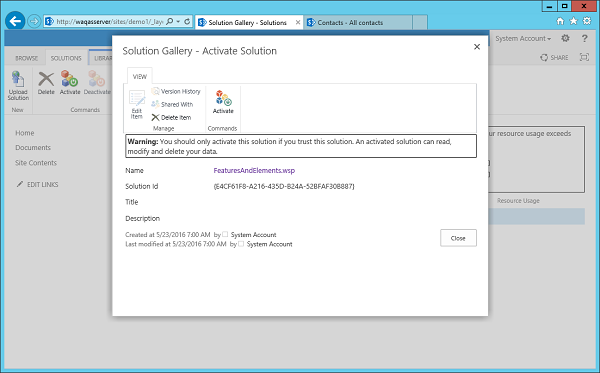
Step 11 − Go to the Manage site features.
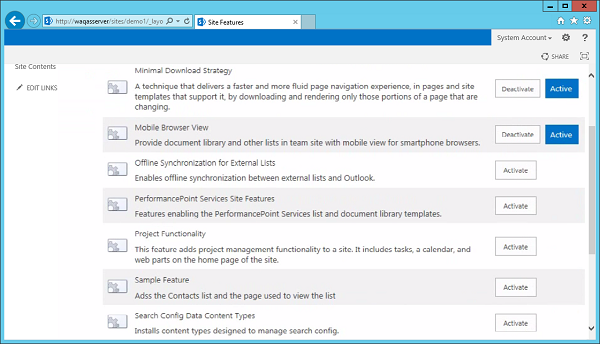
You will now see your Sample Feature and when you click Activate, you should get the same behavior as we had seen before.

SharePoint - Apps
In this chapter, we will be covering SharePoint Apps. The app model is a new development deployment and hosting model for extensions to SharePoint. As a developer in SharePoint 2013, we have the option of using the solutions model, either farm or sandbox solutions, or using the app model.
Microsoft documentation and guidance suggests that you favor the app model over the solutions model and that might be very valid guidance. However, you have to consider that the app model, which is a significant addition to SharePoint 2013, while the solutions model has been around since SharePoint 2007.
Therefore, the knowledge base for development with the solutions model is significantly better than the current state of the knowledge base for developing apps.
Apps have not been around long enough for people to share their real world experiences using it. I think it is very important that you learn the app model and its strengths and weaknesses.
App Characteristics
App characteristics are given below −
The first and probably the most important, from the developer viewpoint, is that all the codes in an app are executed outside of the SharePoint server. This means that the code is either JavaScript running in the users’ browser or it is the code that is running on some external server.
Since all the code is running outside of SharePoint, communication with SharePoint is done via web services, which means you are using the Client Object Model or the REST API.
There are no circumstances where you can use the Server Object Model in a SharePoint app.
Once you are finished building your app, you are either going to put it in the public app store or local app catalog. This requires a review process and there are some rules, which you need to follow to make your app eligible to go in the public app store.
The other option is to put your app in a local app catalog, which is just a site collection, within your web application, that has been configured by central administration to be the app catalog.
Once your app has been deployed to the store of the catalog, users with site collection owner permission can install it in SharePoint sites.
App Types
There are different types of apps that you can build, which are as follows −
SharePoint-Hosted App
The first is the SharePoint-Hosted App. As the name suggests, this kind of app is hosted in your SharePoint farm.
Important features are −
It is hosted in a child site of the site where it is installed and this child site behaves for the most part, like other sites.
It can contain lists, libraries, pages, content types, and so on.
The basics of building a SharePoint-Hosted App are similar to the basics of building a SharePoint Solution.
We have a feature.
We can add elements to that feature and those elements are defined using CAML.
For many of the elements we have designers in Visual Studio.
We can add site pages.
We can add server controls to those site pages.
We cannot add code behind to those site pages, but we can add JavaScript code.
Now once you get beyond the basics, things start to get less and less similar.
Cloud-Hosted Apps
The other two types of apps, Provider-Hosted and Auto-Hosted, are categorized together as Cloud-Hosted Apps. Important features are −
These apps live in a site external to SharePoint.
The big difference between Provider-Hosted and Auto-Hosted is who is going to create and manage this external site −
In a Provider-Hosted App, that is you or your organization.
In an Auto-Hosted App, that is Microsoft.
Building a Cloud-Hosted App is the same as building any other website.
If you are a .NET developer, you are probably using MVC or Web Forms. However, you are not limited to those technologies. You can build a Cloud-Hosted App with whatever web technology you want. When you are finished building your app, in the Provider-Hosted scenario, you will deploy the app up to your site the way you would do for any other website.
In the Auto-Hosted scenario, you use Visual Studio to create an app package. It is an app equivalent to a solution package and then you can upload that to SharePoint Online and a site. If necessary, a database will be provisioned for you to host your app.
Auto-Hosted Apps can only be used with SharePoint Online, they are not supported with an on-premises farm.
Here is the same example, which we already covered in App Model chapter.
Let us look at a simple example of SharePoint-hosted application by opening Visual Studio and select File → New → Project menu option.
Step 1 − Open Visual Studio and select the File → New → Project menu.
Step 2 − In the left pane select Templates → Visual C# → Office/SharePoint and then in the middle pane select App for SharePoint.
Enter the Name in the Name field, Click OK and you will see the following dialog box.
In the New App for SharePoint, we need to add the SharePoint site URL that we want to debug and then select the SharePoint-hosted model as the way you want to host your app for SharePoint.
Step 3 − Go to the SharePoint admin center and copy the SharePoint URL.
Step 4 − Paste the URL in the New App for SharePoint dialog box as shown below.
Step 5 − Click Next and it will open the Connect to SharePoint dialog box where we need to login.
Step 6 − Enter your credentials and click the Sign in button. Once you are successfully logged in to the SharePoint site, you will see the following dialog box −
Step 7 − Click Finish. Once the project is created, click the AppMenifest.xml file in the Solution Explorer.
Step 8 − Click the Permissions tab. A Scope dropdown list will open.
Step 9 − In the Scope dropdown list, select Web, which is the scope of permissions that you are configuring. In the Permission drop-down list, select Read, which is the type of permission you are configuring.
Step 10 − Open the Default.aspx file and replace it with the following code.
<%-- The following 4 lines are ASP.NET directives needed when
   using SharePoint components --%>

<%@ Page Inherits = "Microsoft.SharePoint.WebPartPages.WebPartPage,
   Microsoft.SharePoint, Version = 15.0.0.0, Culture = neutral,
   PublicKeyToken = 71e9bce111e9429c" MasterPageFile = "~masterurl/default.master"
   Language = "C#" %>

<%@ Register TagPrefix = "Utilities" Namespace = "Microsoft.SharePoint.Utilities"
   Assembly = "Microsoft.SharePoint, Version = 15.0.0.0, Culture = neutral,
   PublicKeyToken = 71e9bce111e9429c" %>

<%@ Register TagPrefix = "WebPartPages"
   Namespace = "Microsoft.SharePoint.WebPartPages" Assembly = "Microsoft.SharePoint,
   Version = 15.0.0.0, Culture = neutral, PublicKeyToken = 71e9bce111e9429c" %>

<%@ Register TagPrefix = "SharePoint"
   Namespace = "Microsoft.SharePoint.WebControls" Assembly = "Microsoft.SharePoint,
   Version = 15.0.0.0, Culture = neutral, PublicKeyToken = 71e9bce111e9429c" %>

<%-- The markup and script in the following Content element
   will be placed in the <head> of the page --%>

<asp:Content ID = "Content1" ContentPlaceHolderID = "PlaceHolderAdditionalPageHead"
   runat = "server">
   <script type = "text/javascript" src = "../Scripts/jquery- 1.6.2.min.js"></script>
   <link rel = "Stylesheet" type = "text/css" href = "../Content/App.css" />
   <script type = "text/javascript" src = "../Scripts/App.js"></script>
</asp:Content>

<asp:Content ID = "Content2" ContentPlaceHolderID = "PlaceHolderMain"
   runat = "server">
   <script type = "text/javascript">
      function hello() {
         var currentTime = new Date();
         $get("timeDiv").innerHTML = currentTime.toDateString();
      }
   </script>
   <div id = "timeDiv"></div>
   <input type = "button" value = "Push me!" onclick = "hello();" />
</asp:Content>
Step 11 − Go to the Solution explorer, right-click the project and select Publish. Click the Package the app button. This builds your SharePoint-hosted app and prepares it for you for deployment to your SharePoint site.
You will see the following folder, which contains the *.app file.
Step 12 − Navigate to your SharePoint online site.
Step 13 − Click Apps for SharePoint in the left pane. A new page will open.
Step 14 − Drag your files here to upload.
Once the file is uploaded, you will see the following page −
Step 15 − Click the option - Site Contents in the left pane. Click the add an app icon as shown in the following screen shot −
A new page will open.
Step 16 − Select Your Apps → From Your Organization in the left pane and you will see that the app is available for installation. Click the app.
Step 17 − When you click the app, a dialog box opens as shown in the following screen shot. Click Trust it.
Step 18 − You will see that the app is installed. Once the installation is complete, you can click the app.
You will see the following page, which contains one button −
When you click the Push me button, it will display the current date.
Autohosted
Let us have a look at a simple example of Autohosted by creating a new project.
Step 1 − Select App for SharePoint 2013 and click OK.
Step 2 − Select Autohosted.
Step 3 − Select ASP.NET MVC Web Application and click Finish.
Once the project is created, publish your app. The rest of the steps are the same as given for the SharePoint-hosted option.


