
Xamarin - Android Widgets
Date Picker
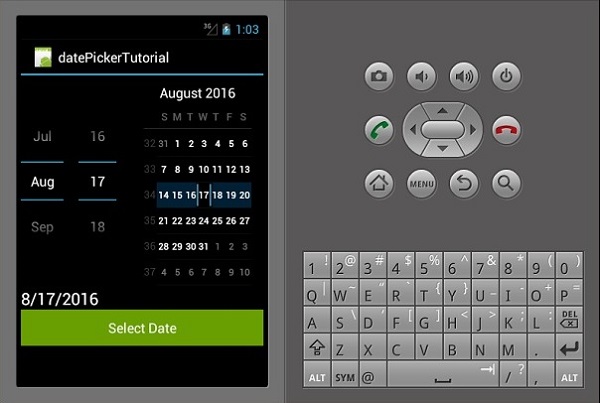
This is a widget used to display date. In this example, we are going to create a date picker which displays the set date on a text view.
First of all, create a new project and call it datePickerExample. Open Main.axml and create a datepicker, textview, and a button.
<?xml version = "1.0" encoding = "utf-8"?>
<LinearLayout xmlns:android = "https://schemas.android.com/apk/res/android"
   android:orientation = "vertical"
   android:layout_width = "fill_parent"
   android:layout_height = "fill_parent">
   <DatePicker
      android:layout_width = "match_parent"
      android:layout_height = "wrap_content"
      android:id = "@+id/datePicker1" />
   <TextView
      android:text = "Current Date"
      android:textAppearance = "?android:attr/textAppearanceLarge"
      android:layout_width = "match_parent"
      android:layout_height = "wrap_content"
      android:id = "@+id/txtShowDate" />
   <Button
      android:text = "Select Date"
      android:layout_width = "match_parent"
      android:layout_height = "wrap_content"
      android:id = "@+id/btnSetDate" />
</LinearLayout>
Next, go to Mainactivity.cs. We first create a private instance of a textview inside the mainActivity:Activity class.
The instance will be used to store the date selected or the default date.
private TextView showCurrentDate;
Next, add the following code after setContentView() method.
DatePicker pickDate = FindViewById<DatePicker>(Resource.Id.datePicker1);
showCurrentDate = FindViewById<TextView>(Resource.Id.txtShowDate);
setCurrentDate();
Button button = FindViewById<Button>(Resource.Id.btnSetDate);
button.Click += delegate {
   showCurrentDate.Text = String.Format("{0}/{1}/{2}",
      pickDate.Month, pickDate.DayOfMonth, pickDate.Year);
};
In the above code, we have referenced our datepicker, textview, and button by finding them from our main.axml file using FindViewById class.
After referencing, we set the button click event which is responsible for passing the selected date from the date picker to the textview.
Next, we create the setCurrentDate() method for displaying the default current date to our textview. The following code explains how it is done.
private void setCurrentDate() {
   string TodaysDate = string.Format("{0}",
      DateTime.Now.ToString("M/d/yyyy").PadLeft(2, '0'));
   showCurrentDate.Text = TodaysDate;
}
DateTime.Now.ToString() class binds today’s time to a string object.
Now, build and run the App. It should display the following output −
Time Picker
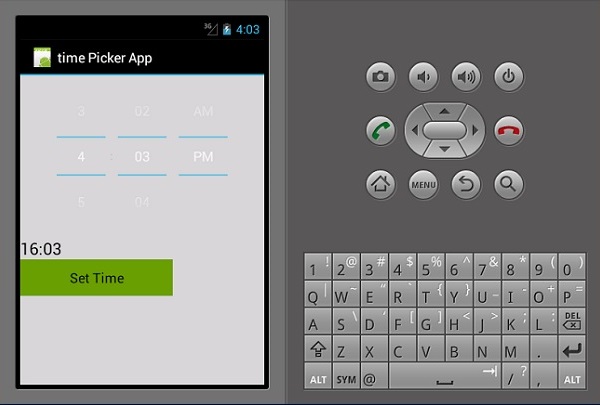
Time Picker is a widget used to display time as well as allowing a user to pick and set time. We are going to create a basic time picker app that displays the time and also allows a user to change the time.
Go to main.axml and add a new button, textview, and a time picker as shown in the following code.
<?xml version = "1.0" encoding = "utf-8"?>
<LinearLayout xmlns:android = "https://schemas.android.com/apk/res/android"
   android:orientation = "vertical"
   android:background = "#d3d3d3"
   android:layout_width = "fill_parent"
   android:layout_height = "fill_parent">
   <TimePicker
      android:layout_width = "match_parent"
      android:layout_height = "wrap_content"
      android:id = "@+id/timePicker1" />
   <TextView
      android:text = "Time"
      android:textAppearance = "?android:attr/textAppearanceLarge"
      android:layout_width = "match_parent"
      android:layout_height = "wrap_content"
      android:id = "@+id/txt_showTime"
      android:textColor = "@android:color/black" />
   <Button
      android:text = "Set Time"
      android:layout_width = "200dp"
      android:layout_height = "wrap_content"
      android:id = "@+id/btnSetTime"
      android:textColor = "@android:color/black"
      android:background = "@android:color/holo_green_dark" />
</LinearLayout>
Go to MainActivity.cs to add the functionality for displaying a set date on the textview we created.
public class MainActivity : Activity {

   private TextView showCurrentTime;

   protected override void OnCreate(Bundle bundle) {

      base.OnCreate(bundle);
      SetContentView(Resource.Layout.Main);
      TimePicker Tpicker = FindViewById<TimePicker>(Resource.Id.timePicker1);
      showCurrentTime = FindViewById<TextView>(Resource.Id.txt_showTime);
      setCurrentTime();
      Button button = FindViewById<Button>(Resource.Id.btnSetTime);

      button.Click += delegate {
         showCurrentTime.Text = String.Format("{0}:{1}",
            Tpicker.CurrentHour, Tpicker.CurrentMinute);
      };
   }
   private void setCurrentTime() {
      string time = string.Format("{0}",
         DateTime.Now.ToString("HH:mm").PadLeft(2, '0'));
      showCurrentTime.Text = time;
   }
}
In the above code, we first referenced the timepicker,set time button and the textview for showing time through the FindViewById<> class. We then created a click event for the set time button which on click sets the time to the time selected by a person. By default, it shows the current system time.
The setCurrentTime() method class initializes the txt_showTime textview to display the current time.
Now, build and run your application. It should display the following output −
Spinner
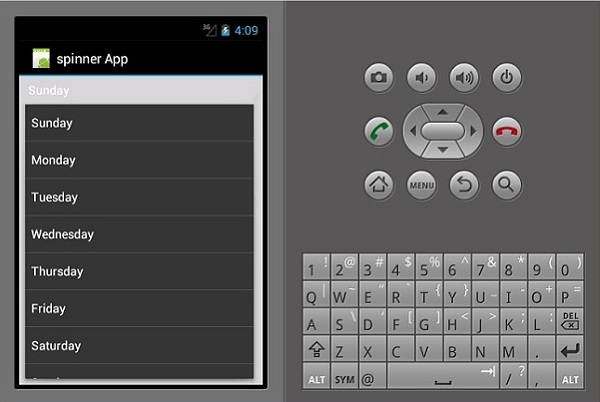
A spinner is a widget used to select one option from a set. It is an equivalent of a dropdown/Combo box. First of all, create a new project and call it Spinner App Tutorial.
Open Main.axml under the layout folder and create a new spinner.
<?xml version = "1.0" encoding = "utf-8"?>
<LinearLayout xmlns:android = "https://schemas.android.com/apk/res/android"
   android:orientation = "vertical"
   android:layout_width = "fill_parent"
   android:layout_height = "fill_parent">
   <Spinner
      android:layout_width = "match_parent"
      android:layout_height = "wrap_content"
      android:id = "@+id/spinner1"
      android:prompt = "@string/daysOfWeek" />
</LinearLayout>
Open Strings.xml file located under values folder and add the following code to create the spinner items.
<resources>
  <string name = "daysOfWeek">Choose a planet</string>
  <string-array name = "days_array">
      <item>Sunday</item>
      <item>Monday</item>
      <item>Tuesday</item>
      <item>Wednesday</item>
      <item>Thursday</item>
      <item>Friday</item>
      <item>Saturday</item>
      <item>Sunday</item>
   </string-array>
</resources>
Next, open MainActivity.cs to add the functionality for displaying the selected day of the week.
protected override void OnCreate(Bundle bundle) {
   base.OnCreate(bundle);
   // Set our view from the "main" layout resource
   SetContentView(Resource.Layout.Main);
   Spinner spinnerDays = FindViewById<Spinner>(Resource.Id.spinner1);
   spinnerDays.ItemSelected += new EventHandler
      <AdapterView.ItemSelectedEventArgs>(SelectedDay);
   var adapter = ArrayAdapter.CreateFromResource(this,
      Resource.Array.days_array, Android.Resource.Layout.SimpleSpinnerItem);
   adapter.SetDropDownViewResource(Android.Resource.Layout.SimpleSpinnerDropD ownItem);
   spinnerDays.Adapter = adapter;
}
private void SelectedDay(object sender, AdapterView.ItemSelectedEventArgs e) {
   Spinner spinner = (Spinner)sender;
   string toast = string.Format("The selected
      day is {0}", spinner.GetItemAtPosition(e.Position));
   Toast.MakeText(this, toast, ToastLength.Long).Show();
}
Now, build and run the application. It should display the following output −
In the above code, we referenced the spinner we created in our main.axml file through the FindViewById<> class. We then created a new arrayAdapter() which we used to bind our array items from the strings.xml class.
Finally we created the method SelectedDay() which we used to display the selected day of the week.


