
Apache Solr - Quick Guide
Apache Solr - Overview
Solr is an open-source search platform which is used to build search applications. It was built on top of Lucene (full text search engine). Solr is enterprise-ready, fast and highly scalable. The applications built using Solr are sophisticated and deliver high performance.
It was Yonik Seely who created Solr in 2004 in order to add search capabilities to the company website of CNET Networks. In Jan 2006, it was made an open-source project under Apache Software Foundation. Its latest version, Solr 6.0, was released in 2016 with support for execution of parallel SQL queries.
Solr can be used along with Hadoop. As Hadoop handles a large amount of data, Solr helps us in finding the required information from such a large source. Not only search, Solr can also be used for storage purpose. Like other NoSQL databases, it is a non-relational data storage and processing technology.
In short, Solr is a scalable, ready to deploy, search/storage engine optimized to search large volumes of text-centric data.
Features of Apache Solr
Solr is a wrap around Lucene’s Java API. Therefore, using Solr, you can leverage all the features of Lucene. Let us take a look at some of most prominent features of Solr −
Restful APIs − To communicate with Solr, it is not mandatory to have Java programming skills. Instead you can use restful services to communicate with it. We enter documents in Solr in file formats like XML, JSON and .CSV and get results in the same file formats.
Full text search − Solr provides all the capabilities needed for a full text search such as tokens, phrases, spell check, wildcard, and auto-complete.
Enterprise ready − According to the need of the organization, Solr can be deployed in any kind of systems (big or small) such as standalone, distributed, cloud, etc.
Flexible and Extensible − By extending the Java classes and configuring accordingly, we can customize the components of Solr easily.
NoSQL database − Solr can also be used as big data scale NOSQL database where we can distribute the search tasks along a cluster.
Admin Interface − Solr provides an easy-to-use, user friendly, feature powered, user interface, using which we can perform all the possible tasks such as manage logs, add, delete, update and search documents.
Highly Scalable − While using Solr with Hadoop, we can scale its capacity by adding replicas.
Text-Centric and Sorted by Relevance − Solr is mostly used to search text documents and the results are delivered according to the relevance with the user’s query in order.
Unlike Lucene, you don’t need to have Java programming skills while working with Apache Solr. It provides a wonderful ready-to-deploy service to build a search box featuring autocomplete, which Lucene doesn’t provide. Using Solr, we can scale, distribute, and manage index, for large scale (Big Data) applications.
Lucene in Search Applications
Lucene is simple yet powerful Java-based search library. It can be used in any application to add search capability. Lucene is a scalable and high-performance library used to index and search virtually any kind of text. Lucene library provides the core operations which are required by any search application, such as Indexing and Searching.
If we have a web portal with a huge volume of data, then we will most probably require a search engine in our portal to extract relevant information from the huge pool of data. Lucene works as the heart of any search application and provides the vital operations pertaining to indexing and searching.
Apache Solr - Search Engine Basics
A Search Engine refers to a huge database of Internet resources such as webpages, newsgroups, programs, images, etc. It helps to locate information on the World Wide Web.
Users can search for information by passing queries into the Search Engine in the form of keywords or phrases. The Search Engine then searches in its database and returns relevant links to the user.

Search Engine Components
Generally, there are three basic components of a search engine as listed below −
Web Crawler − Web crawlers are also known as spiders or bots. It is a software component that traverses the web to gather information.
Database − All the information on the Web is stored in databases. They contain a huge volume of web resources.
Search Interfaces − This component is an interface between the user and the database. It helps the user to search through the database.
How do Search Engines Work?
Any search application is required to perform some or all of the following operations.
| Step | Title | Description |
|---|---|---|
1 |
Acquire Raw Content |
The very first step of any search application is to collect the target contents on which search is to be conducted. |
2 |
Build the document |
The next step is to build the document(s) from the raw contents which the search application can understand and interpret easily. |
3 |
Analyze the document |
Before indexing can start, the document is to be analyzed. |
4 |
Indexing the document |
Once the documents are built and analyzed, the next step is to index them so that this document can be retrieved based on certain keys, instead of the whole contents of the document. Indexing is similar to the indexes that we have at the end of a book where common words are shown with their page numbers so that these words can be tracked quickly, instead of searching the complete book. |
5 |
User Interface for Search |
Once a database of indexes is ready, then the application can perform search operations. To help the user make a search, the application must provide a user interface where the user can enter text and initiate the search process |
6 |
Build Query |
Once the user makes a request to search a text, the application should prepare a query object using that text, which can then be used to inquire the index database to get relevant details. |
7 |
Search Query |
Using the query object, the index database is checked to get the relevant details and the content documents. |
8 |
Render Results |
Once the required result is received, the application should decide how to display the results to the user using its User Interface. |
Take a look at the following illustration. It shows an overall view of how Search Engines function.
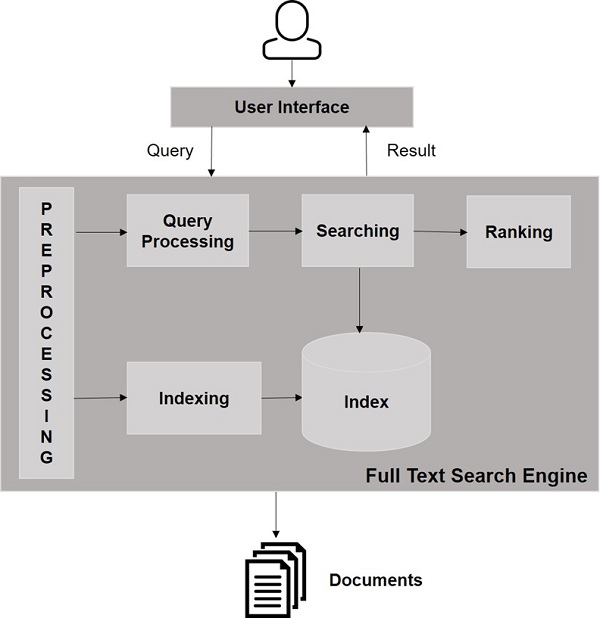
Apart from these basic operations, search applications can also provide administration-user interface to help the administrators control the level of search based on the user profiles. Analytics of search result is another important and advanced aspect of any search application.
Apache Solr - On Windows Environment
In this chapter, we will discuss how to set up Solr in Windows environment. To install Solr on your Windows system, you need to follow the steps given below −
Visit the homepage of Apache Solr and click the download button.
Select one of the mirrors to get an index of Apache Solr. From there download the file named Solr-6.2.0.zip.
Move the file from the downloads folder to the required directory and unzip it.
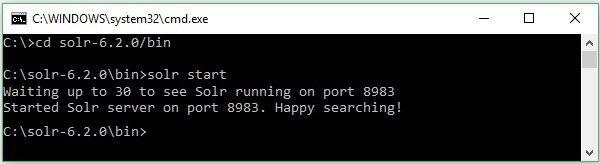
Suppose you downloaded the Solr fie and extracted it in onto the C drive. In such case, you can start Solr as shown in the following screenshot.
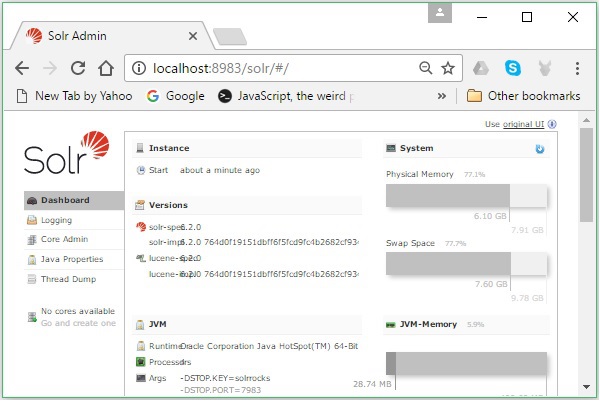
To verify the installation, use the following URL in your browser.
https://localhost:8983/
If the installation process is successful, then you will get to see the dashboard of the Apache Solr user interface as shown below.
Setting Java Environment
We can also communicate with Apache Solr using Java libraries; but before accessing Solr using Java API, you need to set the classpath for those libraries.
Setting the Classpath
Set the classpath to Solr libraries in the .bashrc file. Open .bashrc in any of the editors as shown below.
$ gedit ~/.bashrc
Set classpath for Solr libraries (lib folder in HBase) as shown below.
export CLASSPATH = $CLASSPATH://home/hadoop/Solr/lib/*
This is to prevent the “class not found” exception while accessing the HBase using Java API.
Apache Solr - On Hadoop
Solr can be used along with Hadoop. As Hadoop handles a large amount of data, Solr helps us in finding the required information from such a large source. In this section, let us understand how you can install Hadoop on your system.
Downloading Hadoop
Given below are the steps to be followed to download Hadoop onto your system.
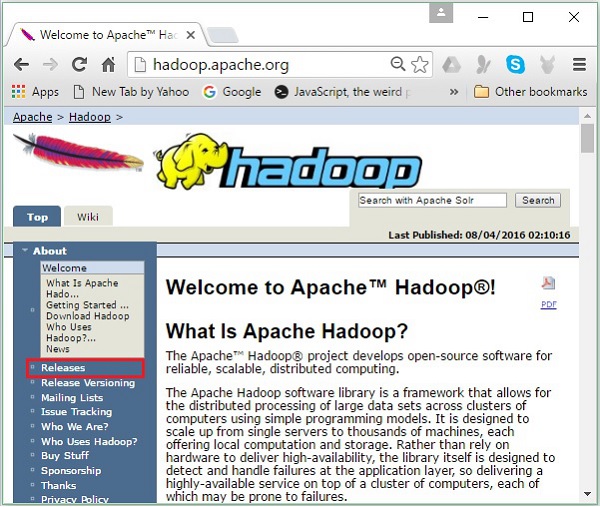
Step 1 − Go to the homepage of Hadoop. You can use the link − www.hadoop.apache.org/. Click the link Releases, as highlighted in the following screenshot.
It will redirect you to the Apache Hadoop Releases page which contains links for mirrors of source and binary files of various versions of Hadoop as follows −
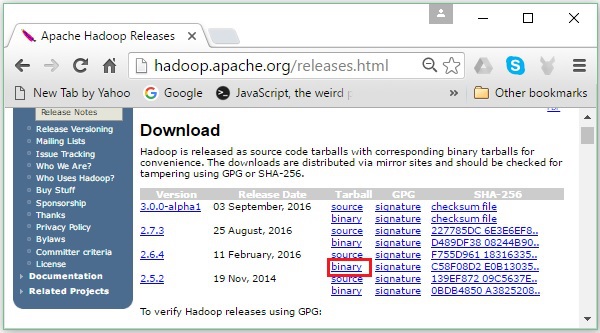
Step 2 − Select the latest version of Hadoop (in our tutorial, it is 2.6.4) and click its binary link. It will take you to a page where mirrors for Hadoop binary are available. Click one of these mirrors to download Hadoop.
Download Hadoop from Command Prompt
Open Linux terminal and login as super-user.
$ su
password:
Go to the directory where you need to install Hadoop, and save the file there using the link copied earlier, as shown in the following code block.
# cd /usr/local
# wget https://redrockdigimark.com/apachemirror/hadoop/common/hadoop-
2.6.4/hadoop-2.6.4.tar.gz
After downloading Hadoop, extract it using the following commands.
# tar zxvf hadoop-2.6.4.tar.gz
# mkdir hadoop
# mv hadoop-2.6.4/* to hadoop/
# exit
Installing Hadoop
Follow the steps given below to install Hadoop in pseudo-distributed mode.
Step 1: Setting Up Hadoop
You can set the Hadoop environment variables by appending the following commands to ~/.bashrc file.
export HADOOP_HOME = /usr/local/hadoop export
HADOOP_MAPRED_HOME = $HADOOP_HOME export
HADOOP_COMMON_HOME = $HADOOP_HOME export
HADOOP_HDFS_HOME = $HADOOP_HOME export
YARN_HOME = $HADOOP_HOME
export HADOOP_COMMON_LIB_NATIVE_DIR = $HADOOP_HOME/lib/native
export PATH = $PATH:$HADOOP_HOME/sbin:$HADOOP_HOME/bin
export HADOOP_INSTALL = $HADOOP_HOME
Next, apply all the changes into the current running system.
$ source ~/.bashrc
Step 2: Hadoop Configuration
You can find all the Hadoop configuration files in the location “$HADOOP_HOME/etc/hadoop”. It is required to make changes in those configuration files according to your Hadoop infrastructure.
$ cd $HADOOP_HOME/etc/hadoop
In order to develop Hadoop programs in Java, you have to reset the Java environment variables in hadoop-env.sh file by replacing JAVA_HOME value with the location of Java in your system.
export JAVA_HOME = /usr/local/jdk1.7.0_71
The following are the list of files that you have to edit to configure Hadoop −
- core-site.xml
- hdfs-site.xml
- yarn-site.xml
- mapred-site.xml
core-site.xml
The core-site.xml file contains information such as the port number used for Hadoop instance, memory allocated for the file system, memory limit for storing the data, and size of Read/Write buffers.
Open the core-site.xml and add the following properties inside the <configuration>, </configuration> tags.
<configuration>
   <property>
      <name>fs.default.name</name>
      <value>hdfs://localhost:9000</value>
   </property>
</configuration>
hdfs-site.xml
The hdfs-site.xml file contains information such as the value of replication data, namenode path, and datanode paths of your local file systems. It means the place where you want to store the Hadoop infrastructure.
Let us assume the following data.
dfs.replication (data replication value) = 1

(In the below given path /hadoop/ is the user name.
hadoopinfra/hdfs/namenode is the directory created by hdfs file system.)
namenode path = //home/hadoop/hadoopinfra/hdfs/namenode

(hadoopinfra/hdfs/datanode is the directory created by hdfs file system.)
datanode path = //home/hadoop/hadoopinfra/hdfs/datanode
Open this file and add the following properties inside the <configuration>, </configuration> tags.
<configuration>
   <property>
      <name>dfs.replication</name>
      <value>1</value>
   </property>

   <property>
      <name>dfs.name.dir</name>
      <value>file:///home/hadoop/hadoopinfra/hdfs/namenode</value>
   </property>

   <property>
      <name>dfs.data.dir</name>
      <value>file:///home/hadoop/hadoopinfra/hdfs/datanode</value>
   </property>
</configuration>
Note − In the above file, all the property values are user-defined and you can make changes according to your Hadoop infrastructure.
yarn-site.xml
This file is used to configure yarn into Hadoop. Open the yarn-site.xml file and add the following properties in between the <configuration>, </configuration> tags in this file.
<configuration>
   <property>
      <name>yarn.nodemanager.aux-services</name>
      <value>mapreduce_shuffle</value>
   </property>
</configuration>
mapred-site.xml
This file is used to specify which MapReduce framework we are using. By default, Hadoop contains a template of yarn-site.xml. First of all, it is required to copy the file from mapred-site,xml.template to mapred-site.xml file using the following command.
$ cp mapred-site.xml.template mapred-site.xml
Open mapred-site.xml file and add the following properties inside the <configuration>, </configuration> tags.
<configuration>
   <property>
      <name>mapreduce.framework.name</name>
      <value>yarn</value>
   </property>
</configuration>
Verifying Hadoop Installation
The following steps are used to verify the Hadoop installation.
Step 1: Name Node Setup
Set up the namenode using the command "hdfs namenode –format" as follows.
$ cd ~
$ hdfs namenode -format
The expected result is as follows.
10/24/14 21:30:55 INFO namenode.NameNode: STARTUP_MSG:
/************************************************************
STARTUP_MSG: Starting NameNode
STARTUP_MSG:   host = localhost/192.168.1.11
STARTUP_MSG:   args = [-format] STARTUP_MSG:   version = 2.6.4
...
...
10/24/14 21:30:56 INFO common.Storage: Storage directory
/home/hadoop/hadoopinfra/hdfs/namenode has been successfully formatted.
10/24/14 21:30:56 INFO namenode.NNStorageRetentionManager: Going to retain 1
images with txid >= 0
10/24/14 21:30:56 INFO util.ExitUtil: Exiting with status 0
10/24/14 21:30:56 INFO namenode.NameNode: SHUTDOWN_MSG:
/************************************************************
SHUTDOWN_MSG: Shutting down NameNode at localhost/192.168.1.11
************************************************************/
Step 2: Verifying the Hadoop dfs
The following command is used to start the Hadoop dfs. Executing this command will start your Hadoop file system.
$ start-dfs.sh
The expected output is as follows −
10/24/14 21:37:56
Starting namenodes on [localhost]
localhost: starting namenode, logging to /home/hadoop/hadoop-2.6.4/logs/hadoop-
hadoop-namenode-localhost.out
localhost: starting datanode, logging to /home/hadoop/hadoop-2.6.4/logs/hadoop-
hadoop-datanode-localhost.out
Starting secondary namenodes [0.0.0.0]
Step 3: Verifying the Yarn Script
The following command is used to start the Yarn script. Executing this command will start your Yarn demons.
$ start-yarn.sh
The expected output as follows −
starting yarn daemons
starting resourcemanager, logging to /home/hadoop/hadoop-2.6.4/logs/yarn-
hadoop-resourcemanager-localhost.out
localhost: starting nodemanager, logging to /home/hadoop/hadoop-
2.6.4/logs/yarn-hadoop-nodemanager-localhost.out
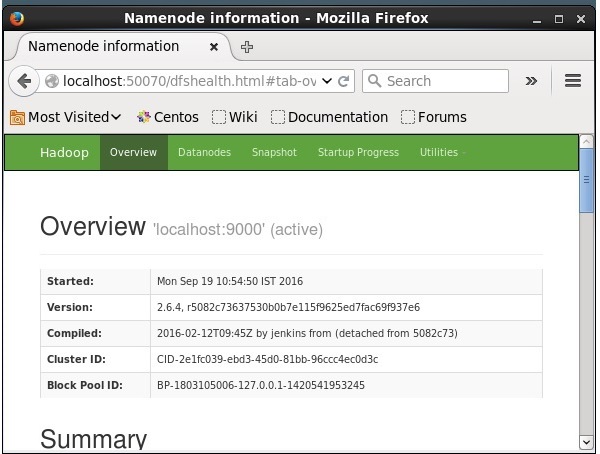
Step 4: Accessing Hadoop on Browser
The default port number to access Hadoop is 50070. Use the following URL to get Hadoop services on browser.
https://localhost:50070/
Installing Solr on Hadoop
Follow the steps given below to download and install Solr.
Step 1
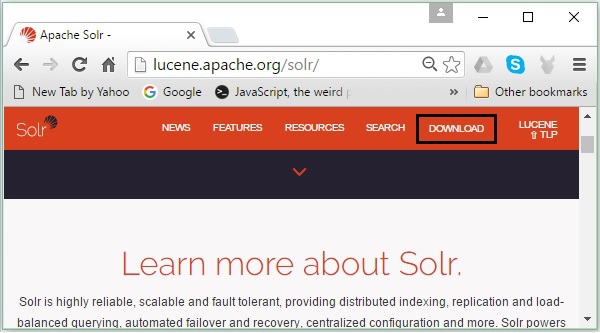
Open the homepage of Apache Solr by clicking the following link − https://lucene.apache.org/solr/
Step 2
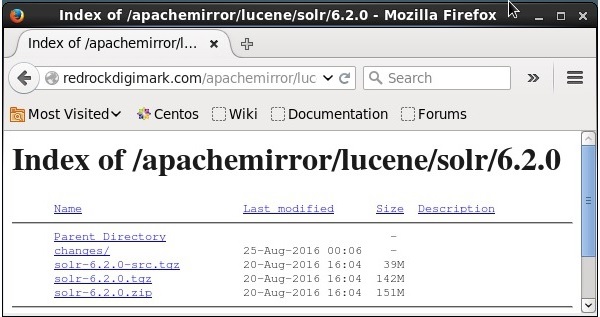
Click the download button (highlighted in the above screenshot). On clicking, you will be redirected to the page where you have various mirrors of Apache Solr. Select a mirror and click on it, which will redirect you to a page where you can download the source and binary files of Apache Solr, as shown in the following screenshot.
Step 3
On clicking, a folder named Solr-6.2.0.tqz will be downloaded in the downloads folder of your system. Extract the contents of the downloaded folder.
Step 4
Create a folder named Solr in the Hadoop home directory and move the contents of the extracted folder to it, as shown below.
$ mkdir Solr
$ cd Downloads
$ mv Solr-6.2.0 /home/Hadoop/
Verification
Browse through the bin folder of Solr Home directory and verify the installation using the version option, as shown in the following code block.
$ cd bin/
$ ./Solr version
6.2.0
Setting home and path
Open the .bashrc file using the following command −
[Hadoop@localhost ~]$ source ~/.bashrc
Now set the home and path directories for Apache Solr as follows −
export SOLR_HOME = /home/Hadoop/Solr
export PATH = $PATH:/$SOLR_HOME/bin/
Open the terminal and execute the following command −
[Hadoop@localhost Solr]$ source ~/.bashrc
Now, you can execute the commands of Solr from any directory.
Apache Solr - Architecture
In this chapter, we will discuss the architecture of Apache Solr. The following illustration shows a block diagram of the architecture of Apache Solr.
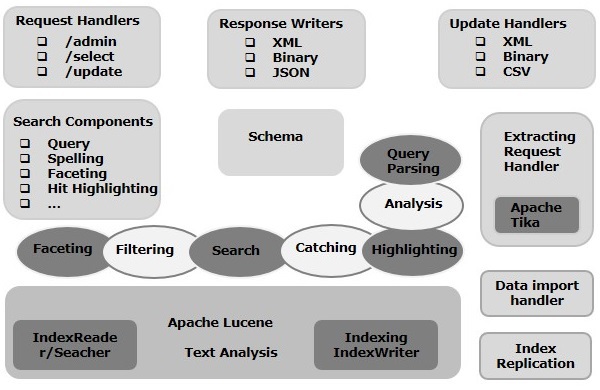
Solr Architecture ─ Building Blocks
Following are the major building blocks (components) of Apache Solr −
Request Handler − The requests we send to Apache Solr are processed by these request handlers. The requests might be query requests or index update requests. Based on our requirement, we need to select the request handler. To pass a request to Solr, we will generally map the handler to a certain URI end-point and the specified request will be served by it.
Search Component − A search component is a type (feature) of search provided in Apache Solr. It might be spell checking, query, faceting, hit highlighting, etc. These search components are registered as search handlers. Multiple components can be registered to a search handler.
Query Parser − The Apache Solr query parser parses the queries that we pass to Solr and verifies the queries for syntactical errors. After parsing the queries, it translates them to a format which Lucene understands.
Response Writer − A response writer in Apache Solr is the component which generates the formatted output for the user queries. Solr supports response formats such as XML, JSON, CSV, etc. We have different response writers for each type of response.
Analyzer/tokenizer − Lucene recognizes data in the form of tokens. Apache Solr analyzes the content, divides it into tokens, and passes these tokens to Lucene. An analyzer in Apache Solr examines the text of fields and generates a token stream. A tokenizer breaks the token stream prepared by the analyzer into tokens.
Update Request Processor − Whenever we send an update request to Apache Solr, the request is run through a set of plugins (signature, logging, indexing), collectively known as update request processor. This processor is responsible for modifications such as dropping a field, adding a field, etc.
Apache Solr - Terminology
In this chapter, we will try to understand the real meaning of some of the terms that are frequently used while working on Solr.
General Terminology
The following is a list of general terms that are used across all types of Solr setups −
Instance − Just like a tomcat instance or a jetty instance, this term refers to the application server, which runs inside a JVM. The home directory of Solr provides reference to each of these Solr instances, in which one or more cores can be configured to run in each instance.
Core − While running multiple indexes in your application, you can have multiple cores in each instance, instead of multiple instances each having one core.
Home − The term $SOLR_HOME refers to the home directory which has all the information regarding the cores and their indexes, configurations, and dependencies.
Shard − In distributed environments, the data is partitioned between multiple Solr instances, where each chunk of data can be called as a Shard. It contains a subset of the whole index.
SolrCloud Terminology
In an earlier chapter, we discussed how to install Apache Solr in standalone mode. Note that we can also install Solr in distributed mode (cloud environment) where Solr is installed in a master-slave pattern. In distributed mode, the index is created on the master server and it is replicated to one or more slave servers.
The key terms associated with Solr Cloud are as follows −
Node − In Solr cloud, each single instance of Solr is regarded as a node.
Cluster − All the nodes of the environment combined together make a cluster.
Collection − A cluster has a logical index that is known as a collection.
Shard − A shard is portion of the collection which has one or more replicas of the index.
Replica − In Solr Core, a copy of shard that runs in a node is known as a replica.
Leader − It is also a replica of shard, which distributes the requests of the Solr Cloud to the remaining replicas.
Zookeeper − It is an Apache project that Solr Cloud uses for centralized configuration and coordination, to manage the cluster and to elect a leader.
Configuration Files
The main configuration files in Apache Solr are as follows −
Solr.xml − It is the file in the $SOLR_HOME directory that contains Solr Cloud related information. To load the cores, Solr refers to this file, which helps in identifying them.
Solrconfig.xml − This file contains the definitions and core-specific configurations related to request handling and response formatting, along with indexing, configuring, managing memory and making commits.
Schema.xml − This file contains the whole schema along with the fields and field types.
Core.properties − This file contains the configurations specific to the core. It is referred for core discovery, as it contains the name of the core and path of the data directory. It can be used in any directory, which will then be treated as the core directory.
Apache Solr - Basic Commands
Starting Solr
After installing Solr, browse to the bin folder in Solr home directory and start Solr using the following command.
[Hadoop@localhost ~]$ cd
[Hadoop@localhost ~]$ cd Solr/
[Hadoop@localhost Solr]$ cd bin/
[Hadoop@localhost bin]$ ./Solr start
This command starts Solr in the background, listening on port 8983 by displaying the following message.
Waiting up to 30 seconds to see Solr running on port 8983 [\]
Started Solr server on port 8983 (pid = 6035). Happy searching!
Starting Solr in foreground
If you start Solr using the start command, then Solr will start in the background. Instead, you can start Solr in the foreground using the –f option.
[Hadoop@localhost bin]$ ./Solr start –f

5823 INFO  (coreLoadExecutor-6-thread-2) [   ] o.a.s.c.SolrResourceLoader
Adding 'file:/home/Hadoop/Solr/contrib/extraction/lib/xmlbeans-2.6.0.jar' to
classloader
5823 INFO  (coreLoadExecutor-6-thread-2) [   ] o.a.s.c.SolrResourceLoader
Adding 'file:/home/Hadoop/Solr/dist/Solr-cell-6.2.0.jar' to classloader
5823 INFO  (coreLoadExecutor-6-thread-2) [   ] o.a.s.c.SolrResourceLoader
Adding 'file:/home/Hadoop/Solr/contrib/clustering/lib/carrot2-guava-18.0.jar'
to classloader
5823 INFO  (coreLoadExecutor-6-thread-2) [   ] o.a.s.c.SolrResourceLoader
Adding 'file:/home/Hadoop/Solr/contrib/clustering/lib/attributes-binder1.3.1.jar'
to classloader
5823 INFO  (coreLoadExecutor-6-thread-2) [   ] o.a.s.c.SolrResourceLoader
Adding 'file:/home/Hadoop/Solr/contrib/clustering/lib/simple-xml-2.7.1.jar'
to classloader
……………………………………………………………………………………………………………………………………………………………………………………………………………
………………………………………………………………………………………………………………………………………………………………………………………………….
12901 INFO  (coreLoadExecutor-6-thread-1) [   x:Solr_sample] o.a.s.u.UpdateLog
Took 24.0ms to seed version buckets with highest version 1546058939881226240 12902
INFO  (coreLoadExecutor-6-thread-1) [   x:Solr_sample]
o.a.s.c.CoreContainer registering core: Solr_sample
12904 INFO  (coreLoadExecutor-6-thread-2) [   x:my_core] o.a.s.u.UpdateLog Took
16.0ms to seed version buckets with highest version 1546058939894857728
12904 INFO  (coreLoadExecutor-6-thread-2) [   x:my_core] o.a.s.c.CoreContainer
registering core: my_core
Starting Solr on another port
Using –p option of the start command, we can start Solr in another port, as shown in the following code block.
[Hadoop@localhost bin]$ ./Solr start -p 8984

Waiting up to 30 seconds to see Solr running on port 8984 [-]
Started Solr server on port 8984 (pid = 10137). Happy searching!
Stopping Solr
You can stop Solr using the stop command.
$ ./Solr stop
This command stops Solr, displaying a message as shown below.
Sending stop command to Solr running on port 8983 ... waiting 5 seconds to
allow Jetty process 6035 to stop gracefully.
Restarting Solr
The restart command of Solr stops Solr for 5 seconds and starts it again. You can restart Solr using the following command −
./Solr restart
This command restarts Solr, displaying the following message −
Sending stop command to Solr running on port 8983 ... waiting 5 seconds to
allow Jetty process 6671 to stop gracefully.
Waiting up to 30 seconds to see Solr running on port 8983 [|]  [/]
Started Solr server on port 8983 (pid = 6906). Happy searching!
Solr ─ help Command
The help command of Solr can be used to check the usage of the Solr prompt and its options.
[Hadoop@localhost bin]$ ./Solr -help

Usage: Solr COMMAND OPTIONS
   where COMMAND is one of: start, stop, restart, status, healthcheck,
create, create_core, create_collection, delete, version, zk
Standalone server example (start Solr running in the background on port 8984):
   ./Solr start -p 8984
SolrCloud example (start Solr running in SolrCloud mode using localhost:2181
to connect to Zookeeper, with 1g max heap size and remote Java debug options enabled):
   ./Solr start -c -m 1g -z localhost:2181 -a "-Xdebug -
   Xrunjdwp:transport = dt_socket,server = y,suspend = n,address = 1044"
Pass -help after any COMMAND to see command-specific usage information,
such as: ./Solr start -help or ./Solr stop -help
Solr ─ status Command
This status command of Solr can be used to search and find out the running Solr instances on your computer. It can provide you information about a Solr instance such as its version, memory usage, etc.
You can check the status of a Solr instance, using the status command as follows −
[Hadoop@localhost bin]$ ./Solr status
On executing, the above command displays the status of Solr as follows −
Found 1 Solr nodes:

Solr process 6906 running on port 8983 {
   "Solr_home":"/home/Hadoop/Solr/server/Solr",
   "version":"6.2.0 764d0f19151dbff6f5fcd9fc4b2682cf934590c5 -
   mike - 2016-08-20 05:41:37",
   "startTime":"2016-09-20T06:00:02.877Z",
   "uptime":"0 days, 0 hours, 5 minutes, 14 seconds",
   "memory":"30.6 MB (%6.2) of 490.7 MB"
}
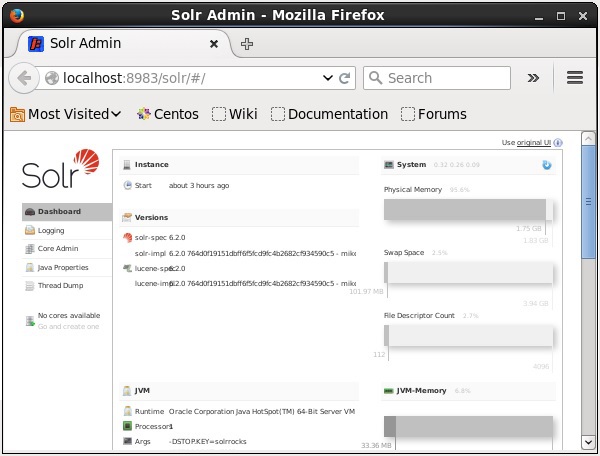
Solr Admin
After starting Apache Solr, you can visit the homepage of the Solr web interface by using the following URL.
Localhost:8983/Solr/
The interface of Solr Admin appears as follows −
Apache Solr - Core
A Solr Core is a running instance of a Lucene index that contains all the Solr configuration files required to use it. We need to create a Solr Core to perform operations like indexing and analyzing.
A Solr application may contain one or multiple cores. If necessary, two cores in a Solr application can communicate with each other.
Creating a Core
After installing and starting Solr, you can connect to the client (web interface) of Solr.
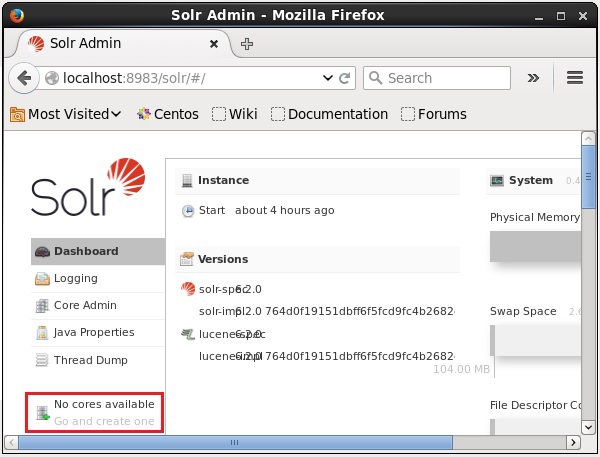
As highlighted in the following screenshot, initially there are no cores in Apache Solr. Now, we will see how to create a core in Solr.
Using create command
One way to create a core is to create a schema-less core using the create command, as shown below −
[Hadoop@localhost bin]$ ./Solr create -c Solr_sample
Here, we are trying to create a core named Solr_sample in Apache Solr. This command creates a core displaying the following message.
Copying configuration to new core instance directory:
/home/Hadoop/Solr/server/Solr/Solr_sample

Creating new core 'Solr_sample' using command:
https://localhost:8983/Solr/admin/cores?action=CREATE&name=Solr_sample&instanceD
ir = Solr_sample {
   "responseHeader":{
      "status":0,
      "QTime":11550
   },
   "core":"Solr_sample"
}
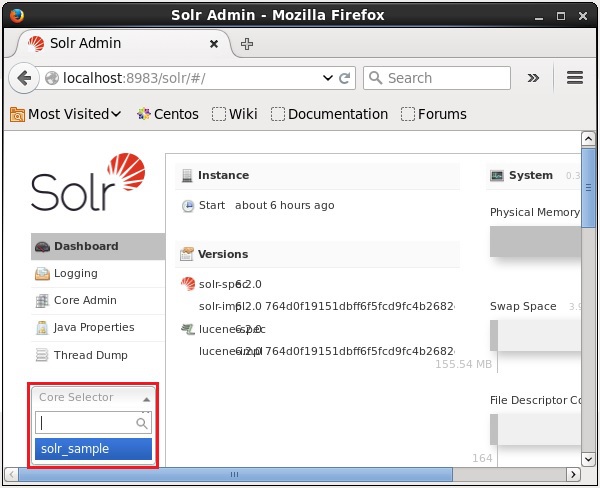
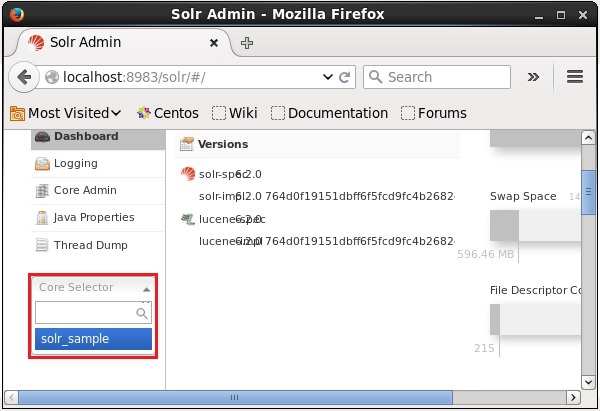
You can create multiple cores in Solr. On the left-hand side of the Solr Admin, you can see a core selector where you can select the newly created core, as shown in the following screenshot.
Using create_core command
Alternatively, you can create a core using the create_core command. This command has the following options −
| –c core_name | Name of the core you wanted to create |
| -p port_name | Port at which you want to create the core |
| -d conf_dir | Configuration directory of the port |
Let’s see how you can use the create_core command. Here, we will try to create a core named my_core.
[Hadoop@localhost bin]$ ./Solr create_core -c my_core
On executing, the above command creates a core displaying the following message −
Copying configuration to new core instance directory:
/home/Hadoop/Solr/server/Solr/my_core

Creating new core 'my_core' using command:
https://localhost:8983/Solr/admin/cores?action=CREATE&name=my_core&instanceD
ir = my_core {
   "responseHeader":{
      "status":0,
      "QTime":1346
   },
   "core":"my_core"
}
Deleting a Core
You can delete a core using the delete command of Apache Solr. Let’s suppose we have a core named my_core in Solr, as shown in the following screenshot.

You can delete this core using the delete command by passing the name of the core to this command as follows −
[Hadoop@localhost bin]$ ./Solr delete -c my_core
On executing the above command, the specified core will be deleted displaying the following message.
Deleting core 'my_core' using command:
https://localhost:8983/Solr/admin/cores?action=UNLOAD&core = my_core&deleteIndex
   = true&deleteDataDir = true&deleteInstanceDir = true  {

   "responseHeader" :{
      "status":0,
      "QTime":170
   }
}
You can open the web interface of Solr to verify whether the core has been deleted or not.
Apache Solr - Indexing Data
In general, indexing is an arrangement of documents or (other entities) systematically. Indexing enables users to locate information in a document.
Indexing collects, parses, and stores documents.
Indexing is done to increase the speed and performance of a search query while finding a required document.
Indexing in Apache Solr
In Apache Solr, we can index (add, delete, modify) various document formats such as xml, csv, pdf, etc. We can add data to Solr index in several ways.
In this chapter, we are going to discuss indexing −
- Using the Solr Web Interface.
- Using any of the client APIs like Java, Python, etc.
- Using the post tool.
In this chapter, we will discuss how to add data to the index of Apache Solr using various interfaces (command line, web interface, and Java client API)
Adding Documents using Post Command
Solr has a post command in its bin/ directory. Using this command, you can index various formats of files such as JSON, XML, CSV in Apache Solr.
Browse through the bin directory of Apache Solr and execute the –h option of the post command, as shown in the following code block.
[Hadoop@localhost bin]$ cd $SOLR_HOME
[Hadoop@localhost bin]$ ./post -h
On executing the above command, you will get a list of options of the post command, as shown below.
Usage: post -c <collection> [OPTIONS] <files|directories|urls|-d [".."]>
or post –help
   collection name defaults to DEFAULT_SOLR_COLLECTION if not specified
OPTIONS
=======
Solr options:
   -url <base Solr update URL> (overrides collection, host, and port)
   -host <host> (default: localhost)
   -p or -port <port> (default: 8983)
   -commit yes|no (default: yes)

Web crawl options:
   -recursive <depth> (default: 1)
   -delay <seconds> (default: 10)

Directory crawl options:
   -delay <seconds> (default: 0)

stdin/args options:
   -type <content/type> (default: application/xml)

Other options:
   -filetypes <type>[,<type>,...] (default:
   xml,json,jsonl,csv,pdf,doc,docx,ppt,pptx,xls,xlsx,odt,odp,ods,ott,otp,ots,
   rtf,htm,html,txt,log)
   -params "<key> = <value>[&<key> = <value>...]" (values must be
   URL-encoded; these pass through to Solr update request)
   -out yes|no (default: no; yes outputs Solr response to console)
   -format Solr (sends application/json content as Solr commands
   to /update instead of /update/json/docs)

Examples:
* JSON file:./post -c wizbang events.json
* XML files: ./post -c records article*.xml
* CSV file: ./post -c signals LATEST-signals.csv
* Directory of files: ./post -c myfiles ~/Documents
* Web crawl: ./post -c gettingstarted https://lucene.apache.org/Solr -recursive 1 -delay 1
* Standard input (stdin): echo '{commit: {}}' | ./post -c my_collection -
type application/json -out yes –d
* Data as string: ./post -c signals -type text/csv -out yes -d $'id,value\n1,0.47'
Example
Suppose we have a file named sample.csv with the following content (in the bin directory).
| Student ID | First Name | Lasst Name | Phone | City |
|---|---|---|---|---|
| 001 | Rajiv | Reddy | 9848022337 | Hyderabad |
| 002 | Siddharth | Bhattacharya | 9848022338 | Kolkata |
| 003 | Rajesh | Khanna | 9848022339 | Delhi |
| 004 | Preethi | Agarwal | 9848022330 | Pune |
| 005 | Trupthi | Mohanty | 9848022336 | Bhubaneshwar |
| 006 | Archana | Mishra | 9848022335 | Chennai |
The above dataset contains personal details like Student id, first name, last name, phone, and city. The CSV file of the dataset is shown below. Here, you must note that you need to mention the schema, documenting its first line.
id,    first_name,   last_name,   phone_no,      location
001,   Pruthvi,      Reddy,       9848022337,    Hyderabad
002,   kasyap,       Sastry,      9848022338,    Vishakapatnam
003,   Rajesh,       Khanna,      9848022339,    Delhi
004,   Preethi,      Agarwal,     9848022330,    Pune
005,   Trupthi,      Mohanty,     9848022336,    Bhubaneshwar
006,   Archana,      Mishra,      9848022335,    Chennai
You can index this data under the core named sample_Solr using the post command as follows −
[Hadoop@localhost bin]$ ./post -c Solr_sample sample.csv
On executing the above command, the given document is indexed under the specified core, generating the following output.
/home/Hadoop/java/bin/java -classpath /home/Hadoop/Solr/dist/Solr-core
6.2.0.jar -Dauto = yes -Dc = Solr_sample -Ddata = files
org.apache.Solr.util.SimplePostTool sample.csv
SimplePostTool version 5.0.0
Posting files to [base] url https://localhost:8983/Solr/Solr_sample/update...
Entering auto mode. File endings considered are
xml,json,jsonl,csv,pdf,doc,docx,ppt,pptx,xls,xlsx,odt,odp,ods,ott,otp,ots,rtf,
htm,html,txt,log
POSTing file sample.csv (text/csv) to [base]
1 files indexed.
COMMITting Solr index changes to
https://localhost:8983/Solr/Solr_sample/update...
Time spent: 0:00:00.228
Visit the homepage of Solr Web UI using the following URL −
https://localhost:8983/
Select the core Solr_sample. By default, the request handler is /select and the query is “:”. Without doing any modifications, click the ExecuteQuery button at the bottom of the page.
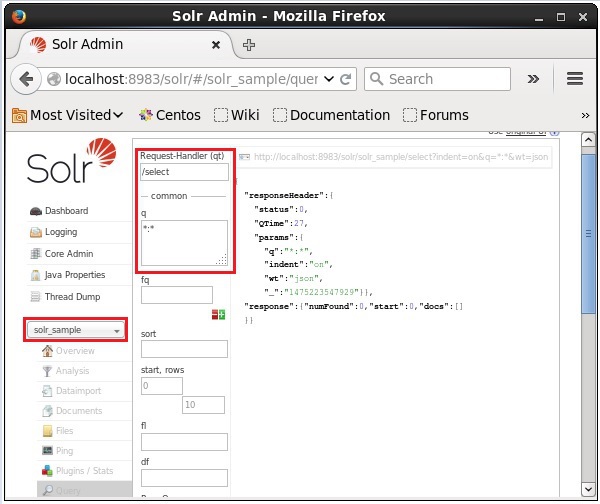
On executing the query, you can observe the contents of the indexed CSV document in JSON format (default), as shown in the following screenshot.

Note − In the same way, you can index other file formats such as JSON, XML, CSV, etc.
Adding Documents using the Solr Web Interface
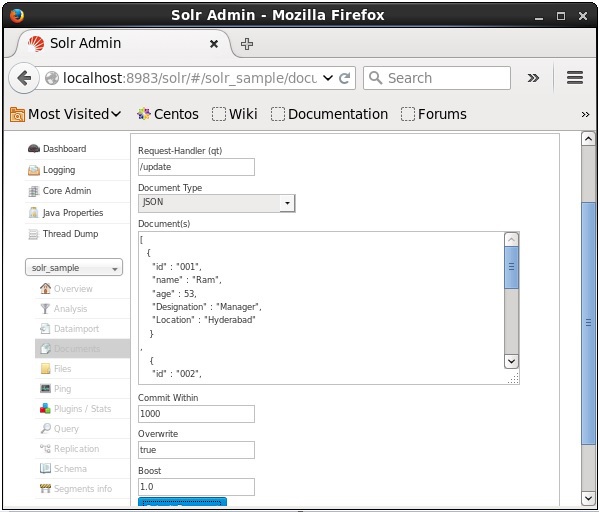
You can also index documents using the web interface provided by Solr. Let us see how to index the following JSON document.
[
   {
      "id" : "001",
      "name" : "Ram",
      "age" : 53,
      "Designation" : "Manager",
      "Location" : "Hyderabad",
   },
   {
      "id" : "002",
      "name" : "Robert",
      "age" : 43,
      "Designation" : "SR.Programmer",
      "Location" : "Chennai",
   },
   {
      "id" : "003",
      "name" : "Rahim",
      "age" : 25,
      "Designation" : "JR.Programmer",
      "Location" : "Delhi",
   }
]
Step 1
Open Solr web interface using the following URL −
https://localhost:8983/
Step 2
Select the core Solr_sample. By default, the values of the fields Request Handler, Common Within, Overwrite, and Boost are /update, 1000, true, and 1.0 respectively, as shown in the following screenshot.
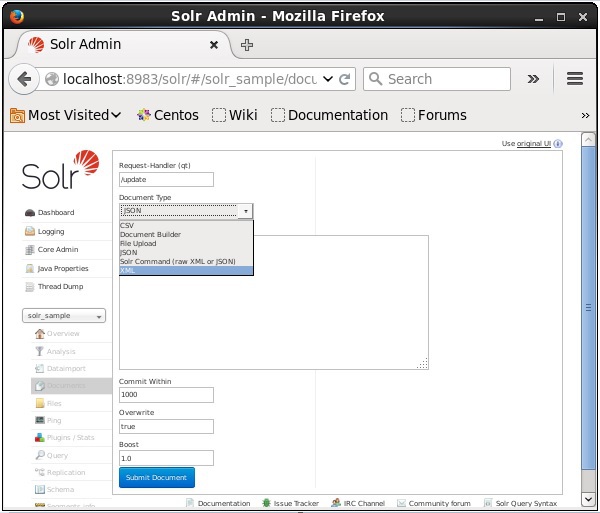
Now, choose the document format you want from JSON, CSV, XML, etc. Type the document to be indexed in the text area and click the Submit Document button, as shown in the following screenshot.
Adding Documents using Java Client API
Following is the Java program to add documents to Apache Solr index. Save this code in a file with the name AddingDocument.java.
import java.io.IOException;

import org.apache.Solr.client.Solrj.SolrClient;
import org.apache.Solr.client.Solrj.SolrServerException;
import org.apache.Solr.client.Solrj.impl.HttpSolrClient;
import org.apache.Solr.common.SolrInputDocument;

public class AddingDocument {
   public static void main(String args[]) throws Exception {
      //Preparing the Solr client
      String urlString = "https://localhost:8983/Solr/my_core";
      SolrClient Solr = new HttpSolrClient.Builder(urlString).build();

      //Preparing the Solr document
      SolrInputDocument doc = new SolrInputDocument();

      //Adding fields to the document
      doc.addField("id", "003");
      doc.addField("name", "Rajaman");
      doc.addField("age","34");
      doc.addField("addr","vishakapatnam");

      //Adding the document to Solr
      Solr.add(doc);

      //Saving the changes
      Solr.commit();
      System.out.println("Documents added");
   }
}
Compile the above code by executing the following commands in the terminal −
[Hadoop@localhost bin]$ javac AddingDocument
[Hadoop@localhost bin]$ java AddingDocument
On executing the above command, you will get the following output.
Documents added
Apache Solr - Adding Documents (XML)
In the previous chapter, we explained how to add data into Solr which is in JSON and .CSV file formats. In this chapter, we will demonstrate how to add data in Apache Solr index using XML document format.
Sample Data
Suppose we need to add the following data to Solr index using the XML file format.
| Student ID | First Name | Last Name | Phone | City |
|---|---|---|---|---|
| 001 | Rajiv | Reddy | 9848022337 | Hyderabad |
| 002 | Siddharth | Bhattacharya | 9848022338 | Kolkata |
| 003 | Rajesh | Khanna | 9848022339 | Delhi |
| 004 | Preethi | Agarwal | 9848022330 | Pune |
| 005 | Trupthi | Mohanty | 9848022336 | Bhubaneshwar |
| 006 | Archana | Mishra | 9848022335 | Chennai |
Adding Documents Using XML
To add the above data into Solr index, we need to prepare an XML document, as shown below. Save this document in a file with the name sample.xml.
<add>
   <doc>
      <field name = "id">001</field>
      <field name = "first name">Rajiv</field>
      <field name = "last name">Reddy</field>
      <field name = "phone">9848022337</field>
      <field name = "city">Hyderabad</field>
   </doc>
   <doc>
      <field name = "id">002</field>
      <field name = "first name">Siddarth</field>
      <field name = "last name">Battacharya</field>
      <field name = "phone">9848022338</field>
      <field name = "city">Kolkata</field>
   </doc>
   <doc>
      <field name = "id">003</field>
      <field name = "first name">Rajesh</field>
      <field name = "last name">Khanna</field>
      <field name = "phone">9848022339</field>
      <field name = "city">Delhi</field>
   </doc>
   <doc>
      <field name = "id">004</field>
      <field name = "first name">Preethi</field>
      <field name = "last name">Agarwal</field>
      <field name = "phone">9848022330</field>
      <field name = "city">Pune</field>
   </doc>
   <doc>
      <field name = "id">005</field>
      <field name = "first name">Trupthi</field>
      <field name = "last name">Mohanthy</field>
      <field name = "phone">9848022336</field>
      <field name = "city">Bhuwaeshwar</field>
   </doc>
   <doc>
      <field name = "id">006</field>
      <field name = "first name">Archana</field>
      <field name = "last name">Mishra</field>
      <field name = "phone">9848022335</field>
      <field name = "city">Chennai</field>
   </doc>
</add>
As you can observe, the XML file written to add data to index contains three important tags namely, <add> </add>, <doc></doc>, and < field >< /field >.
add − This is the root tag for adding documents to the index. It contains one or more documents that are to be added.
doc − The documents we add should be wrapped within the <doc></doc> tags. This document contains the data in the form of fields.
field − The field tag holds the name and value of the fields of the document.
After preparing the document, you can add this document to the index using any of the means discussed in the previous chapter.
Suppose the XML file exists in the bin directory of Solr and it is to be indexed in the core named my_core, then you can add it to Solr index using the post tool as follows −
[Hadoop@localhost bin]$ ./post -c my_core sample.xml
On executing the above command, you will get the following output.
/home/Hadoop/java/bin/java -classpath /home/Hadoop/Solr/dist/Solr-
core6.2.0.jar -Dauto = yes -Dc = my_core -Ddata = files
org.apache.Solr.util.SimplePostTool sample.xml
SimplePostTool version 5.0.0
Posting files to [base] url https://localhost:8983/Solr/my_core/update...
Entering auto mode. File endings considered are xml,json,jsonl,csv,pdf,doc,docx,ppt,pptx,
xls,xlsx,odt,odp,ods,ott,otp,ots,rtf,htm,html,txt,log
POSTing file sample.xml (application/xml) to [base]
1 files indexed.
COMMITting Solr index changes to https://localhost:8983/Solr/my_core/update...
Time spent: 0:00:00.201
Verification
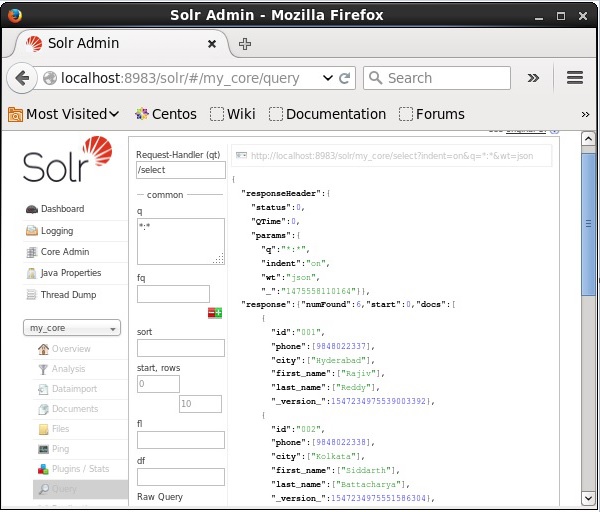
Visit the homepage of Apache Solr web interface and select the core my_core. Try to retrieve all the documents by passing the query “:” in the text area q and execute the query. On executing, you can observe that the desired data is added to the Solr index.
Apache Solr - Updating Data
Updating the Document Using XML
Following is the XML file used to update a field in the existing document. Save this in a file with the name update.xml.
<add>
   <doc>
      <field name = "id">001</field>
      <field name = "first name" update = "set">Raj</field>
      <field name = "last name" update = "add">Malhotra</field>
      <field name = "phone" update = "add">9000000000</field>
      <field name = "city" update = "add">Delhi</field>
   </doc>
</add>
As you can observe, the XML file written to update data is just like the one which we use to add documents. But the only difference is we use the update attribute of the field.
In our example, we will use the above document and try to update the fields of the document with the id 001.
Suppose the XML document exists in the bin directory of Solr. Since we are updating the index which exists in the core named my_core, you can update using the post tool as follows −
[Hadoop@localhost bin]$ ./post -c my_core update.xml
On executing the above command, you will get the following output.
/home/Hadoop/java/bin/java -classpath /home/Hadoop/Solr/dist/Solr-core
6.2.0.jar -Dauto = yes -Dc = my_core -Ddata = files
org.apache.Solr.util.SimplePostTool update.xml
SimplePostTool version 5.0.0
Posting files to [base] url https://localhost:8983/Solr/my_core/update...
Entering auto mode. File endings considered are
xml,json,jsonl,csv,pdf,doc,docx,ppt,pptx,xls,xlsx,odt,odp,ods,ott,otp,ots,rtf,
htm,html,txt,log
POSTing file update.xml (application/xml) to [base]
1 files indexed.
COMMITting Solr index changes to https://localhost:8983/Solr/my_core/update...
Time spent: 0:00:00.159
Verification
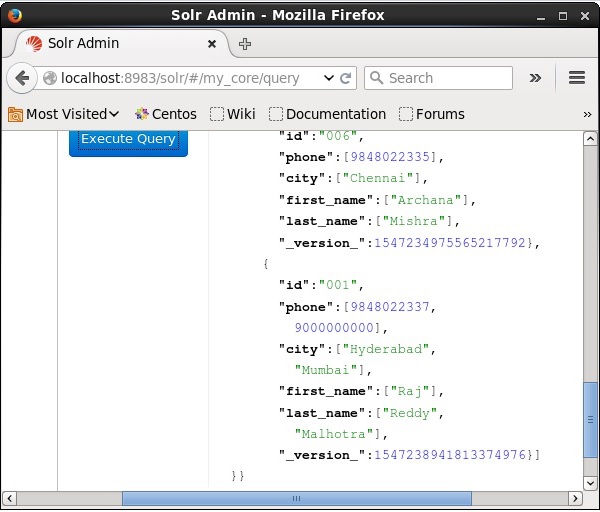
Visit the homepage of Apache Solr web interface and select the core as my_core. Try to retrieve all the documents by passing the query “:” in the text area q and execute the query. On executing, you can observe that the document is updated.
Updating the Document Using Java (Client API)
Following is the Java program to add documents to Apache Solr index. Save this code in a file with the name UpdatingDocument.java.
import java.io.IOException;

import org.apache.Solr.client.Solrj.SolrClient;
import org.apache.Solr.client.Solrj.SolrServerException;
import org.apache.Solr.client.Solrj.impl.HttpSolrClient;
import org.apache.Solr.client.Solrj.request.UpdateRequest;
import org.apache.Solr.client.Solrj.response.UpdateResponse;
import org.apache.Solr.common.SolrInputDocument;

public class UpdatingDocument {
   public static void main(String args[]) throws SolrServerException, IOException {
      //Preparing the Solr client
      String urlString = "https://localhost:8983/Solr/my_core";
      SolrClient Solr = new HttpSolrClient.Builder(urlString).build();

      //Preparing the Solr document
      SolrInputDocument doc = new SolrInputDocument();

      UpdateRequest updateRequest = new UpdateRequest();
      updateRequest.setAction( UpdateRequest.ACTION.COMMIT, false, false);
      SolrInputDocument myDocumentInstantlycommited = new SolrInputDocument();

      myDocumentInstantlycommited.addField("id", "002");
      myDocumentInstantlycommited.addField("name", "Rahman");
      myDocumentInstantlycommited.addField("age","27");
      myDocumentInstantlycommited.addField("addr","hyderabad");

      updateRequest.add( myDocumentInstantlycommited);
      UpdateResponse rsp = updateRequest.process(Solr);
      System.out.println("Documents Updated");
   }
}
Compile the above code by executing the following commands in the terminal −
[Hadoop@localhost bin]$ javac UpdatingDocument
[Hadoop@localhost bin]$ java UpdatingDocument
On executing the above command, you will get the following output.
Documents updated
Apache Solr - Deleting Documents
Deleting the Document
To delete documents from the index of Apache Solr, we need to specify the ID’s of the documents to be deleted between the <delete></delete> tags.
<delete>
   <id>003</id>
   <id>005</id>
   <id>004</id>
   <id>002</id>
</delete>
Here, this XML code is used to delete the documents with ID’s 003 and 005. Save this code in a file with the name delete.xml.
If you want to delete the documents from the index which belongs to the core named my_core, then you can post the delete.xml file using the post tool, as shown below.
[Hadoop@localhost bin]$ ./post -c my_core delete.xml
On executing the above command, you will get the following output.
/home/Hadoop/java/bin/java -classpath /home/Hadoop/Solr/dist/Solr-core
6.2.0.jar -Dauto = yes -Dc = my_core -Ddata = files
org.apache.Solr.util.SimplePostTool delete.xml
SimplePostTool version 5.0.0
Posting files to [base] url https://localhost:8983/Solr/my_core/update...
Entering auto mode. File endings considered are
xml,json,jsonl,csv,pdf,doc,docx,ppt,pptx,xls,xlsx,odt,odp,ods,ott,otp,ots,
rtf,htm,html,txt,log
POSTing file delete.xml (application/xml) to [base]
1 files indexed.
COMMITting Solr index changes to https://localhost:8983/Solr/my_core/update...
Time spent: 0:00:00.179
Verification
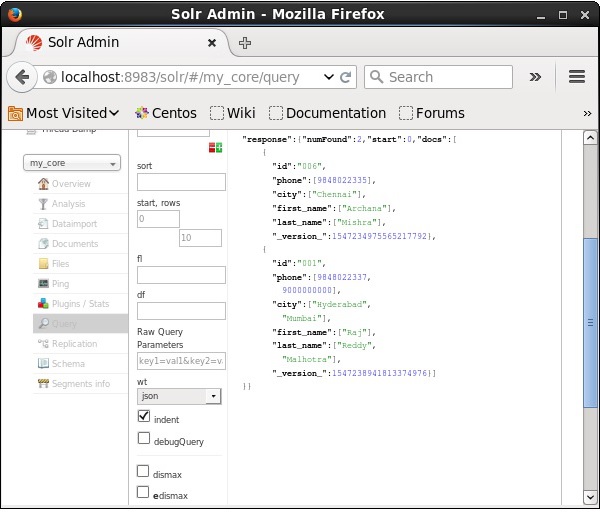
Visit the homepage of the of Apache Solr web interface and select the core as my_core. Try to retrieve all the documents by passing the query “:” in the text area q and execute the query. On executing, you can observe that the specified documents are deleted.
Deleting a Field
Sometimes we need to delete documents based on fields other than ID. For example, we may have to delete the documents where the city is Chennai.
In such cases, you need to specify the name and value of the field within the <query></query> tag pair.
<delete>
   <query>city:Chennai</query>
</delete>
Save it as delete_field.xml and perform the delete operation on the core named my_core using the post tool of Solr.
[Hadoop@localhost bin]$ ./post -c my_core delete_field.xml
On executing the above command, it produces the following output.
/home/Hadoop/java/bin/java -classpath /home/Hadoop/Solr/dist/Solr-core
6.2.0.jar -Dauto = yes -Dc = my_core -Ddata = files
org.apache.Solr.util.SimplePostTool delete_field.xml
SimplePostTool version 5.0.0
Posting files to [base] url https://localhost:8983/Solr/my_core/update...
Entering auto mode. File endings considered are
xml,json,jsonl,csv,pdf,doc,docx,ppt,pptx,xls,xlsx,odt,odp,ods,ott,otp,ots,
rtf,htm,html,txt,log
POSTing file delete_field.xml (application/xml) to [base]
1 files indexed.
COMMITting Solr index changes to https://localhost:8983/Solr/my_core/update...
Time spent: 0:00:00.084
Verification
Visit the homepage of the of Apache Solr web interface and select the core as my_core. Try to retrieve all the documents by passing the query “:” in the text area q and execute the query. On executing, you can observe that the documents containing the specified field value pair are deleted.

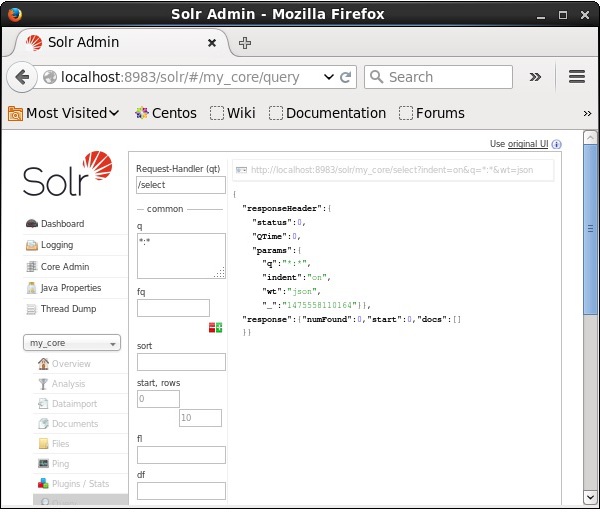
Deleting All Documents
Just like deleting a specific field, if you want to delete all the documents from an index, you just need to pass the symbol “:” between the tags <query></ query>, as shown below.
<delete>
   <query>*:*</query>
</delete>
Save it as delete_all.xml and perform the delete operation on the core named my_core using the post tool of Solr.
[Hadoop@localhost bin]$ ./post -c my_core delete_all.xml
On executing the above command, it produces the following output.
/home/Hadoop/java/bin/java -classpath /home/Hadoop/Solr/dist/Solr-core
6.2.0.jar -Dauto = yes -Dc = my_core -Ddata = files
org.apache.Solr.util.SimplePostTool deleteAll.xml
SimplePostTool version 5.0.0
Posting files to [base] url https://localhost:8983/Solr/my_core/update...
Entering auto mode. File endings considered are
xml,json,jsonl,csv,pdf,doc,docx,ppt,pptx,xls,xlsx,odt,odp,ods,ott,otp,ots,rtf,
htm,html,txt,log
POSTing file deleteAll.xml (application/xml) to [base]
1 files indexed.
COMMITting Solr index changes to https://localhost:8983/Solr/my_core/update...
Time spent: 0:00:00.138
Verification
Visit the homepage of Apache Solr web interface and select the core as my_core. Try to retrieve all the documents by passing the query “:” in the text area q and execute the query. On executing, you can observe that the documents containing the specified field value pair are deleted.
Deleting all the documents using Java (Client API)
Following is the Java program to add documents to Apache Solr index. Save this code in a file with the name UpdatingDocument.java.
import java.io.IOException;

import org.apache.Solr.client.Solrj.SolrClient;
import org.apache.Solr.client.Solrj.SolrServerException;
import org.apache.Solr.client.Solrj.impl.HttpSolrClient;
import org.apache.Solr.common.SolrInputDocument;

public class DeletingAllDocuments {
   public static void main(String args[]) throws SolrServerException, IOException {
      //Preparing the Solr client
      String urlString = "https://localhost:8983/Solr/my_core";
      SolrClient Solr = new HttpSolrClient.Builder(urlString).build();

      //Preparing the Solr document
      SolrInputDocument doc = new SolrInputDocument();

      //Deleting the documents from Solr
      Solr.deleteByQuery("*");

      //Saving the document
      Solr.commit();
      System.out.println("Documents deleted");
   }
}
Compile the above code by executing the following commands in the terminal −
[Hadoop@localhost bin]$ javac DeletingAllDocuments
[Hadoop@localhost bin]$ java DeletingAllDocuments
On executing the above command, you will get the following output.
Documents deleted
Apache Solr - Retrieving Data
In this chapter, we will discuss how to retrieve data using Java Client API. Suppose we have a .csv document named sample.csv with the following content.
001,9848022337,Hyderabad,Rajiv,Reddy
002,9848022338,Kolkata,Siddarth,Battacharya
003,9848022339,Delhi,Rajesh,Khanna
You can index this data under the core named sample_Solr using the post command.
[Hadoop@localhost bin]$ ./post -c Solr_sample sample.csv
Following is the Java program to add documents to Apache Solr index. Save this code in a file with named RetrievingData.java.
import java.io.IOException;

import org.apache.Solr.client.Solrj.SolrClient;
import org.apache.Solr.client.Solrj.SolrQuery;
import org.apache.Solr.client.Solrj.SolrServerException;
import org.apache.Solr.client.Solrj.impl.HttpSolrClient;
import org.apache.Solr.client.Solrj.response.QueryResponse;
import org.apache.Solr.common.SolrDocumentList;

public class RetrievingData {
   public static void main(String args[]) throws SolrServerException, IOException  {
      //Preparing the Solr client
      String urlString = "https://localhost:8983/Solr/my_core";
      SolrClient Solr = new HttpSolrClient.Builder(urlString).build();

      //Preparing Solr query
      SolrQuery query = new SolrQuery();
      query.setQuery("*:*");

      //Adding the field to be retrieved
      query.addField("*");

      //Executing the query
      QueryResponse queryResponse = Solr.query(query);

      //Storing the results of the query
      SolrDocumentList docs = queryResponse.getResults();
      System.out.println(docs);
      System.out.println(docs.get(0));
      System.out.println(docs.get(1));
      System.out.println(docs.get(2));

      //Saving the operations
      Solr.commit();
   }
}
Compile the above code by executing the following commands in the terminal −
[Hadoop@localhost bin]$ javac RetrievingData
[Hadoop@localhost bin]$ java RetrievingData
On executing the above command, you will get the following output.
{numFound = 3,start = 0,docs = [SolrDocument{id=001, phone = [9848022337],
city = [Hyderabad], first_name = [Rajiv], last_name = [Reddy],
_version_ = 1547262806014820352}, SolrDocument{id = 002, phone = [9848022338],
city = [Kolkata], first_name = [Siddarth], last_name = [Battacharya],

_version_ = 1547262806026354688}, SolrDocument{id = 003, phone = [9848022339],
city = [Delhi], first_name = [Rajesh], last_name = [Khanna],

_version_ = 1547262806029500416}]}

SolrDocument{id = 001, phone = [9848022337], city = [Hyderabad], first_name = [Rajiv],
last_name = [Reddy], _version_ = 1547262806014820352}

SolrDocument{id = 002, phone = [9848022338], city = [Kolkata], first_name = [Siddarth],
last_name = [Battacharya], _version_ = 1547262806026354688}

SolrDocument{id = 003, phone = [9848022339], city = [Delhi], first_name = [Rajesh],
last_name = [Khanna], _version_ = 1547262806029500416}
Apache Solr - Querying Data
In addition to storing data, Apache Solr also provides the facility of querying it back as and when required. Solr provides certain parameters using which we can query the data stored in it.
In the following table, we have listed down the various query parameters available in Apache Solr.
| Parameter | Description |
|---|---|
| q | This is the main query parameter of Apache Solr, documents are scored by their similarity to terms in this parameter. |
| fq | This parameter represents the filter query of Apache Solr the restricts the result set to documents matching this filter. |
| start | The start parameter represents the starting offsets for a page results the default value of this parameter is 0. |
| rows | This parameter represents the number of the documents that are to be retrieved per page. The default value of this parameter is 10. |
| sort | This parameter specifies the list of fields, separated by commas, based on which the results of the query is to be sorted. |
| fl | This parameter specifies the list of the fields to return for each document in the result set. |
| wt | This parameter represents the type of the response writer we wanted to view the result. |
You can see all these parameters as options to query Apache Solr. Visit the homepage of Apache Solr. On the left-hand side of the page, click on the option Query. Here, you can see the fields for the parameters of a query.
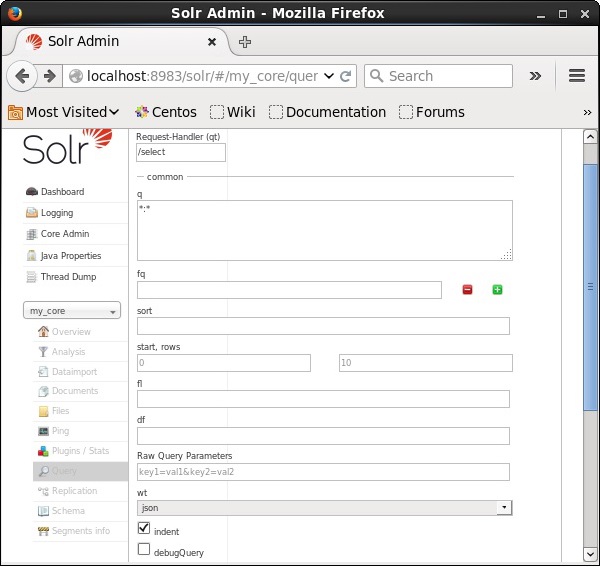
Retrieving the Records
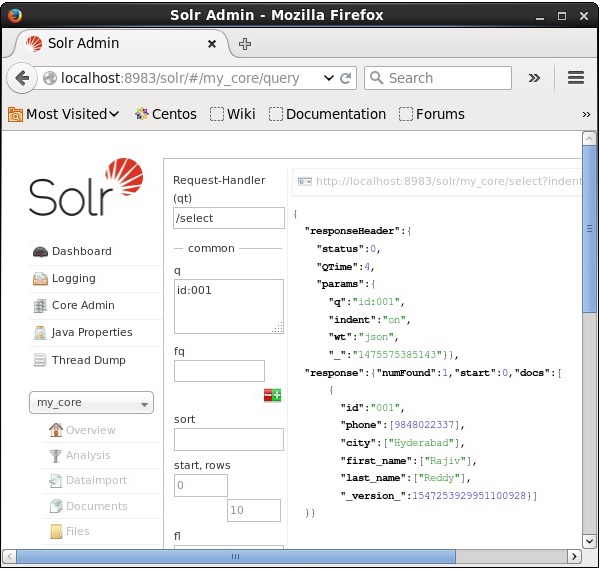
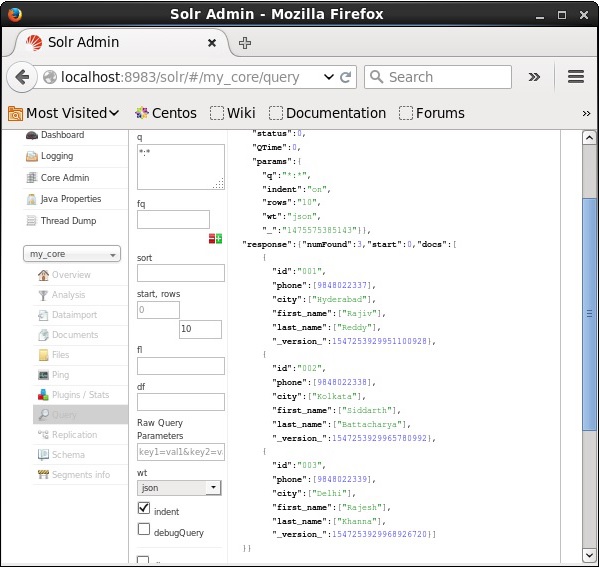
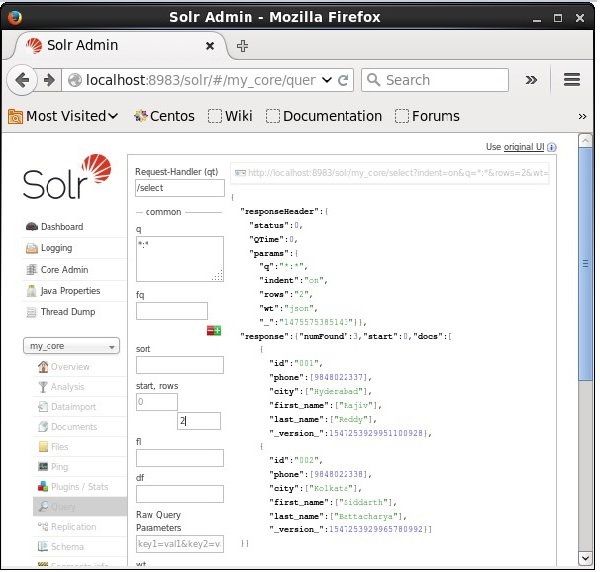
Assume we have 3 records in the core named my_core. To retrieve a particular record from the selected core, you need to pass the name and value pairs of the fields of a particular document. For example, if you want to retrieve the record with the value of the field id, you need to pass the name-value pair of the field as − Id:001 as value for the parameter q and execute the query.
In the same way, you can retrieve all the records from an index by passing *:* as a value to the parameter q, as shown in the following screenshot.
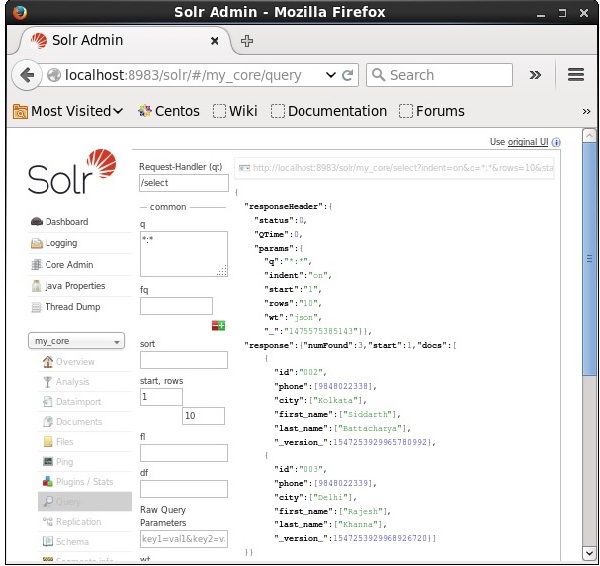
Retrieving from the 2nd record
We can retrieve the records from the second record by passing 2 as a value to the parameter start, as shown in the following screenshot.
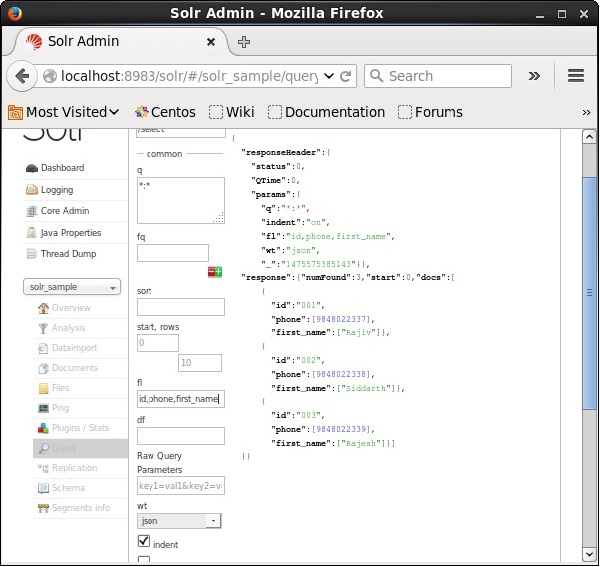
Restricting the Number of Records
You can restrict the number of records by specifying a value in the rows parameter. For example, we can restrict the total number of records in the result of the query to 2 by passing the value 2 into the parameter rows, as shown in the following screenshot.
Response Writer Type
You can get the response in required document type by selecting one from the provided values of the parameter wt.

In the above instance, we have chosen the .csv format to get the response.
List of the Fields
If we want to have particular fields in the resulted documents, we need to pass the list of the required fields, separated by commas, as a value to the property fl.
In the following example, we are trying to retrieve the fields − id, phone, and first_name.
Apache Solr - Faceting
Faceting in Apache Solr refers to the classification of the search results into various categories. In this chapter, we will discuss the types of faceting available in Apache Solr −
Query faceting − It returns the number of documents in the current search results that also match the given query.
Date faceting − It returns the number of documents that fall within certain date ranges.
Faceting commands are added to any normal Solr query request, and the faceting counts come back in the same query response.
Faceting Query Example
Using the field faceting, we can retrieve the counts for all terms, or just the top terms in any given field.
As an example, let us consider the following books.csv file that contains data about various books.
id,cat,name,price,inStock,author,series_t,sequence_i,genre_s
0553573403,book,A Game of Thrones,5.99,true,George R.R. Martin,"A Song of Ice
and Fire",1,fantasy

0553579908,book,A Clash of Kings,10.99,true,George R.R. Martin,"A Song of Ice
and Fire",2,fantasy

055357342X,book,A Storm of Swords,7.99,true,George R.R. Martin,"A Song of Ice
and Fire",3,fantasy

0553293354,book,Foundation,7.99,true,Isaac Asimov,Foundation Novels,1,scifi
0812521390,book,The Black Company,4.99,false,Glen Cook,The Chronicles of The
Black Company,1,fantasy

0812550706,book,Ender's Game,6.99,true,Orson Scott Card,Ender,1,scifi
0441385532,book,Jhereg,7.95,false,Steven Brust,Vlad Taltos,1,fantasy
0380014300,book,Nine Princes In Amber,6.99,true,Roger Zelazny,the Chronicles of
Amber,1,fantasy

0805080481,book,The Book of Three,5.99,true,Lloyd Alexander,The Chronicles of
Prydain,1,fantasy

080508049X,book,The Black Cauldron,5.99,true,Lloyd Alexander,The Chronicles of
Prydain,2,fantasy
Let us post this file into Apache Solr using the post tool.
[Hadoop@localhost bin]$ ./post -c Solr_sample sample.csv
On executing the above command, all the documents mentioned in the given .csv file will be uploaded into Apache Solr.
Now let us execute a faceted query on the field author with 0 rows on the collection/core my_core.
Open the web UI of Apache Solr and on the left-hand side of the page, check the checkbox facet, as shown in the following screenshot.
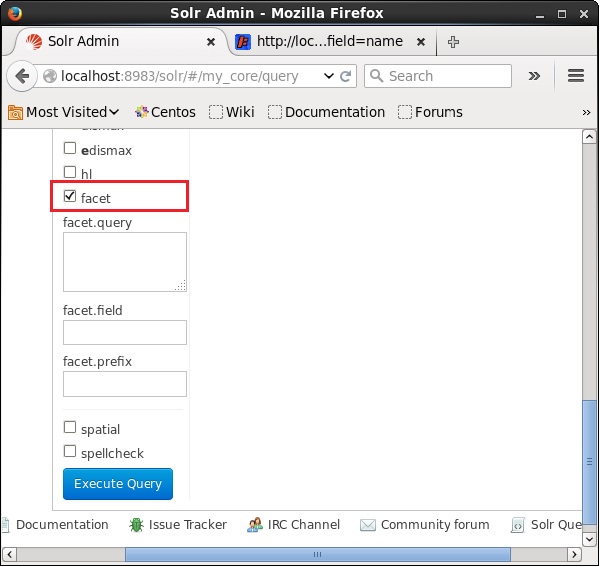
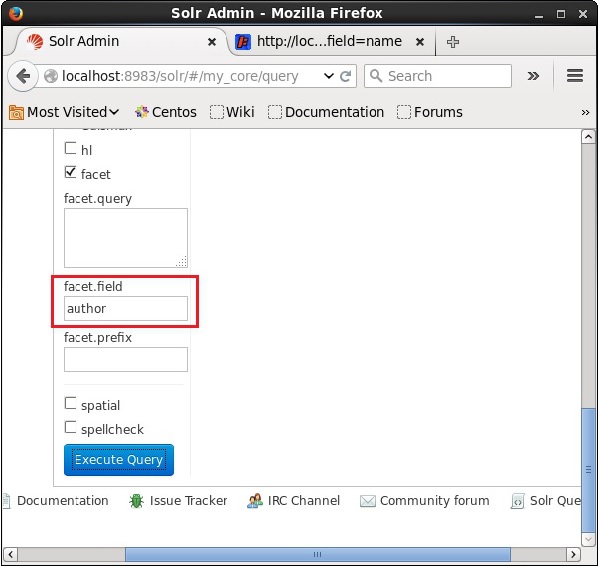
On checking the checkbox, you will have three more text fields in order to pass the parameters of the facet search. Now, as parameters of the query, pass the following values.
q = *:*, rows = 0, facet.field = author
Finally, execute the query by clicking the Execute Query button.
On executing, it will produce the following result.
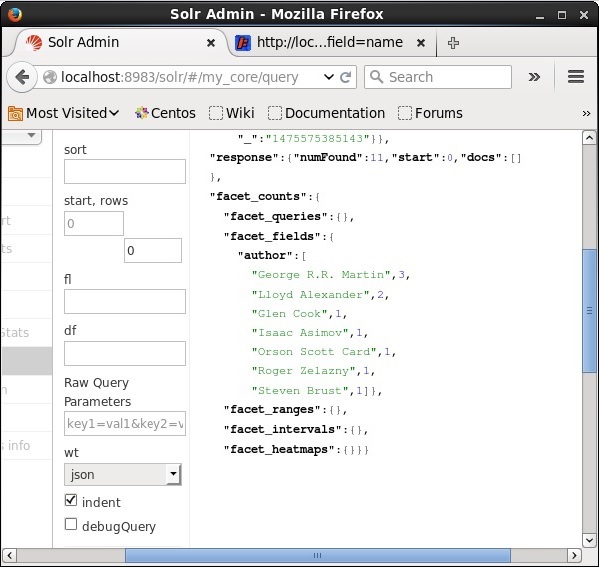
It categorizes the documents in the index based on author and specifies the number of books contributed by each author.
Faceting Using Java Client API
Following is the Java program to add documents to Apache Solr index. Save this code in a file with the name HitHighlighting.java.
import java.io.IOException;
import java.util.List;

import org.apache.Solr.client.Solrj.SolrClient;
import org.apache.Solr.client.Solrj.SolrQuery;
import org.apache.Solr.client.Solrj.SolrServerException;
import org.apache.Solr.client.Solrj.impl.HttpSolrClient;
import org.apache.Solr.client.Solrj.request.QueryRequest;
import org.apache.Solr.client.Solrj.response.FacetField;
import org.apache.Solr.client.Solrj.response.FacetField.Count;
import org.apache.Solr.client.Solrj.response.QueryResponse;
import org.apache.Solr.common.SolrInputDocument;

public class HitHighlighting {
   public static void main(String args[]) throws SolrServerException, IOException {
      //Preparing the Solr client
      String urlString = "https://localhost:8983/Solr/my_core";
      SolrClient Solr = new HttpSolrClient.Builder(urlString).build();

      //Preparing the Solr document
      SolrInputDocument doc = new SolrInputDocument();

      //String query = request.query;
      SolrQuery query = new SolrQuery();

      //Setting the query string
      query.setQuery("*:*");

      //Setting the no.of rows
      query.setRows(0);

      //Adding the facet field
      query.addFacetField("author");

      //Creating the query request
      QueryRequest qryReq = new QueryRequest(query);

      //Creating the query response
      QueryResponse resp = qryReq.process(Solr);

      //Retrieving the response fields
      System.out.println(resp.getFacetFields());

      List<FacetField> facetFields = resp.getFacetFields();
      for (int i = 0; i > facetFields.size(); i++) {
         FacetField facetField = facetFields.get(i);
         List<Count> facetInfo = facetField.getValues();

         for (FacetField.Count facetInstance : facetInfo) {
            System.out.println(facetInstance.getName() + " : " +
               facetInstance.getCount() + " [drilldown qry:" +
               facetInstance.getAsFilterQuery());
         }
         System.out.println("Hello");
      }
   }
}
Compile the above code by executing the following commands in the terminal −
[Hadoop@localhost bin]$ javac HitHighlighting
[Hadoop@localhost bin]$ java HitHighlighting
On executing the above command, you will get the following output.
[author:[George R.R. Martin (3), Lloyd Alexander (2), Glen Cook (1), Isaac
Asimov (1), Orson Scott Card (1), Roger Zelazny (1), Steven Brust (1)]]


