.NET Core - Quick Guide
.NET Core - Overview
.NET Core is the latest general purpose development platform maintained by Microsoft. It works across different platforms and has been redesigned in a way that makes .NET fast, flexible and modern. This happens to be one of the major contributions by Microsoft. Developers can now build Android, iOS, Linux, Mac, and Windows applications with .NET, all in Open Source.
In this tutorial, we will cover .NET Core and a few new innovations including the .NET Framework updates, .NET Standard, and Universal Windows Platform updates, etc.
Characteristics of .NET Core
The following are the major characteristics of .NET Core −
Open source
.NET Core is an open source implementation, using MIT and Apache 2 licenses.
.NET Core is a .NET Foundation project and is available on GitHub.
As an open source project, it promotes a more transparent development process and promotes an active and engaged community.
Cross-platform
Application implemented in .NET Core can be run and its code can be reused regardless of your platform target.
It currently supports three main operating systems (OS)
Windows
Linux
MacOS
The supported Operating Systems (OS), CPUs and application scenarios will grow over time, provided by Microsoft, other companies, and individuals.
Flexible deployment
There can be two types of deployments for .NET Core applications −
Framework-dependent deployment
Self-contained deployment
With framework-dependent deployment, your app depends on a system-wide version of .NET Core on which your app and third-party dependencies are installed.
With self-contained deployment, the .NET Core version used to build your application is also deployed along with your app and third-party dependencies and can run side-by-side with other versions.
Command-line tools
All product scenarios can be exercised at the command-line.
Compatible
.NET Core is compatible with .NET Framework, Xamarin and Mono, via the .NET Standard Library
Modular
.NET Core is released through NuGet in smaller assembly packages.
.NET Framework is one large assembly that contains most of the core functionalities.
.NET Core is made available as smaller feature-centric packages.
This modular approach enables the developers to optimize their app by including just those NuGet packages which they need in their app.
The benefits of a smaller app surface area include tighter security, reduced servicing, improved performance, and decreased costs in a pay-for-what-you-use model.
The .NET Core Platform
.NET Core Platform contains the following main parts −
.NET Runtime − It provides a type system, assembly loading, a garbage collector, native interop and other basic services.
Fundamental Libraries − A set of framework libraries, which provide primitive data types, app composition types and fundamental utilities.
SDK & Compiler − A set of SDK tools and language compilers that enable the base developer experience, available in the .NET Core SDK.
‘dotnet’ app host − It is used to launch .NET Core apps. It selects the runtime and hosts the runtime, provides an assembly loading policy and launches the app. The same host is also used to launch SDK tools in much the same way.
.NET Core - Prerequisites
In this chapter, we will discuss the various dependencies that you need to deploy and run. These include the .NET Core applications on Windows machines that are developed using Visual Studio.
Supported Windows Versions
.NET Core is supported on the following versions of Windows −
- Windows 7 SP1
- Windows 8.1
- Windows 10
- Windows Server 2008 R2 SP1 (Full Server or Server Core)
- Windows Server 2012 SP1 (Full Server or Server Core)
- Windows Server 2012 R2 SP1 (Full Server or Server Core)
- Windows Server 2016 (Full Server, Server Core or Nano Server)
Dependencies
If you are running your .NET Core application on Windows versions earlier than Windows 10 and Windows Server 2016, then it will also require the Visual C++ Redistributable.
This dependency is automatically installed for you if you use the .NET Core installer.
You need to manually install the Visual C++ Redistributable for Visual Studio 2015 if you are installing .NET Core via the installer script or deploying a self-contained .NET Core application.
For Windows 7 and Windows Server 2008 machines, you need to make sure that your Windows installation is up-to-date and also includes hotfix KB2533623 installed through Windows Update.
Prerequisites with Visual Studio
To develop .NET Core applications using the .NET Core SDK, you can use any editor of your choice.
However, if you want to develop .NET Core applications on Windows using Visual Studio, you can use the following two versions −
Visual Studio 2015
Visual Studio 2017 RC
Projects created with Visual Studio 2015 will be project.json-based by default while projects created with Visual Studio 2017 RC will always be MSBuild-based.
.NET Core - Environment Setup
In this chapter, we will discuss the Environment Setup of .NET Core. It is a significant redesign of the .NET Framework. To use .NET Core in your application, there are two versions you can use −
- Visual Studio 2015
- Visual Studio 2017 RC
Visual Studio 2015
To use Visual Studio 2015, you must have installed the following −
- Microsoft Visual Studio 2015 Update 3
- Microsoft .NET Core 1.0.1 - VS 2015 Tooling Preview 2
Microsoft provides a free version of visual studio which also contains the SQL Server and can be downloaded from https://www.visualstudio.com/en-us/downloads/download-visual-studio-vs.aspx and Microsoft .NET Core 1.0.1 - VS 2015 Tooling Preview 2 can be downloaded from https://www.visualstudio.com/downloads/
You can also follow the installation guidelines on the following Url https://www.microsoft.com/net/core/#windowsvs2017
Installation of Visual Studio 2015
Follow these steps to install Visual Studio 2015 −
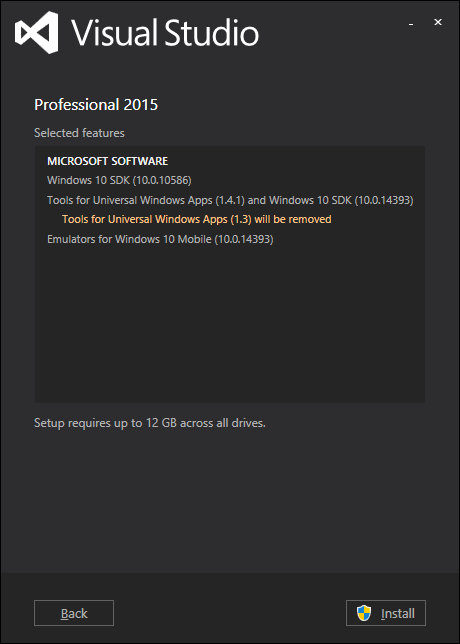
Step 1 − Once the downloading completes, then run the installer. The following dialog box will be displayed.
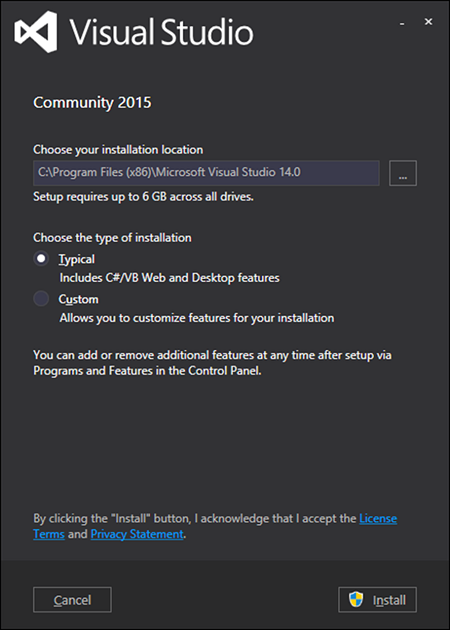
Step 2 − Click Install to start the installation process.
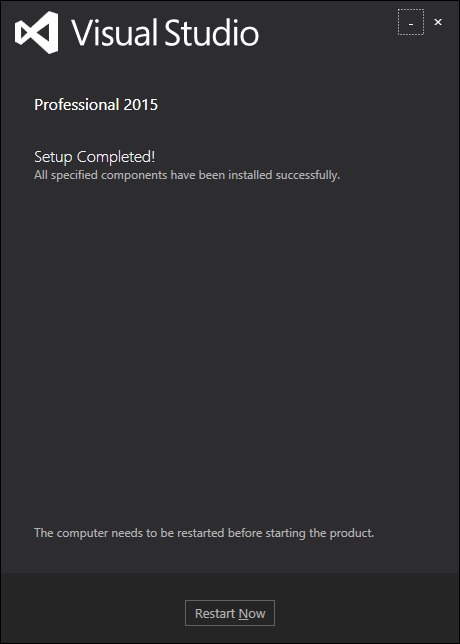
Step 3 − Once the installation completes, you will see the following dialog box.

Step 4 − Close this dialog and restart your computer if required.
Step 5 − Open Visual Studio from the Start Menu; you will receive the following dialog box. It may take a few minutes to load and finally be used for the first time.
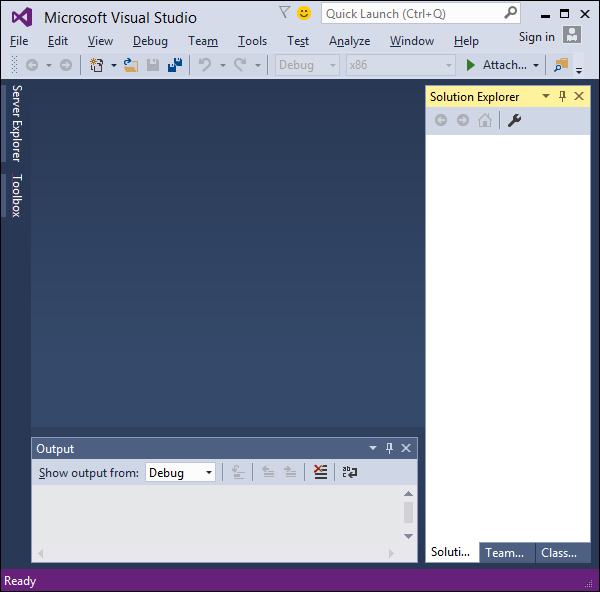
Step 6 − Once it is loaded, you will see the following screen.
Step 7 − Once Visual Studio installation is finished, then close Visual Studio and launch Microsoft .NET Core - VS 2015 Tooling Preview 2.
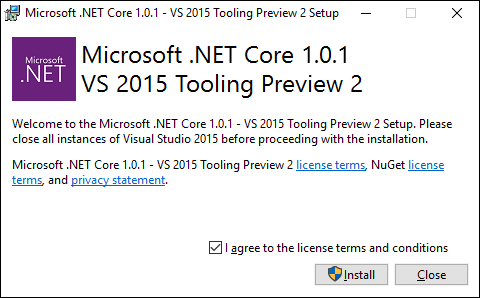
Step 8 − Check the checkbox and click Install.
Step 9 − Once the installation completes, you will see the following dialog box.
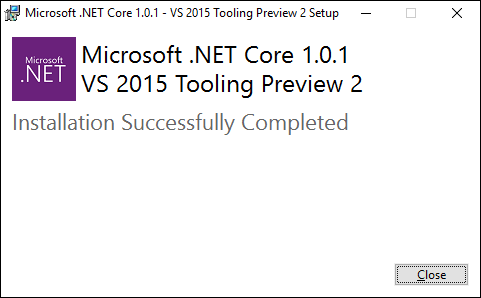
You are now ready to start your application using .NET Core.
Visual Studio 2017
In this tutorial, we will be using Visual Studio 2015, but if you want to use Visual Studio 2017, an experimental release of .NET Core tools for Visual Studio is included in Visual Studio 2017 RC and you can see the installation guidelines here https://www.microsoft.com/net/core/#windowsvs2017
.NET Core - Getting Started
Visual Studio 2015 provides a full-featured development environment for developing .NET Core applications. In this chapter, we will be creating a new project inside Visual Studio. Once you have installed the Visual Studio 2015 tooling, you can start building a new .NET Core Application.

In the New Project dialog box, in the Templates list, expand the Visual C# node and select .NET Core and you should see the following three new project templates
- Class Library (.NET Core)
- Console Application (.NET Core)
- ASP.NET Core Web Application (.NET Core)
In the middle pane on the New Project dialog box, select Console Application (.NET Core) and name it "FirstApp", then click OK.
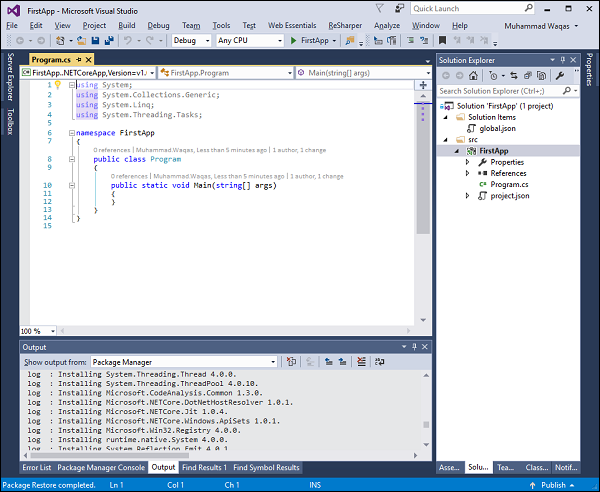
Visual Studio will open the newly created project, and you will see in the Solution Explorer window all of the files that are in this project.
To test that .NET core console application is working, let us add the following line.
using System;
using System.Collections.Generic;
using System.Linq;
using System.Threading.Tasks;
namespace FirstApp {
public class Program {
public static void Main(string[] args) {
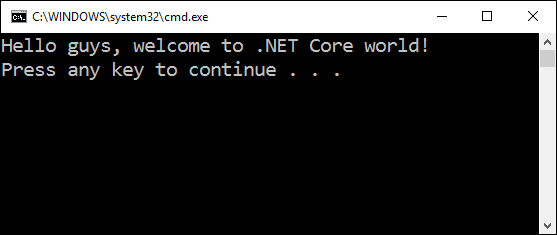
Console.WriteLine("Hello guys, welcome to .NET Core world!");
}
}
}
Now, run the application. You should see the following output.
.NET Core - Numerics
.NET Core supports the standard numeric integral and floating-point primitives. It also supports the following types −
System.Numerics.BigInteger which is an integral type with no upper or lower bound.
System.Numerics.Complex is a type that represents complex numbers.
A set of Single Instruction Multiple Data (SIMD)-enabled vector types in the System.Numerics namespace.
Integral types
.NET Core supports both signed and unsigned integers of different ranges from one byte to eight bytes in length. All integers are value types.
The following table represents the integral types and their size;
| Type | Signed/ Unsigned | Size (bytes) | Minimum Value | Maximum Value |
|---|---|---|---|---|
| Byte | Unsigned | 1 | 0 | 255 |
| Int16 | Signed | 2 | −32,768 | 32,767 |
| Int32 | Signed | 4 | −2,147,483,648 | 2,147,483,647 |
| Int64 | Signed | 8 | −9,223,372,036,854,775,808 | 9,223,372,036,854,775,807 |
| SByte | Signed | 1 | -128 | 127 |
| UInt16 | Unsigned | 2 | 0 | 65,535 |
| UInt32 | Unsigned | 4 | 0 | 4,294,967,295 |
| UInt64 | Unsigned | 8 | 0 | 18,446,744,073,709,551,615 |
Each integral type supports a standard set of arithmetic, comparison, equality, explicit conversion, and implicit conversion operators.
You can also work with the individual bits in an integer value by using the System.BitConverter class.
Floating-point types
.NET Core includes three primitive floating point types, which are shown in the following table.
| Type | Size (bytes) | Minimum Value | Maximum Value |
|---|---|---|---|
| Double | 8 | −1.79769313486232e308 | 1.79769313486232e308 |
| Single | 4 | −3.402823e38 | 3.402823e38 |
| Decimal | 16 | −79,228,162,514,264,337,593,5 43,950,335 | 79,228,162,514,264,337,593,543,9 50,335 |
Each floating-point type supports a standard set of arithmetic, comparison, equality, explicit conversion, and implicit conversion operators.
You can also work with the individual bits in Double and Single values by using the BitConverter class.
The Decimal structure has its own methods, Decimal.GetBits and Decimal.Decimal(Int32()), for working with a decimal value's individual bits, as well as its own set of methods for performing some additional mathematical operations.
BigInteger
System.Numerics.BigInteger is an immutable type that represents an arbitrarily large integer whose value in theory has no upper or lower bounds.
The methods of the BigInteger type is closely parallel to those of the other integral types.
Complex
The System.Numerics.Complex type represents a complex number, i.e., a number with a real number part and an imaginary number part
It supports a standard set of arithmetic, comparison, equality, explicit conversion, and implicit conversion operators, as well as mathematical, algebraic, and trigonometric methods.
SIMD
The Numerics namespace includes a set of SIMD-enabled vector types for .NET Core.
SIMD allows some operations to be parallelized at the hardware level, which results in huge performance improvements in mathematical, scientific, and graphics apps that perform computations over vectors.
The SIMD-enabled vector types in .NET Core include the following −
System.Numerics.Vector2, System.Numerics.Vector3, and System.Numerics.Vector4 types, which are 2, 3, and 4-dimensional vectors of type Single.
The Vector <T> structure that allows you to create a vector of any primitive numeric type. The primitive numeric types include all numeric types in the System namespace except for Decimal.
Two matrix types, System.Numerics.Matrix3×2, which represents a 3×2 matrix; and System.Numerics.Matrix4×4, which represents a 4×4 matrix.
The System.Numerics.Plane type, which represents a three-dimensional plane, and the System.Numerics.Quaternion type, which represents a vector that is used to encode three-dimensional physical rotations.
.NET Core - Garbage Collection
In this chapter, we will cover the concept of Garbage collection which is one of most important features of the .NET managed code platform. The garbage collector (GC) manages the allocation and release of memory. The garbage collector serves as an automatic memory manager.
You do not need to know how to allocate and release memory or manage the lifetime of the objects that use that memory
An allocation is made any time you declare an object with a “new” keyword or a value type is boxed. Allocations are typically very fast
When there isn’t enough memory to allocate an object, the GC must collect and dispose of garbage memory to make memory available for new allocations.
This process is known as garbage collection.
Advantages of Garbage Collection
Garbage Collection provides the following benefits −
You don’t need to free memory manually while developing your application.
It also allocates objects on the managed heap efficiently.
When objects are no longer used then it will reclaim those objects by clearing their memory, and keeps the memory available for future allocations.
Managed objects automatically get clean content to start with, so their constructors do not have to initialize every data field.
It also provides memory safety by making sure that an object cannot use the content of another object.
Conditions for Garbage Collection
Garbage collection occurs when one of the following conditions is true.
The system has low physical memory.
The memory that is used by allocated objects on the managed heap surpasses an acceptable threshold. This threshold is continuously adjusted as the process runs.
The GC.Collect method is called and in almost all cases, you do not have to call this method, because the garbage collector runs continuously. This method is primarily used for unique situations and testing.
Generations
The .NET Garbage Collector has 3 generations and each generation has its own heap that that is used for the storage of allocated objects. There is a basic principle that most objects are either short-lived or long-lived.
Generation First (0)
In Generation 0, objects are first allocated.
In this generation, objects often don’t live past the first generation, since they are no longer in use (out of scope) by the time the next garbage collection occurs.
Generation 0 is quick to collect because its associated heap is small.
Generation Second (1)
In Generation 1, objects have a second chance space.
Objects that are short-lived but survive the generation 0 collection (often based on coincidental timing) go to generation 1.
Generation 1 collections are also quick because its associated heap is also small.
The first two heaps remain small because objects are either collected or promoted to the next generation heap.
Generation Third (2)
In Generation 2, all long objects are lived and its heap can grow to be very large.
The objects in this generation can survive a long time and there is no next generation heap to further promote objects.
The Garbage Collector has an additional heap for large objects known as Large Object Heap (LOH).
It is reserved for objects that are 85,000 bytes or greater.
Large objects are not allocated to the generational heaps but are allocated directly to the LOH
Generation 2 and LOH collections can take noticeable time for programs that have run for a long time or operate over large amounts of data.
Large server programs are known to have heaps in the 10s of GBs.
The GC employs a variety of techniques to reduce the amount of time that it blocks program execution.
The primary approach is to do as much garbage collection work as possible on a background thread in a way that does not interfere with program execution.
The GC also exposes a few ways for developers to influence its behavior, which can be quite useful to improve performance.
.NET Core - Code Execution
In this chapter, we will understand the execution process of .NET Core and compare it with the .NET Framework. The managed execution process includes the following steps.
- Choosing a compiler
- Compiling your code to MSIL
- Compiling MSIL to native code
- Running code
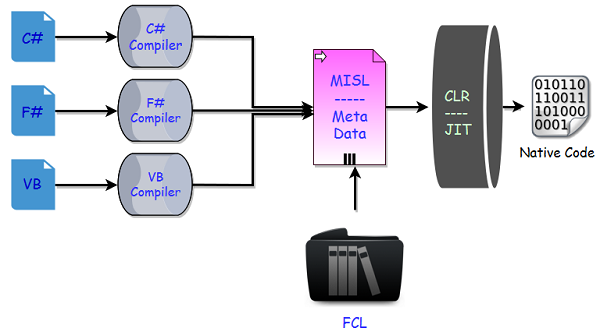
Choosing a Compiler
It is a multi-language execution environment, the runtime supports a wide variety of data types and language features.
To obtain the benefits provided by the common language runtime, you must use one or more language compilers that target the runtime.
Compiling your code to MSIL
Compiling translates your source code into Microsoft Intermediate Language (MSIL) and generates the required metadata.
Metadata describes the types in your code, including the definition of each type, the signatures of each type's members, the members that your code references, and other data that the runtime uses at execution time.
The runtime locates and extracts the metadata from the file as well as from framework class libraries (FCL) as needed during execution.
Compiling MSIL to Native Code
At execution time, a just-in-time (JIT) compiler translates the MSIL into native code.
During this compilation, code must pass a verification process that examines the MSIL and metadata to find out whether the code can be determined to be type safe.
Running Code
The common language runtime provides the infrastructure that enables the execution to take place and services that can be used during execution.
During execution, managed code receives services such as garbage collection, security, interoperability with unmanaged code, cross-language debugging support, and enhanced deployment and versioning support.
.NET Core Code Execution Process
Now let’s relate how code executes with .NET Core as compared to .NET Framework. In .NET Core there are many replacements of these components that are the part of the .NET Framework.
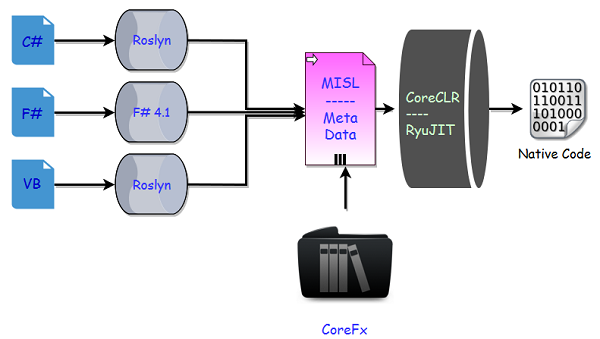
In .NET Core now we have a new series of compilers, like we have Roslyn for C# and VB.
You can also make use of the new F# 4.1 compiler if you want to use F# with .NET Core.
Actually these tools are different and we can use Roslyn with .NET Framework as well if we are using C# 6 or later, because C# compiler can only support up to C# 5.
In .NET Core, we don’t have a framework class libraries (FCL), so a different set of libraries are used and we now have CoreFx.
CoreFx is the reimplementation of the class libraries for .NET Core.
We also have a new run time with .NET Core known as CoreCLR and leverages a JIT Compiler.
Now the question is why do we have the reimplementation of all these components that we already have in .NET framework.
So the answer is the same as why Microsoft implemented .NET Core.
.NET Core - Modularity
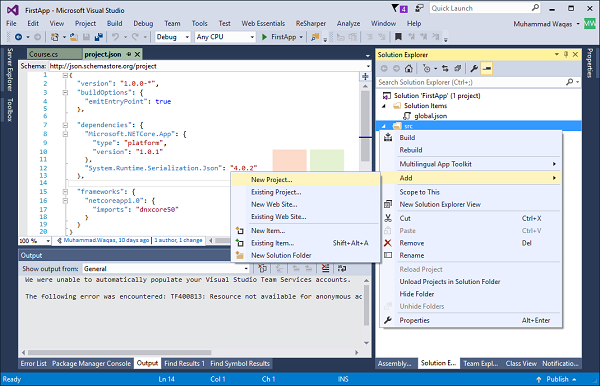
It is another consideration of .NET Core to build and implement application that is modular. Instead of installing the entire .NET Framework, your application can now just install what is required. Let us go to the visual studio and see the modularity.
Here is our simple .NET Core application, in Solution Explorer. Let us expand References and you will see reference to .NETCoreApp

Inside .NETCoreApp, you will see package reference to NuGet; let us expand it.
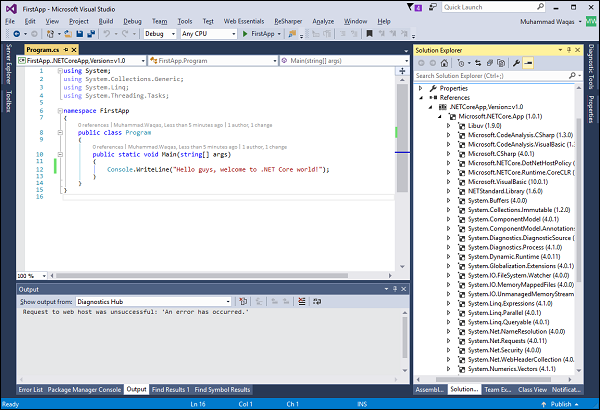
You will see the whole series of NuGet Package references. If you have worked in .NET Framework, then many of these namespaces will look familiar, because you are used to it by using in .NET Framework.
.NET Framework is split into many different pieces and re-implemented with CoreFx; these pieces are further distributed as individual packages.
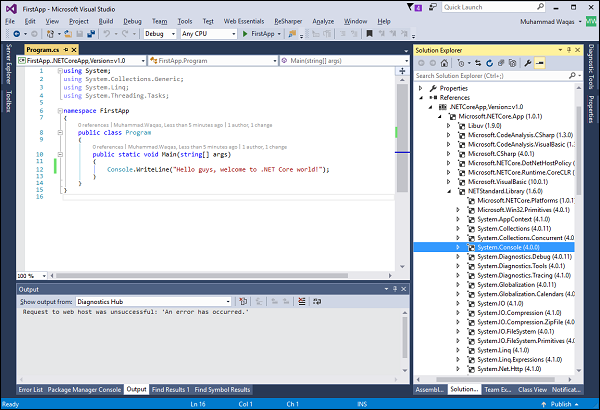
Now if you expand the NETStandard.Library, you will see addition references. You will even notice System.Console which we are using in this application.
Now you don’t have to bring in everything inside the .NET Framework, but just bring in what you need for your application.
There are some other benefits as well; for example, these modules can be updated individually if desired.
Modularity leads to performance benefits and your application can run faster, especially ASP.NET Core application.
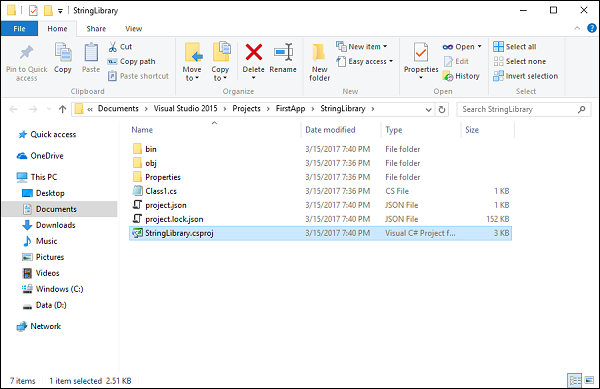
.NET Core - Project Files
In this chapter, we will discuss .NET Core project files and how you can add existing files in your project.
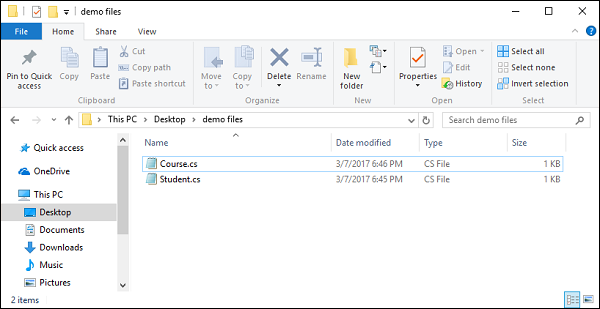
Let us understand a simple example in which we have some files which are already created; we have to add these files in our FirstApp project.
Here is the implementation of the Student.cs file
using System;
using System.Collections.Generic;
using System.Linq;
using System.Threading.Tasks;

namespace FirstApp {
   public class Student {
      public int ID { get; set; }
      public string LastName { get; set; }
      public string FirstMidName { get; set; }
      public DateTime EnrollmentDate { get; set; }
   }
}
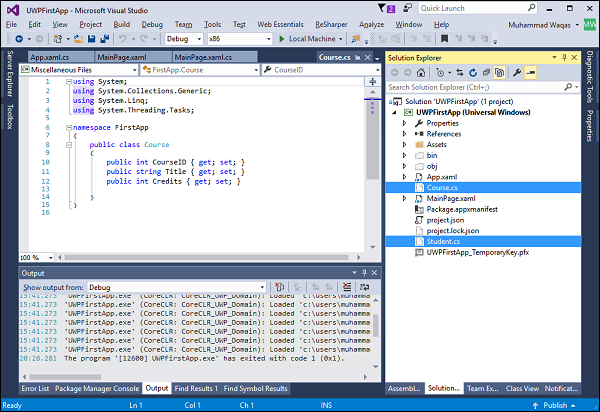
Here is the implementation of the Course.cs file.
using System;
using System.Collections.Generic;
using System.Linq;
using System.Threading.Tasks;

namespace FirstApp {
   public class Course {
      public int CourseID { get; set; }
      public string Title { get; set; }
      public int Credits { get; set; }
   }
}
Let us now save these three files in your disk and the source folder of your project.
Now if you are familiar with .NET and this one was a traditional .NET framework console application, it is important to understand how to add these files in your project in Visual Studio.
You first need to drag the files to the solution explorer to copy them in your project folder, because your project needs reference to these files.
One of the benefits of .NET Core is the approach taken with the project file (project.json); we can just drop files into the root of our project and then these will be automatically included in our project.
We don’t have to manually reference files like we did in the past for traditional .NET Framework application in Visual Studio.
Let us now open the root of your project.
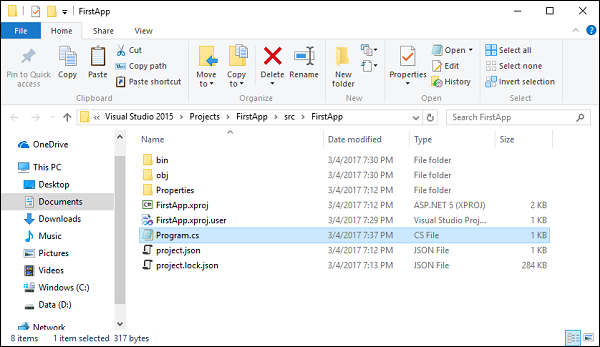
Let us now copy all of the three files into the root of your project.
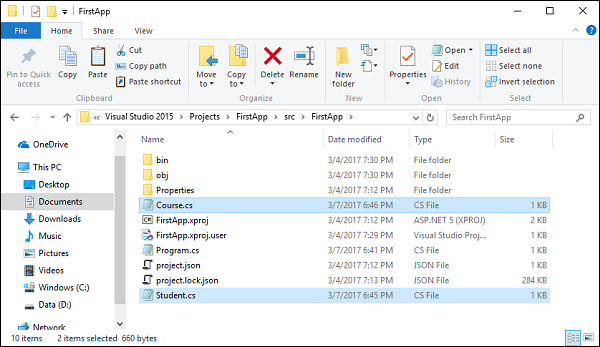
You can now see all the files copied to the root folder.
Let us now go to Visual Studio; you will receive the following dialog box.
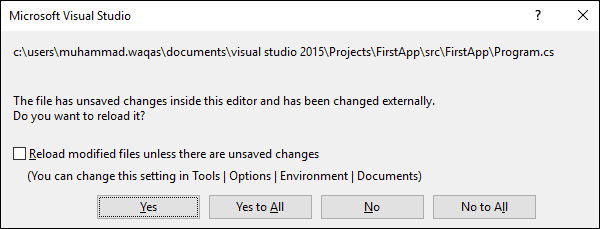
Click Yes to All to reload your project.
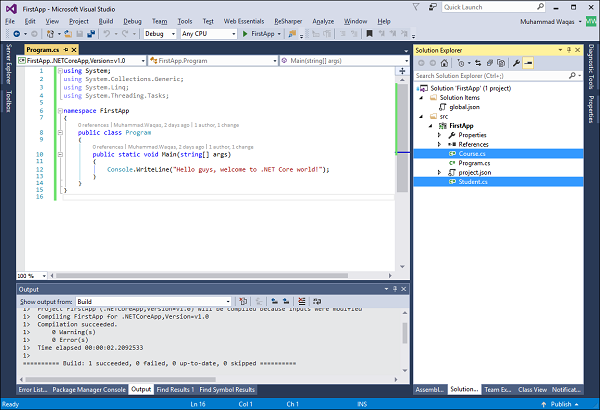
You will now that files are automatically included in your project.
.NET Core - Package References
In this chapter, we will discuss how to add packages in your .NET Core application and how to find a specific package. We can directly go to NuGet and add package, but here we will see some other places.
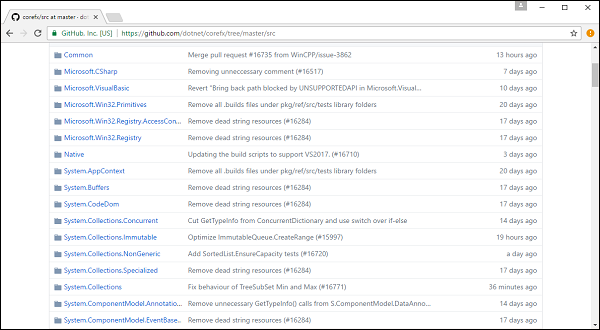
Let us now go to the source code of .NET Core which is located here − https://github.com/dotnet/corefx
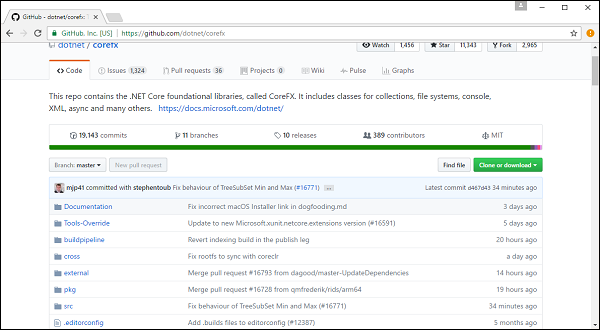
In CoreFx repo, open the src folder −
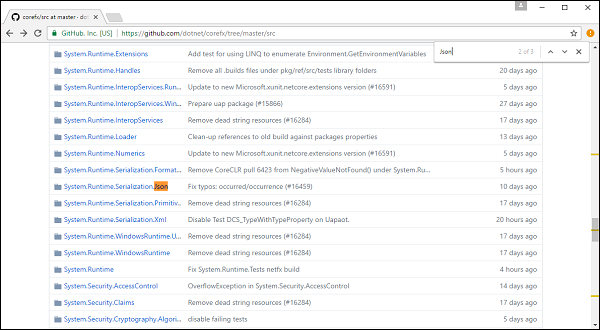
And you will see the whole list of folders that correspond to different packages. Let us now search Json −
There is another way to find your package, you probably know various types if you are familiar with .NET Framework, but the assembling of packages in .NET Core is totally different and you won’t know where that packages in.
If you know the type, you can search to reverse package search by using https://packagesearch.azurewebsites.net/
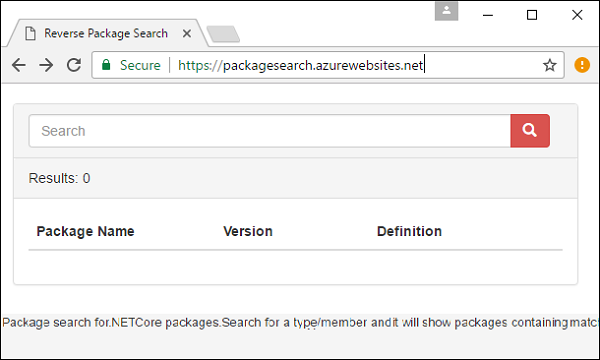
Here you can enter any type of package you would like to find. Then, this site will scan NuGet and find the relevant packages for you.
Let us now search for DataContractJson.
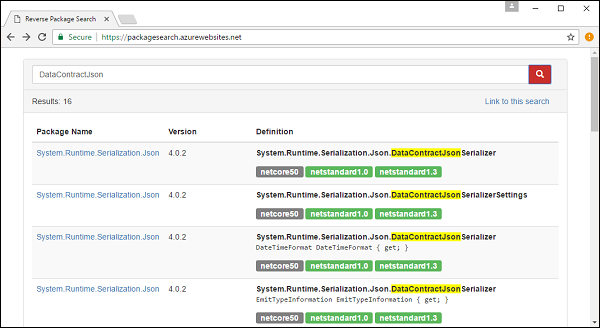
You will now see that we get the same package; let us click on the package.
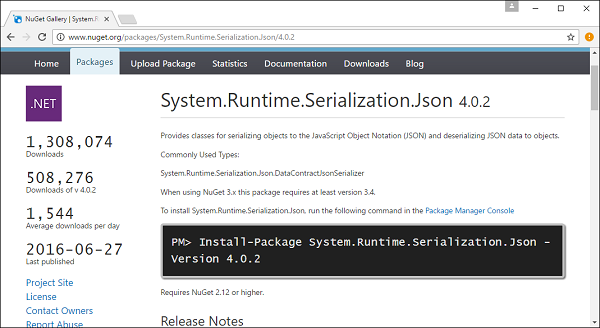
You will now see the NuGet page; you need to confirm that you need this package. You can add this in your application using a few methods.
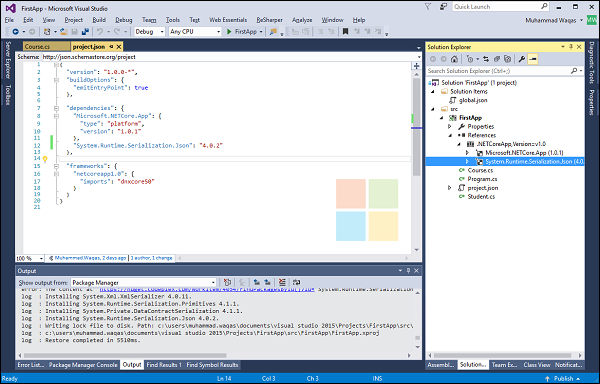
Let us open the project.json file.
{
   "version": "1.0.0-*",
   "buildOptions": {
      "emitEntryPoint": true
   },
   "dependencies": {
      "Microsoft.NETCore.App": {
         "type": "platform",
         "version": "1.0.1"
      }
   },
   "frameworks": {
      "netcoreapp1.0": {
         "imports": "dnxcore50"
      }
   }
}
This is the new project format and inside this file you will see the dependencies section. Let us add a new dependency as shown below.
{
   "version": "1.0.0-*",
   "buildOptions": {
      "emitEntryPoint": true
   },
   "dependencies": {
      "Microsoft.NETCore.App": {
         "type": "platform",
         "version": "1.0.1"
      },
      "System.Runtime.Serialization.Json": "4.0.2"
   },
   "frameworks": {
      "netcoreapp1.0": {
         "imports": "dnxcore50"
      }
   }
}
Now if you look at your references, then you will see that System.Runtime.Serialization.Json package is added to your project.
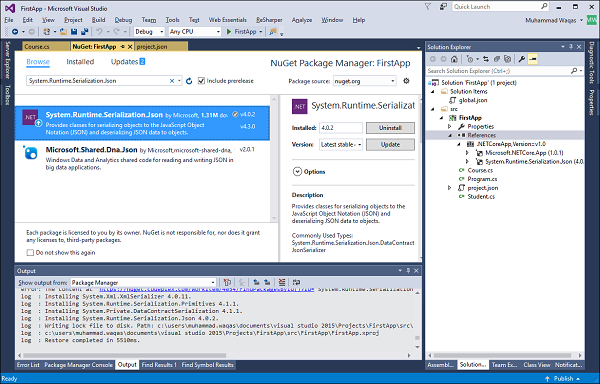
Another way is to go to the NuGet Manager and browse the package you want to add.
.NET Core - Create UWP App
In this chapter, we will discuss how to create a UWP application using .NET Core. UWP is also known as Windows 10 UWP application. This application does not run on previous versions of Windows but will only run on future version of Windows.
Following are a few exceptions where UWP will run smoothly.
If you want to run it locally you must have Windows 10, you can also develop on Windows 8 and then you will need to run it on Emulator, but it is encouraged to use Windows 10.
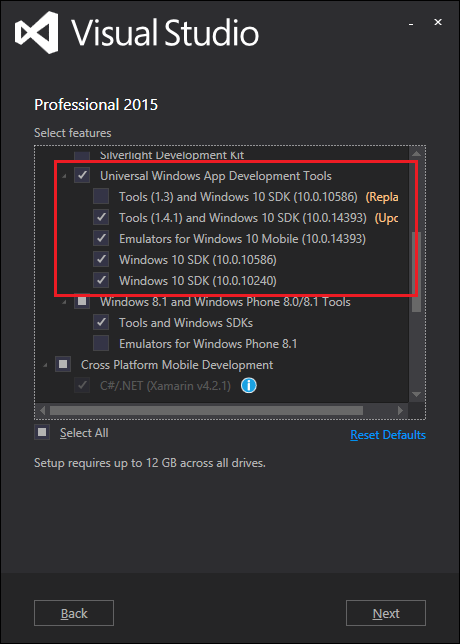
For UWP application you will also need Windows 10 SDK. Let us open Visual Studio 2015 setup and then modify Visual Studio.
On select features page, scroll down and you will see Universal Windows App Development Tools, check that option as shown below.
Here you can see the different versions of SDK and the latest update on Tools as well, click Next.
Now, click the Install button.
Once the installation is finished, you will need to restart your system.
Let us now implement the UWP by following these steps.
First, launch Visual Studio 2015.
Click on the File menu and select New → Project; a New Project dialog will show up. You can see the different types of templates on the left pane of the dialog box.
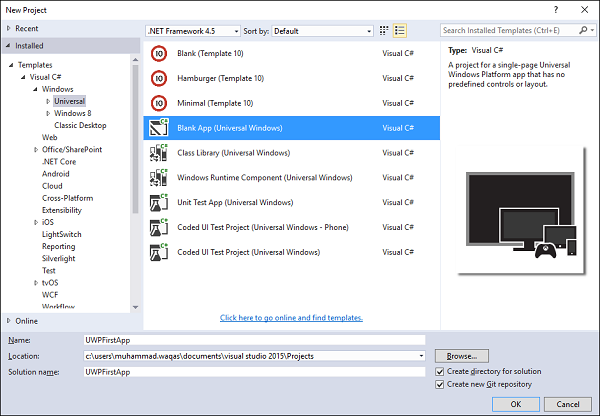
In the left pane, you can see the tree view, now select Universal template from Templates → Visual C# → Windows.
From the center pane, select the Blank App (Universal Windows) template.
Give a name to the project by typing UWPFirstApp in the Name field and click OK.
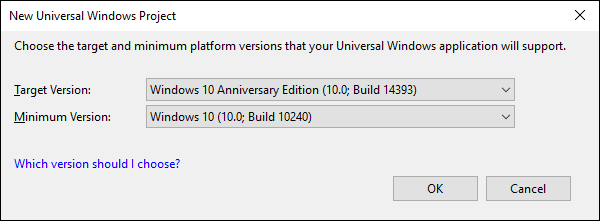
The target version/minimum version dialog appears. The default settings are fine for this tutorial, so select OK to create the project.
Here, we have a single project which can target all Windows 10 Devices, and you will notice that both .NET Core and UWP are simplification of multi-targeting.
When a new project opens, its files are displayed on the right hand side of the Solution Explorer pane. You may need to choose the Solution Explorer tab instead of the Properties tab to see your files.
Although the Blank App (Universal Window) is a minimal template, it still contains a lot of files. These files are essential to all UWP apps using C#. Every project that you create in Visual Studio contains the files.
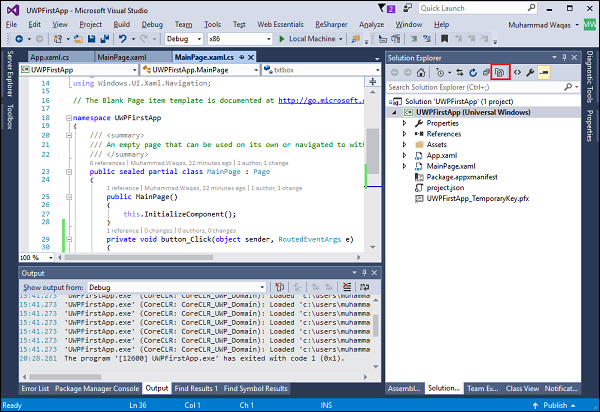
To see the running example, let us open MainPage.XAML and add the following code.
<Page
   x:Class = "UWPFirstApp.MainPage"
   xmlns = "https://schemas.microsoft.com/winfx/2006/xaml/presentation"
   xmlns:x = "https://schemas.microsoft.com/winfx/2006/xaml"
   xmlns:local = "using:UWPFirstApp"
   xmlns:d = "https://schemas.microsoft.com/expression/blend/2008"
   xmlns:mc = "https://schemas.openxmlformats.org/markup-compatibility/2006"
   mc:Ignorable = "d">

   <Grid Background = "{ThemeResource ApplicationPageBackgroundThemeBrush}">
      <StackPanel HorizontalAlignment = "Center">
         <TextBlock Text = "Hello, world!"
            Margin = "20"
            Width = "200"
            HorizontalAlignment = "Left"/>
         <TextBlock Text = "Write your name."
            Margin = "20"
            Width = "200"
            HorizontalAlignment = "Left"/>
         <TextBox x:Name = "txtbox"
            Width = "280"
            Margin = "20"
            HorizontalAlignment = "Left"/>
         <Button x:Name = "button" Content = "Click Me"
            Margin = "20"
            Click = "button_Click"/>
         <TextBlock x:Name = "txtblock"
            HorizontalAlignment = "Left"
            Margin = "20"/>
      </StackPanel>
   </Grid>

</Page>
Below is the click event of button in C#.
using System;
using System.Collections.Generic;
using System.IO;
using System.Linq;
using System.Runtime.InteropServices.WindowsRuntime;

using Windows.Foundation;
using Windows.Foundation.Collections;

using Windows.UI.Xaml;
using Windows.UI.Xaml.Controls;
using Windows.UI.Xaml.Controls.Primitives;
using Windows.UI.Xaml.Data;
using Windows.UI.Xaml.Input;
using Windows.UI.Xaml.Media;
using Windows.UI.Xaml.Navigation;

// The Blank Page item template is documented at
// https://go.microsoft.com/fwlink/?LinkId=402352&clcid=0x409

namespace UWPHellowWorld {
   /// <summary>
   /// An empty page that can be used on its own or navigated to within a Frame.
   /// </summary>
   public sealed partial class MainPage : Page {
      public MainPage() {
         this.InitializeComponent();
      }
      private void button_Click(object sender, RoutedEventArgs e) {
         if (txtbox.Text != "")
            txtblock.Text = "Hello: " + txtbox.Text;
         else
            txtblock.Text = "You have not write your name";
      }
   }
}
Let us now run the above code on the local machine and you will see the following window. Now type any name in the text box and press the Click Me button.

.NET Core - MSBuild
In this chapter, we will discuss what is MSBuild and how it works with .NET Core. MSBuild is the build platform for Microsoft and Visual Studio. In UWP application if you open the project folder, then you will see both project.json and *.csproj files.
But if you open our previous .NET Core Console app, then you will see project.json and *.xproj files.
The .NET Core build system or the project.json build system is not sufficient for UWP needs; this is why UWP is still using *.csproj (MSBuild) Build system.
But project.json will move out as far as the build system is concerned.
Now if you want to add a few existing files to your UWP application as we have added in the Console app, then you need to add those files in the project folder. Further, you will also need to include in your project in Solution Explorer as well.
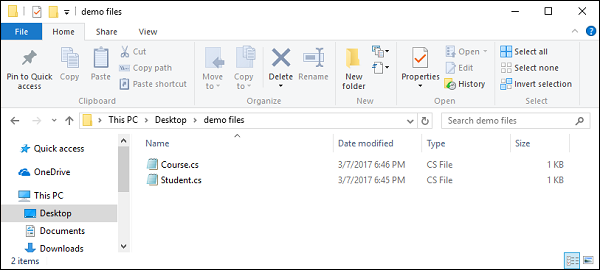
Let us now consider the following files; copy these files to your project folder.
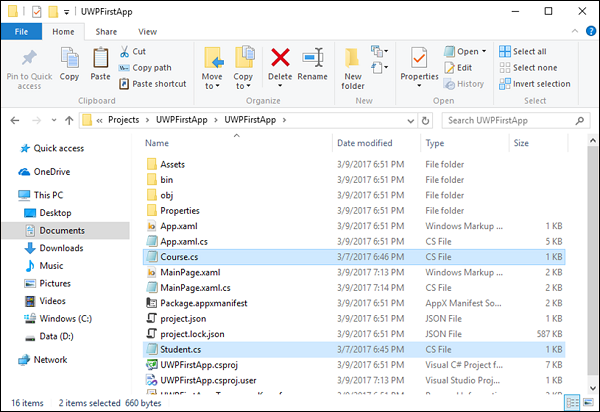
Let us go back to Visual Studio and open the Solution Explorer.
You can now see that only copying files is not sufficient in case of UWP applications, because in Solution Explorer, we can’t see those files.
Now we must include those files as well by clicking on the Show All Files icon as highlighted in the above screenshot and you will see now all files in the project folder.
These two files are still not included in our project. To include these files, select these files and right-click on any file and then select Include in Project.

Now these files are also included. One good thing that can be foreseen is the project.json approach of dropping files for *.csproj in the future version of the SKD tools and also to Visual Studio.
.NET Core - Metapackage
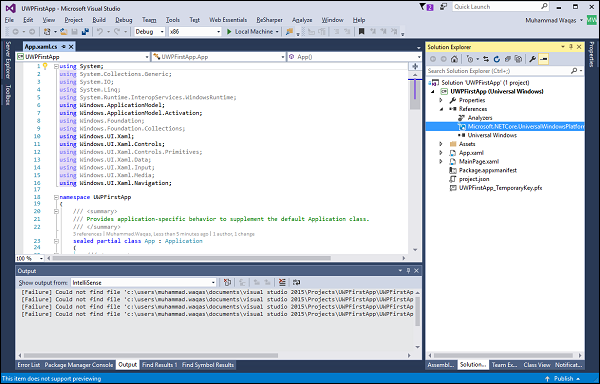
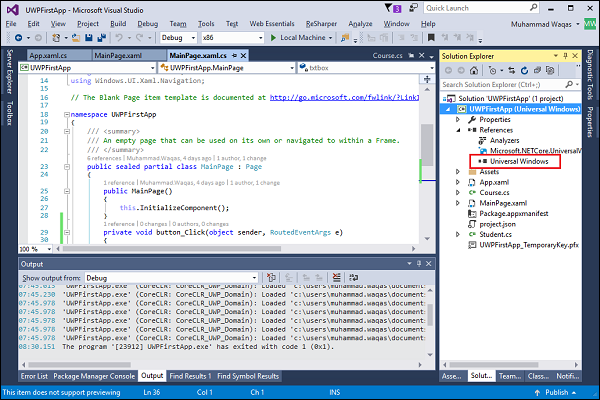
In this chapter, we will discuss the references between our Console app and our UWP app. If you look at the References in Solution Explorer of your Console application, you will see the .NETCoreApp as shown below.
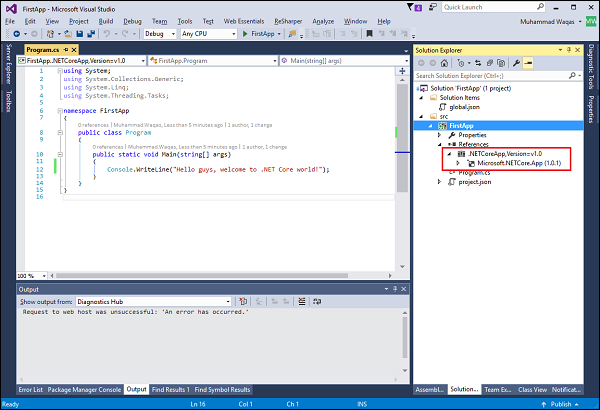
.NETCoreApp is a new framework that targeted .NET Core application. Now if you look under the References of UWP application, it will look a bit different as shown below.

The main reason for this is because here in UWP we have the *.csproj, so we are back to the old style of references and we can target only one framework with this project type.
The references are similar though. You can now see that in UWP application, the Miscrosoft.NETCore.UniversalWindowsPlatform NuGet Package reference is similar to the Microsoft.NETCore.App NuGet reference in Console application.
Both Miscrosoft.NETCore.UniversalWindowsPlatform and Microsoft.NETCore.App are meta-package which means that they are composed of other packages.
In Console application, we can drill in and see other packages inside Microsoft.NETCore.App, but we can’t do the same Miscrosoft.NETCore.UniversalWindowsPlatform in Solution Explorer.
However, we can use another tool, the NuGet Package Explorer to look at this. Let us now open this url in the browser − https://npe.codeplex.com/downloads/get/clickOnce/NuGetPackageExplorer.application and you will see a small utility downloading.
Once downloading completes, then double-click on that file.
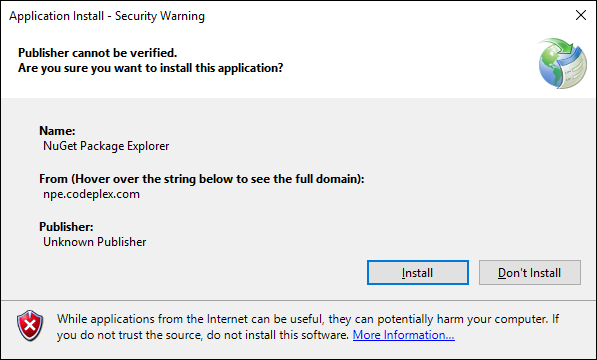
Click Install to start installation on the NuGet Package Explorer.

When the installation is finished, you will see the following dialog box.
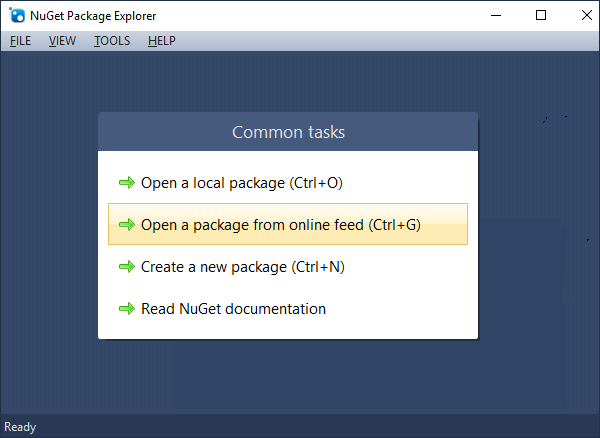
Let us now click on the Open a package from online feed option.
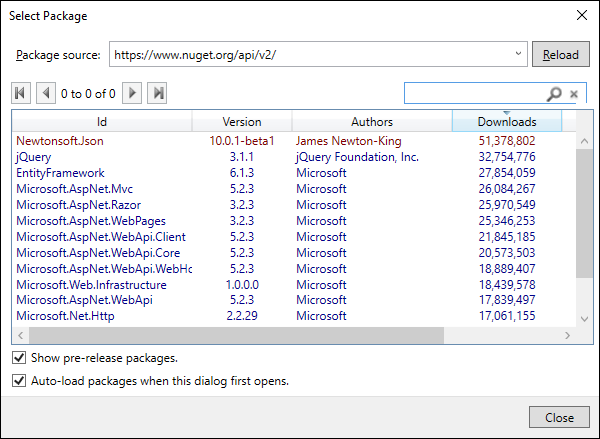
By default it will search for the nuget.org feed. Let us now search for Microsoft.NETCore.UniversalWindowsPlatform in the search box and you will see 1 result as shown below.

Click the open link and it will open the top-level dependencies of this metapackage.
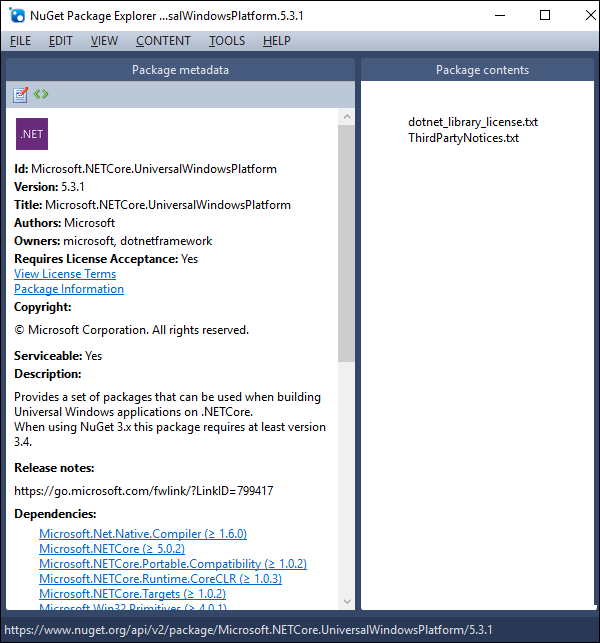
Let us now open the .NETCore meta package for the .NETCore application and meta-package for UWP application side by side.
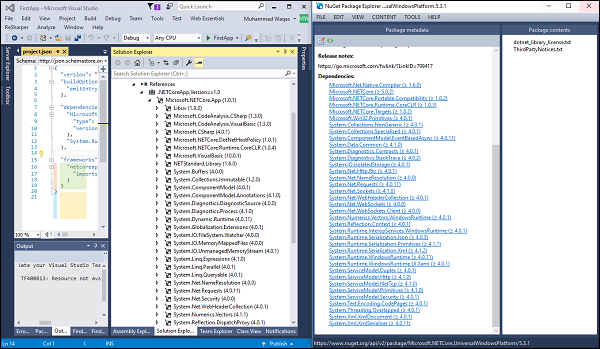
You can now see that each meta-package is composed of different set of packages.
.NET Core is a subset of the classes available in .NET Framework at least at this point of time, but is growing and will be as per the base classes of .NET Framework.
The UWP is based on .NET Core, it is a superset of the APIs available for Windows Store development.
We now have more APIs available for development due to .NET Core.
Windows Runtime and Extension SDKs
Windows Runtime components are self-contained objects that you can instantiate and use from any language, including C#, Visual Basic, JavaScript, and C++. In addition to the .NET Core meta-package we saw in the previous chapter, UWP app also has a reference by default to a Universal Windows SDK.
Universal Windows is the reference to Windows Runtime and it has been factored into a series of APIs contracts.
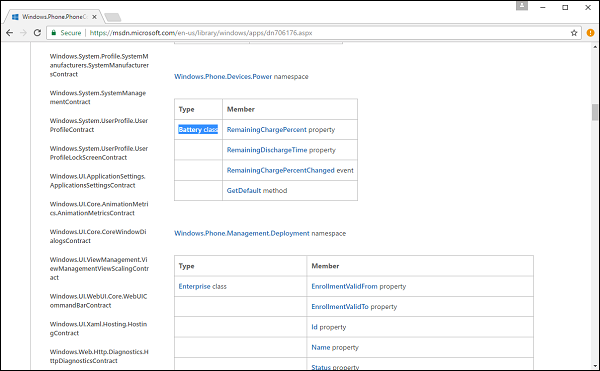
The set of APIs within a device family is broken down into subdivisions known as API contracts. You can find a list of different API contracts here https://msdn.microsoft.com/en-us/library/windows/apps/dn706135.aspx
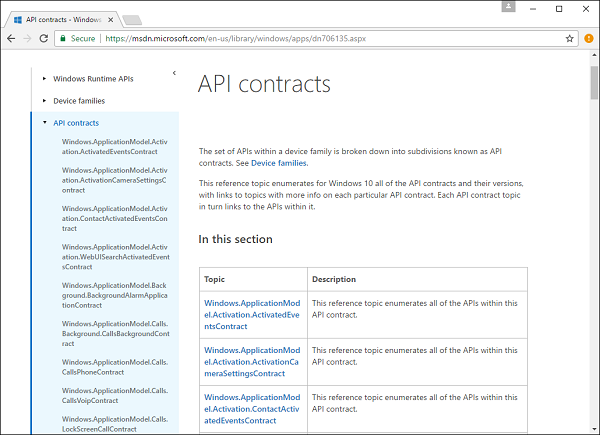
Most of those APIs inside windows runtime are factored into a single contract. Let us now search for the Universal keyword on the API Contracts page.

You can see links to various APIs and you can also see the Universal family is so big that it has 12 pages of documentation.
You can also search for phone API contract on this page.
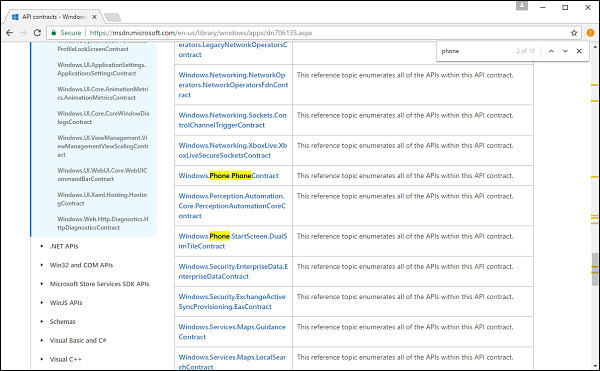
Let us now click on the Windows.Phone.PhoneContract and scroll down; you will now see the battery information of phone or the mobile device.
If you want to add this information on top of what you already have, then you should add the references manually. Let us now go to the Visual Studio and right-click on the References in Solution Explorer.
Select Add References…
You can now see the new reference category for Universal Windows; under this category there is Core which refers to the core Universal Windows API contracts
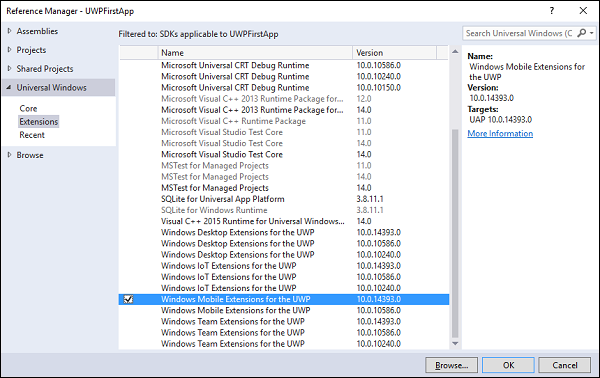
The Extensions allow us to extend the functionality and you will see different references Mobile, Desktop and other Extensions.
There are different SKD extensions and you can add on top to get more APIs.
You can also see different versions. So, make sure you get the latest version to get the updated APIs and then click OK.
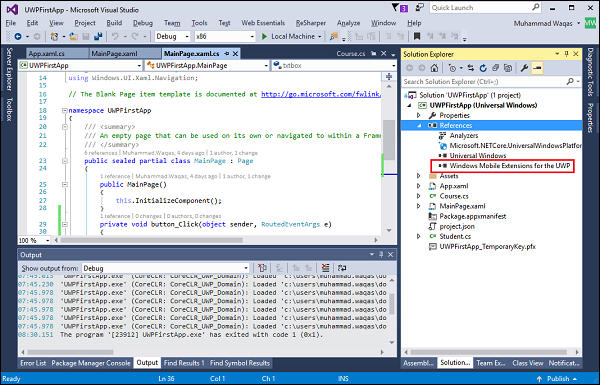
You can now see that Windows Mobile Extensions for the UWP is added as reference.
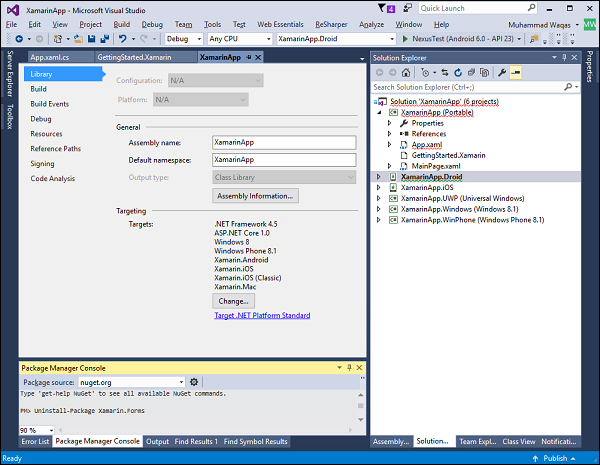
.NET Core - Create .NET Standard Library
A class library defines the types and methods that can be called from any application.
A class library developed using .NET Core supports the .NET Standard Library, which allows your library to be called by any .NET platform that supports that version of the .NET Standard Library.
When you finish your class library, you can decide whether you want to distribute it as a third-party component, or whether you want to include it as a component that is bundled with one or more applications.
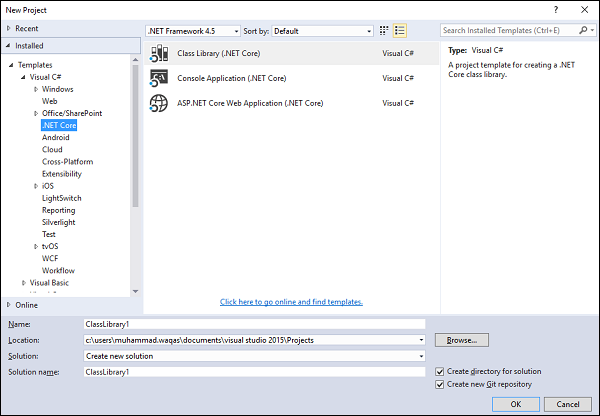
Let us start by adding a class library project in our Console application; right-click on the src folder in Solution Explorer and select Add → New Project…
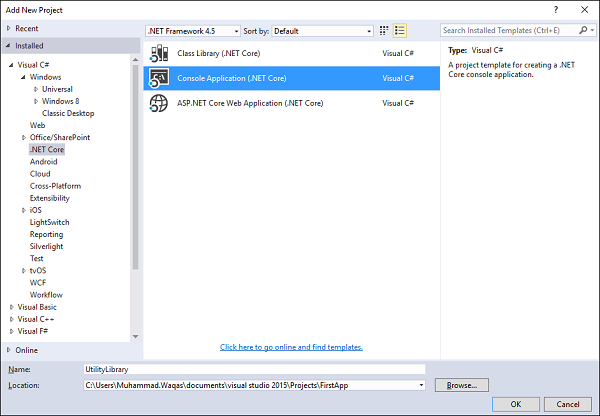
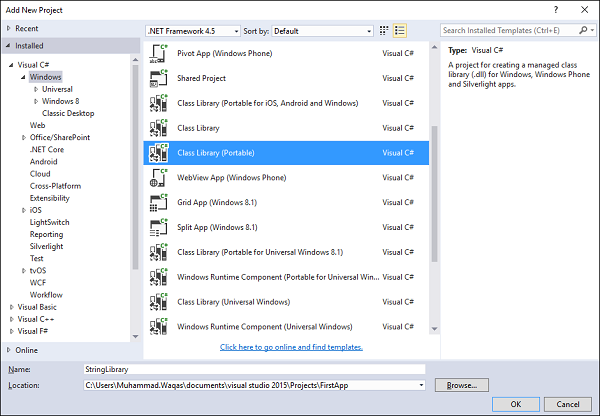
In the Add New Project dialog box, choose the .NET Core node, then choose the Class Library (.NET Core) project template.
In the Name text box, enter "UtilityLibrary" as the name of the project, as the following figure shows.
Click OK to create the class library project. Once the project is created, let us add a new class. Right-click on project in Solution Explorer and select Add → Class...
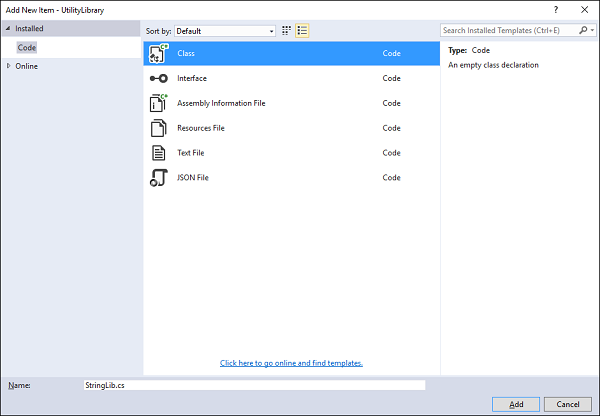
Select class in the middle pane and enter StringLib.cs in the name and field and then click Add. Once the class is added, then replace the following code in StringLib.cs file.
using System;
using System.Collections.Generic;
using System.Linq;
using System.Threading.Tasks;

namespace UtilityLibrary {
   public static class StringLib {
      public static bool StartsWithUpper(this String str) {
         if (String.IsNullOrWhiteSpace(str))
         return false;
         Char ch = str[0];
         return Char.IsUpper(ch);
      }
      public static bool StartsWithLower(this String str) {
         if (String.IsNullOrWhiteSpace(str))
         return false;
         Char ch = str[0];
         return Char.IsLower(ch);
      }
      public static bool StartsWithNumber(this String str) {
         if (String.IsNullOrWhiteSpace(str))
         return false;
         Char ch = str[0];
         return Char.IsNumber(ch);
      }
   }
}
The class library, UtilityLibrary.StringLib, contains some methods like, StartsWithUpper, StartsWithLower, and StartsWithNumber which returns a Boolean value that indicates whether the current string instance begins with an uppercase, lowercase and number respectively.
In .NET Core, the Char.IsUpper method returns true if a character is in uppercase, the Char.IsLower method returns true if a character is in lowercase, and similarly the Char.IsNumber method returns true if a character is a numeric.
On the menu bar, choose Build, Build Solution. The project should compile without error.
Our .NET Core console project doesn't have access to our class library.
Now to consume this class library we need to add reference of this class library in our console project.
To do so, expand FirstApp and right-click on References and select Add Reference…
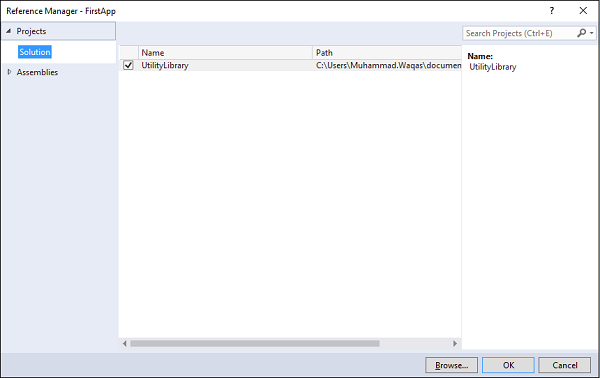
In the Reference Manager dialog box, select UtilityLibrary, our class library project, and then click OK.
Let us now open the Program.cs file of the console project and replace all of the code with the following code.
using System;
using System.Collections.Generic;
using System.Linq;
using System.Threading.Tasks;
using UtilityLibrary;
namespace FirstApp {
public class Program {
public static void Main(string[] args) {
int rows = Console.WindowHeight;
Console.Clear();
do {
if (Console.CursorTop >= rows || Console.CursorTop == 0) {
Console.Clear();
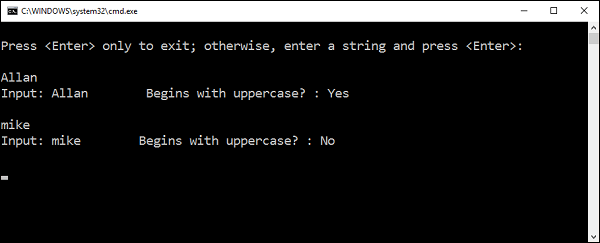
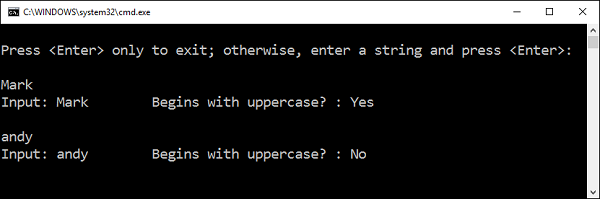
Console.WriteLine("\nPress <Enter> only to exit; otherwise, enter a string and press <Enter>:\n");
}
string input = Console.ReadLine();
if (String.IsNullOrEmpty(input)) break;
Console.WriteLine("Input: {0} {1,30}: {2}\n", input, "Begins with uppercase? ",
input.StartsWithUpper() ? "Yes" : "No");
} while (true);
}
}
}
Let us now run your application and you will see the following output.
For better understanding, let us make use of the other extension methods of your class library in your project.
.NET Core - Portable Class Library
In this chapter, we will discuss what is PCL (Portable Class Library), and also why we need PCL. To understand this concept, let us open the class library project folder which we have created in the previous chapter.
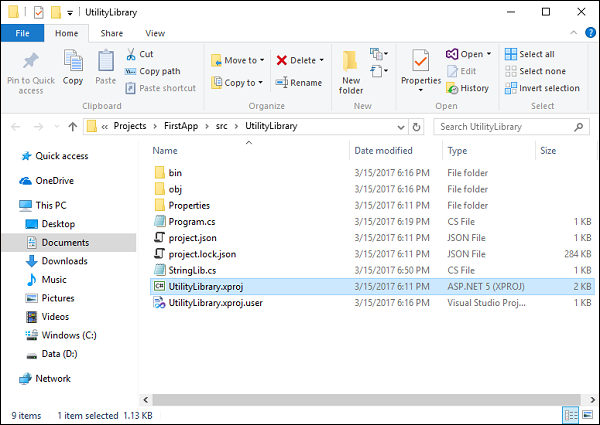
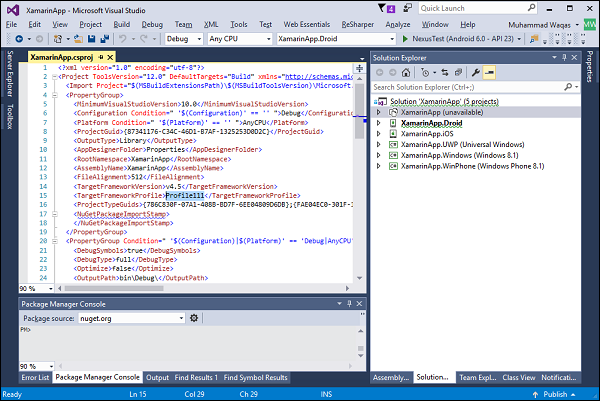
In this folder, you can see that in addition to project.json and CS files we also have *.xproj file, and that is because Visual Studio setup .NET Core project type as *.xproj instead of *.csproj.
As mentioned by Microsoft, *.xproj will be going away, but it is still here in preview 2 tooling. As we have covered that UWP application uses the *.csproj.
Now it is actually not feasible to get *.csproj to reference and *.xproj and that functionality is not going to be implemented because *.xproj will move out.
So instead, we need a class library which can be shared between the console app and the UWP app and here comes PCL.
What is PCL
Let us now understand what PCL is −
The Portable Class Library project enables you to write and build managed assemblies that work on more than one .NET Framework platform.
You can create classes that contain code you wish to share across many projects, such as shared business logic, and then reference those classes from different types of projects.
It can also help you build cross-platform apps and libraries for Microsoft platforms quickly and easily.
Portable class libraries can help you reduce the time and costs of developing and testing code.
Use this project type to write and build portable .NET Framework assemblies, and then reference those assemblies from apps that target multiple platforms such as Windows and Windows Phone, etc.
Let us now remove the class library which we have created from the Solution Explorer. At the same time, delete it from the Solution folder and further add a new project item.
Select the Visual C# → Windows template in the left pane and select Class Library (Portable) in the middle pane.
Enter StringLibrary in the name field and click OK to create this project.
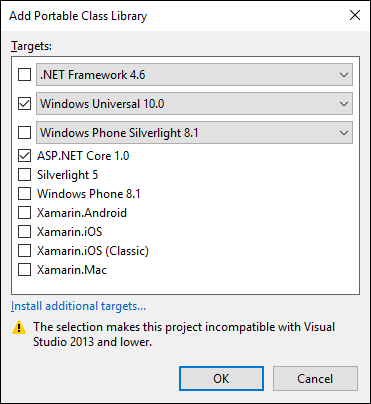
Now we need to select the target frameworks to reference. Let us select Windows Universal and ASP.NET Core for a moment then we will retarget it. Click OK.
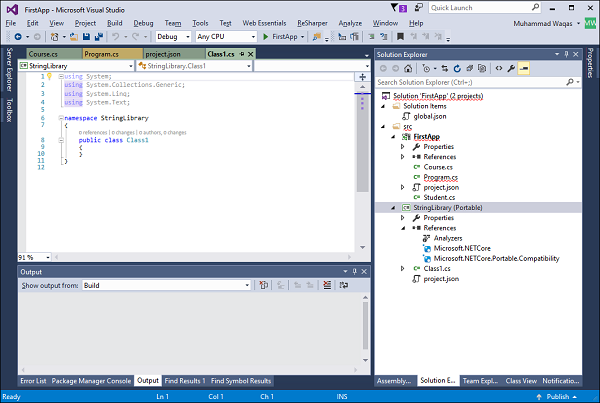
You can see that it has created a new project in PCF format. Let us now right-click StringLibrary project in the Solution Explorer and select Properties.
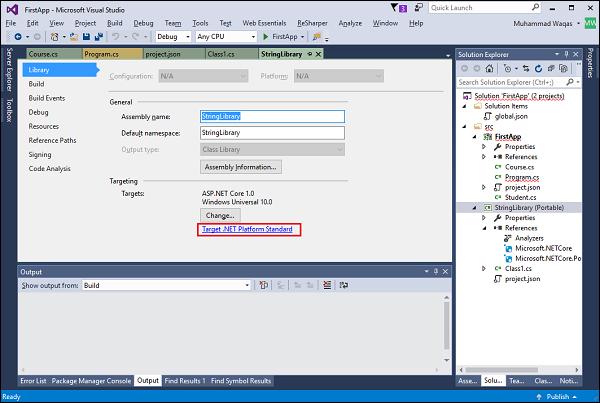
Click on the Target .NET Platform Standard.
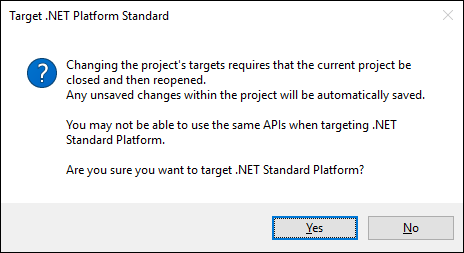
Click Yes; it is now the same class library with one minor difference. The difference is that it can be used by UWP as well, because it contains *.csproj file instead of *.xproj.
Let us now add a new class; for this, you need to right-click on project in Solution Explorer and select Add → Class...
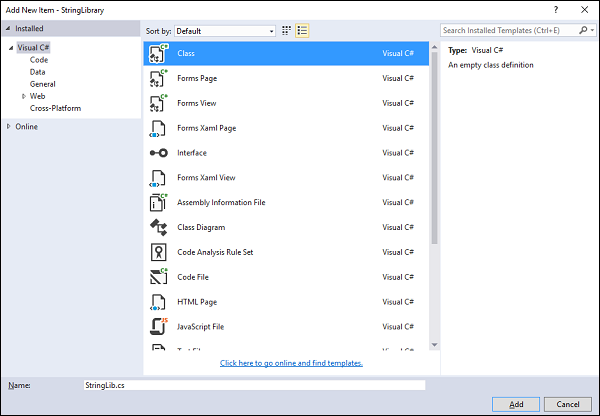
Select class in the middle pane and enter StringLib.cs in the name field and then Click Add. Once the class is added, then replace the following code in StringLib.cs file.
using System;
using System.Collections.Generic;
using System.Linq;
using System.Text;
using System.Threading.Tasks;

namespace StringLibrary {
   public static class StringLib {
      public static bool StartsWithUpper(this String str) {
         if (String.IsNullOrWhiteSpace(str))
            return false;
         Char ch = str[0];
         return Char.IsUpper(ch);
      }
      public static bool StartsWithLower(this String str) {
         if (String.IsNullOrWhiteSpace(str))
            return false;
         Char ch = str[0];
         return Char.IsLower(ch);
      }
      public static bool StartsWithNumber(this String str) {
         if (String.IsNullOrWhiteSpace(str))
            return false;
         Char ch = str[0];
         return Char.IsNumber(ch);
      }
   }
}
Let us build this portable class library project and it should compile without error. Now we need to add reference of this portable class library in our console project. So, expand FirstApp and right-click on References and select Add Reference…
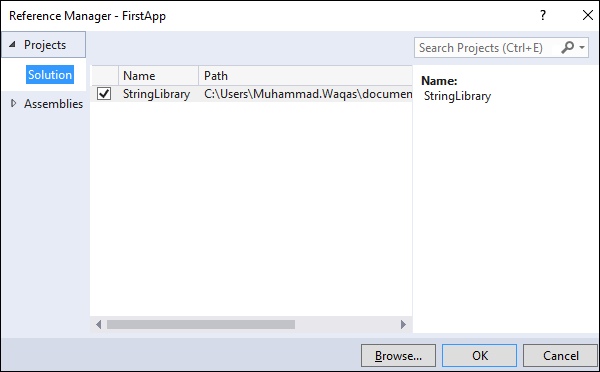
In the Reference Manager dialog box, select StringLibrary which is our portable class library project, and then click OK.
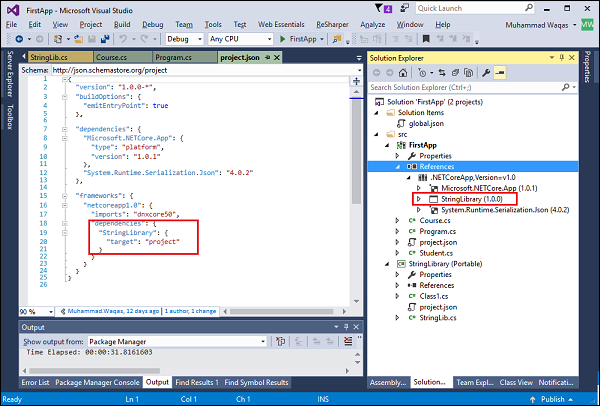
You can see that the StringLibrary reference is added to the console project and it can be seen in the project.json file as well.
You can now run the application again and you will see the same output.
Let us now use the other extension methods of your portable class library in your project. The same portable library will be consumed in your UWP application as well.
.NET Core - Adding References to Library
In this chapter, we will discuss how to add references to your library. Adding references to library is like adding references to your other projects, like console project and UWP project.
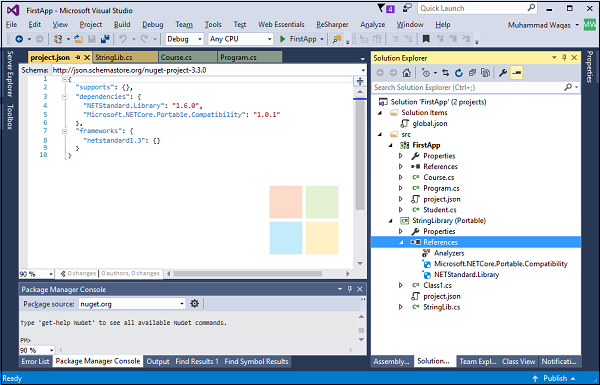
You can now see that the PCL project has some references by default. You can also add other references as per your application need.
In the PCL library, you can also see the project.json file.
{
   "supports": {},
   "dependencies": {
      "NETStandard.Library": "1.6.0",
      "Microsoft.NETCore.Portable.Compatibility": "1.0.1"
   },
   "frameworks": {
      "netstandard1.3": {}
   }
}
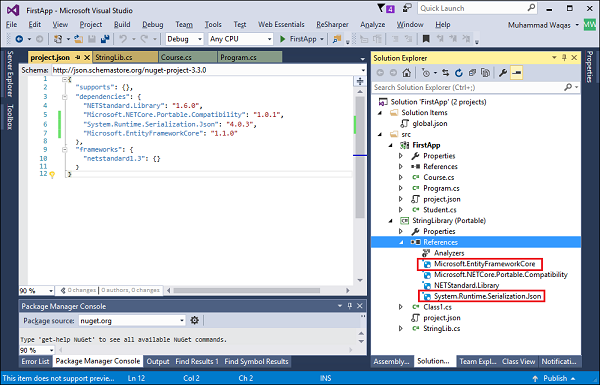
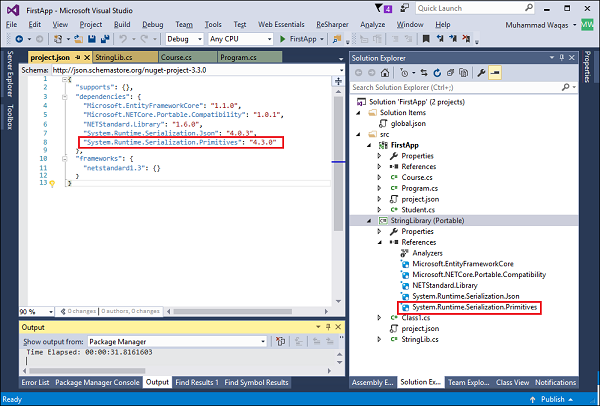
One method of adding references to your library is by typing it directly in the project.json file. As you can see that we have added some references under the dependencies section as shown in the following code.
{
   "supports": {},
   "dependencies": {
      "NETStandard.Library": "1.6.0",
      "Microsoft.NETCore.Portable.Compatibility": "1.0.1",
      "System.Runtime.Serialization.Json": "4.0.3",
      "Microsoft.EntityFrameworkCore": "1.1.0"
   },
   "frameworks": {
      "netstandard1.3": {}
   }
}
Let us now save this file and you will see that references are added to your library now.
The other method of adding references to your library is the NuGet Package Manager. Let us now right-click on the StringLibrary (Portable) project and select Mange NuGet Packages…
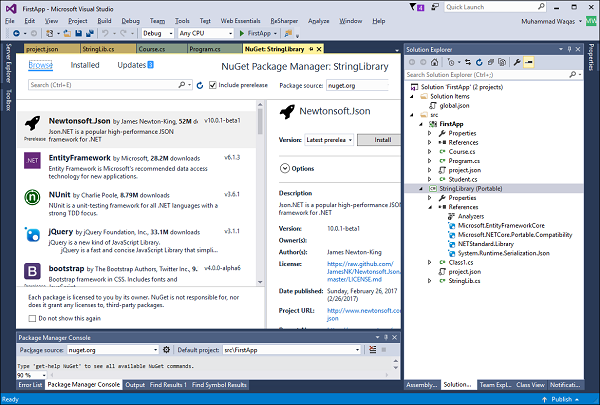
On the Browse tab, you can search any NuGet package; let us say we want to add “System.Runtime.Serialization.Primitives” package.

Click the Install button, which will display the following screen.
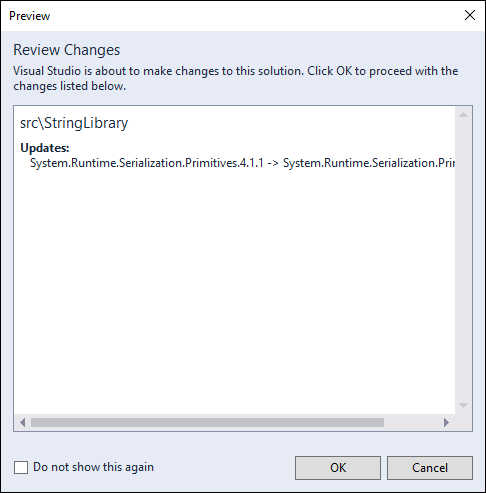
Now, click the OK button.
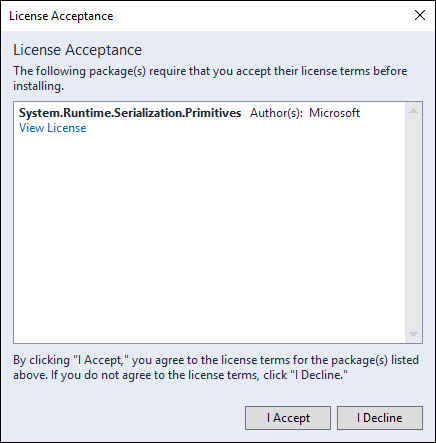
Finally, click the I Accept button to start installation of this NuGet package. Once installation is finished, then you will see that the “System.Runtime.Serialization.Primitives” NuGet package is added to your library.
.NET Core - Sharing Libraries
In this chapter, we will discuss how to share your library as NuGet Package so that it can be consumed within another project. Creating a package starts with the code you want to package and share with others, either through the public nuget.org gallery or a private gallery within your organization. The package can also include additional files such as a readme that is displayed when the package is installed, and can include transformations to certain project files.
Let us now consider a simple example in which we will create a NuGet package from our library. To do so, open the command prompt and go to the folder where the project.json file of your library project is located.
Let us now run the following command.
dotnet help
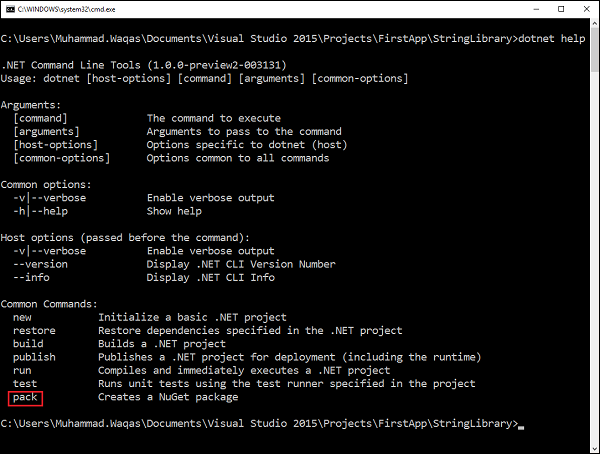
At the end, you can see different commands like new, restore and build, etc.
The last command is pack; this will create a NuGet package. Let us now execute the following command.
dotnet pack
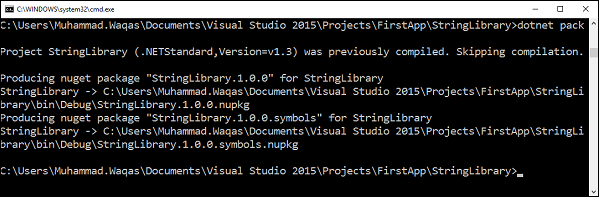
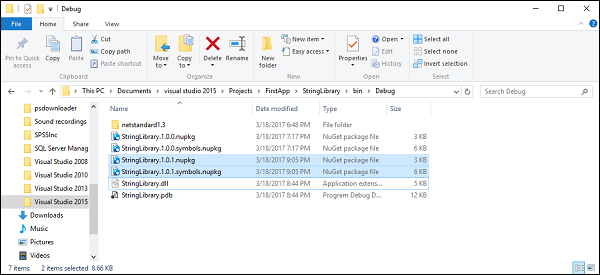
You can now see that the NuGet packages are produced in the bin folder; let us open the bin\Debug folder.
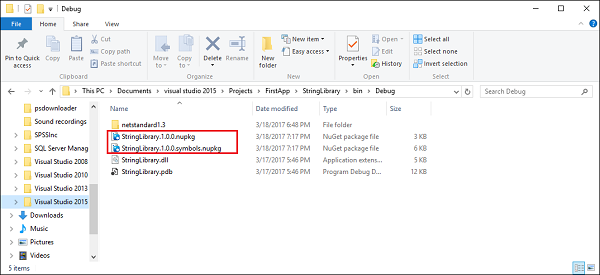
Now the question is what is inside the NuGet packages, to see that we can use NuGet Package Explorer. Let us now open the NuGet Package Explorer.
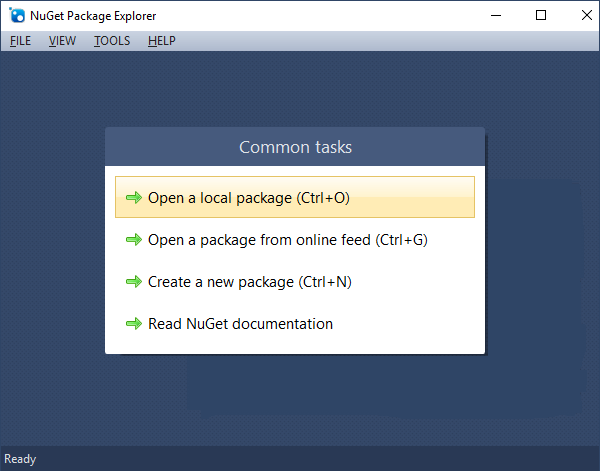
Select the first option Open a local package.
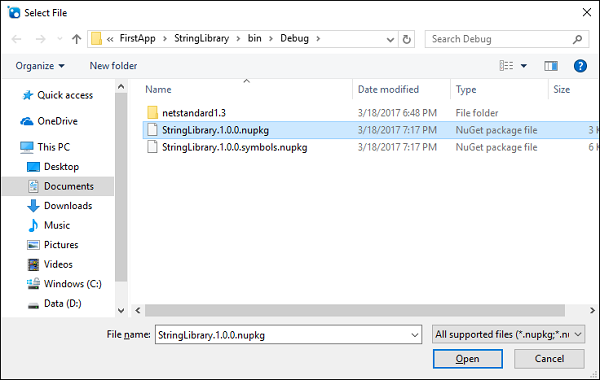
Select the StringLibrary.1.0.0.nupkg and click Open.
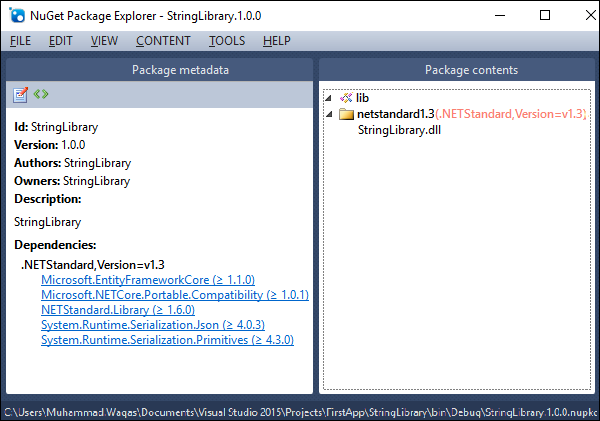
You can see that in the Package contents section we have StringLibrary.dll only. In the Package metadata section, you will see a bit of information about this library like Id, Versions and all the of the dependencies.
Let us now open the StringLibrary.1.0.0.symbols.nupkg.
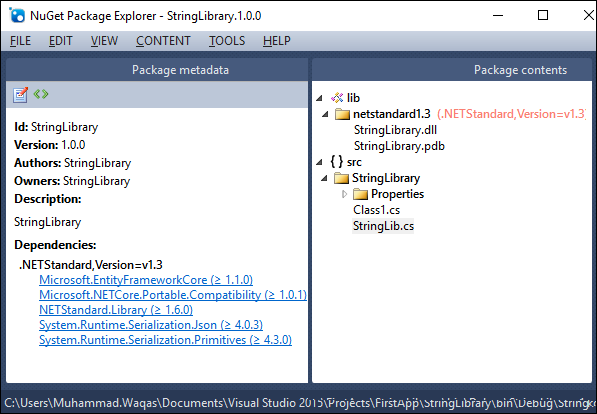
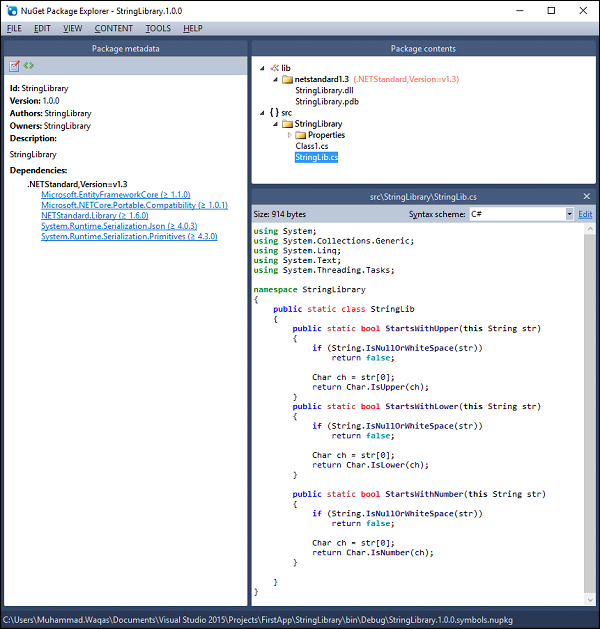
In this NuGet package, you will see the source files and the *.pdb file as well. If you double-click on the StringLib.cs file, you see the source code as well.
Here the question is, how can configure the metadata like version, authors and description, etc.
The project.json file is used on .NET Core projects to define project metadata, compilation information, and dependencies. Let us now open the project.json file and add the following additional information.
{
   "authors": [ "Mark Junior" ],
   "description": "String Library API",
   "version" : "1.0.1-*",
   "supports": {},

   "dependencies": {
      "Microsoft.EntityFrameworkCore": "1.1.0",
      "Microsoft.NETCore.Portable.Compatibility": "1.0.1",
      "NETStandard.Library": "1.6.0",
      "System.Runtime.Serialization.Json": "4.0.3",
      "System.Runtime.Serialization.Primitives": "4.3.0"
   },
   "frameworks": {
      "netstandard1.3": {}
   }
}
You can now see additional information like author name, description and version added here. Let us save this file, build the library project, then execute the “dotnet pack” command again.
Inside the bin\Debug folder, you can see that the StringLibrary NuGet packages are produced with version 1.0.1; let us open it in NuGet Package Explorer.
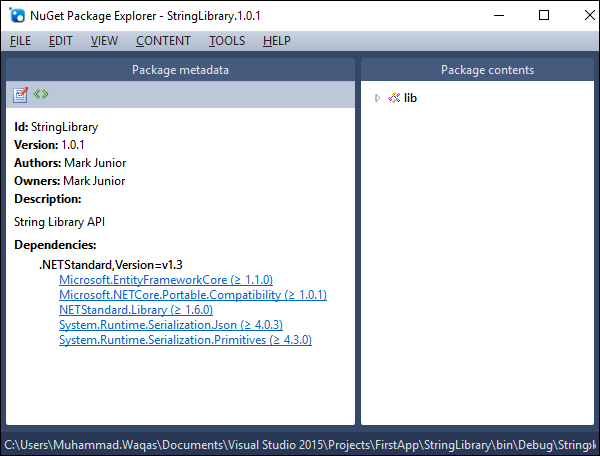
You will see the updated metadata. The question now is, how can we use it in another package.
We need to start by publishing somewhere in the NuGet feed and then we can consume it in another project.
There are two options to publish the updated metadata −
- Publish it to nuget.org
- Push the metadata to private NuGet feed
Here we will be using the private NuGet feed because it is a lot easier than to setup an account on nuget.org. To learn how to publish your package to nuget.org, you can follow all the guidelines specified here https://docs.microsoft.com/en-us/nuget/create-packages/publish-a-package.
Follow these steps to push the updated metadata to private NuGet feed.
Step 1 − To start with, we need the nuget commandline utility and we have to install it. Let us now open the NuGet Package Manager and search for nuget.commandline.
Step 2 − Select Nuget.Commandline and click Install.
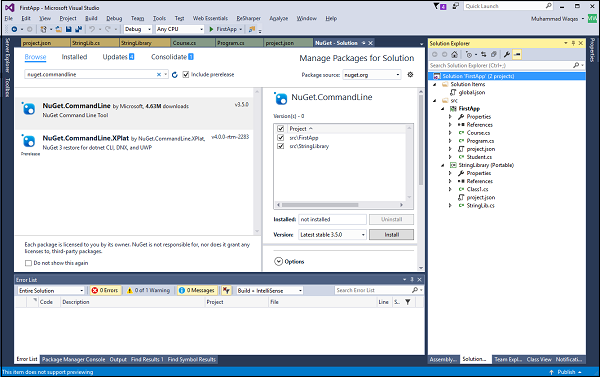
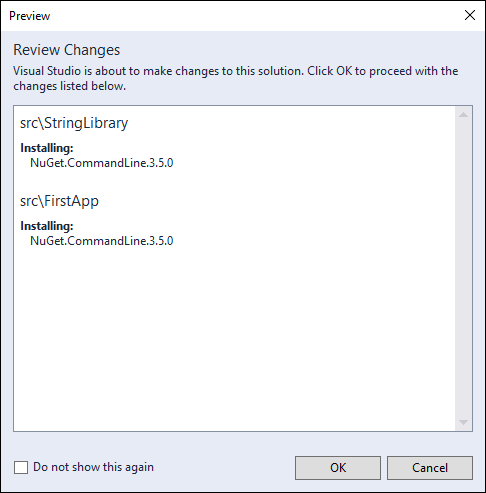
Step 3 − Click OK to install Nuget.Commandline. You can also manually install it by downloading it from the following Url https://dist.nuget.org/index.html and then set up the environment variable.
Step 4 − Once the installation is finished, let us open the command prompt again and go to the bin\Debug folder where the NuGet packages are located and specify the following command −
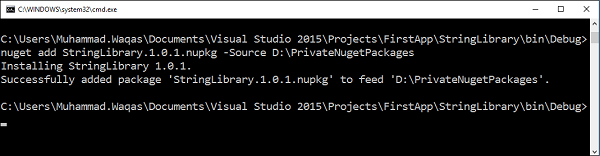
nuget add StringLibrary.1.0.1.nupkg -Source D:\PrivateNugetPackages
Step 5 − In the above command, we add the StringLibrary.1.0.1.nupkg package to our private feed and the location is D:\PrivateNugetPackages, -Source specifies the package source.
Step 6 − You can see that the StringLibrary is installed; the StringLibrary can further be added to the private feed.
Step 7 − Let us go to that folder.
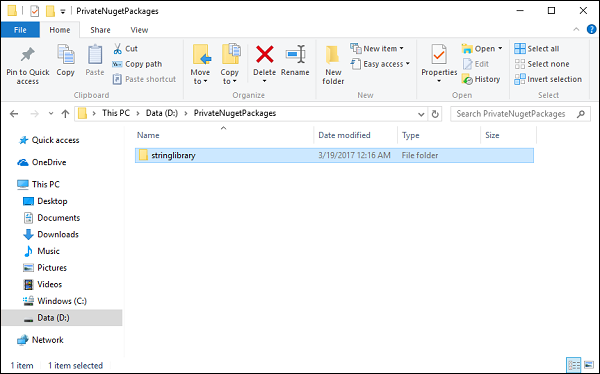
Step 8 − Inside the stringlibrary folder, you will see another folder with the version name and here it is 1.0.1.
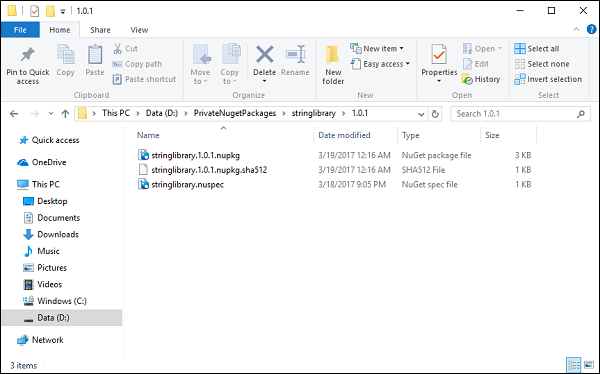
The NuGet package is located here.
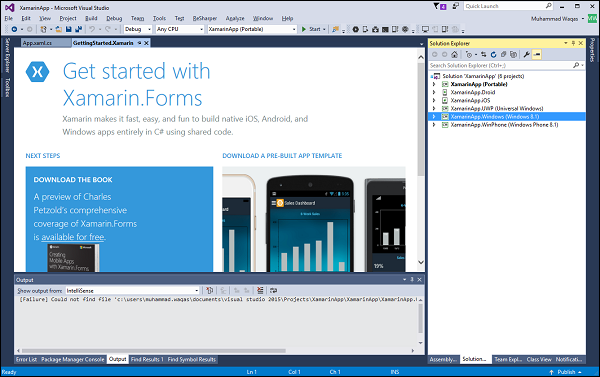
Creating a Xamarin.Forms Project
In this chapter, we will discuss how to consume the NuGet package which we have created and published to a private NuGet feed. So, first we will create a Xamarin.Forms project. We need to first understand what is Xamarin.Forms.
Xamarin.Forms is a framework that allows developers to rapidly create crossplatform user interfaces.
Xamarin.Forms is a cross-platform natively backed UI toolkit abstraction that allows developers to easily create user interfaces that can be shared across Android, iOS, Windows, and Windows Phone.
The user interfaces are rendered using the native controls of the target platform, allowing Xamarin.Forms applications to retain the appropriate look and feel for each platform.
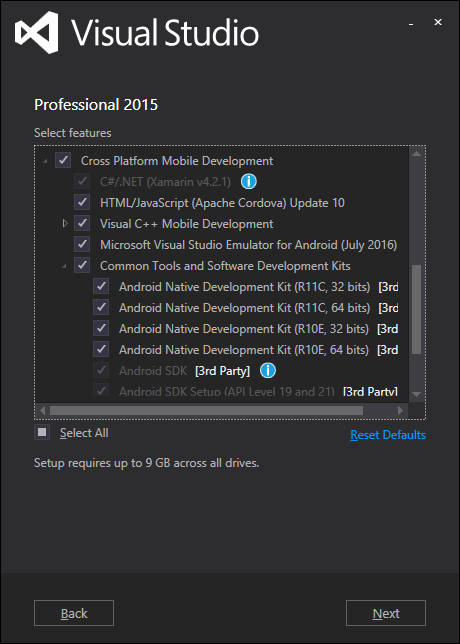
To start Xamarin.Forms, we need some additional features in Visual Studio 2015. Let us modify your Visual Studio 2015 and make sure the following cross-platform mobile development option is selected.
Once the installation is finished, let us update the Xamarin by selecting Tools → Options…
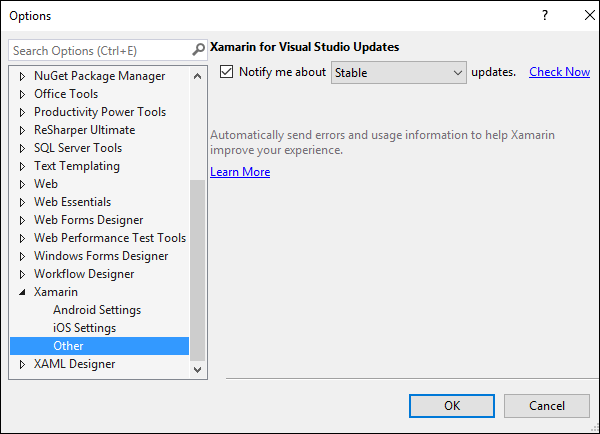
Scroll down and expand Xamarin in the left pane and then select Other. On top right hand corner of the dialog box, click on Check Now to see if updates are available.
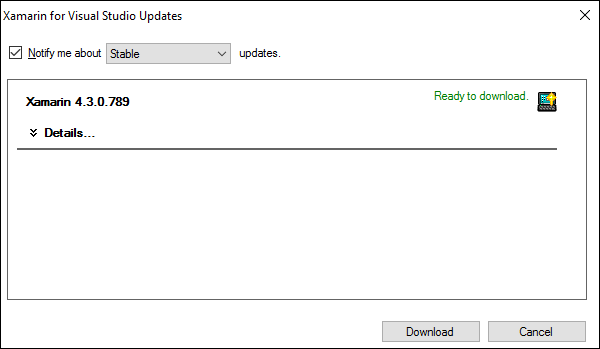
You can see that updates are available, let us click on the Download button to start downloading. Once downloading is finished, you will be notified to install the updates.
Let us now open the Visual studio again and select the File → New → Project… menu option.
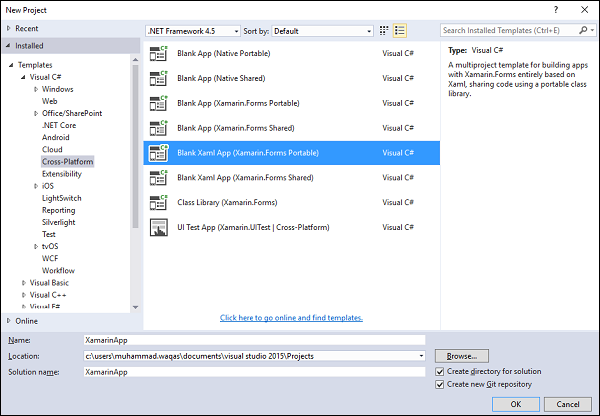
In the left pane, select the Visual C# → Cross-Platform template and in the middle pane, select Blank Xaml App (Xamarin.Forms Portable). Enter the name in the Name field and click OK.
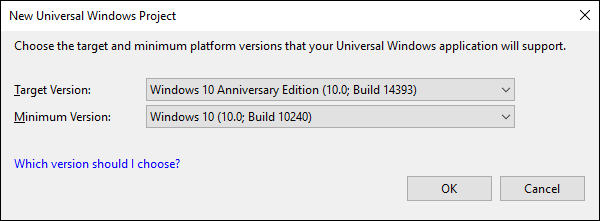
Select the Target Version and the Minimum Version and click OK.
You will see a series of projects; at the top we have the PCL library which will be shared among all platforms like Android, iOS, UWP, Windows 8.1, and Windows Phone 8.1.
Here, we will focus on the PCL library and will bring some code here. Let us expand the code.
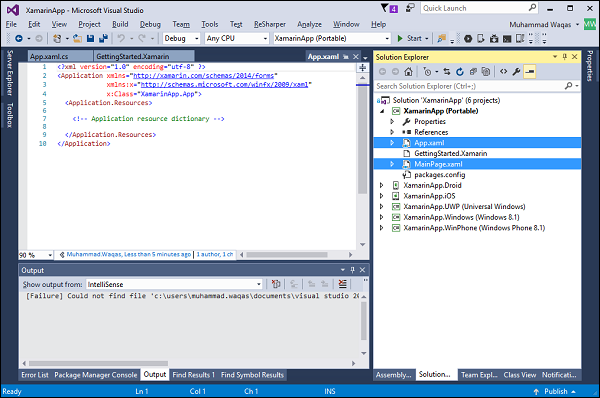
In this Xamarin.Forms template, you can see the generic App.xaml and MainPage.xaml, uses Xamarin.Forms XAML framework which works across these platforms.
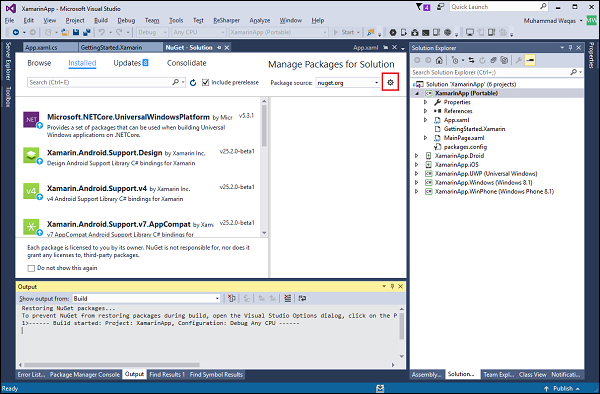
We need to import our codes and we also need the private NuGet feed we set up in the last chapter.
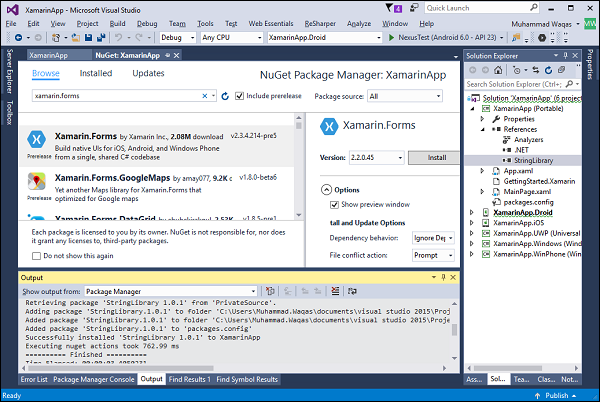
Let us now open the NuGet Package Manager. Click on the wheel next to the Package source dropdown list.
We need to add our private feed here, let us click on the plus (+) button.
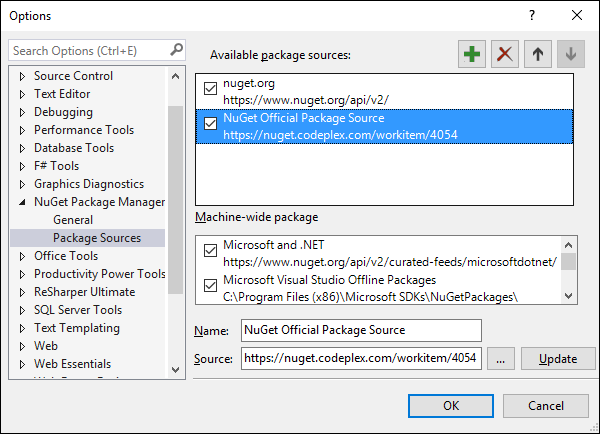
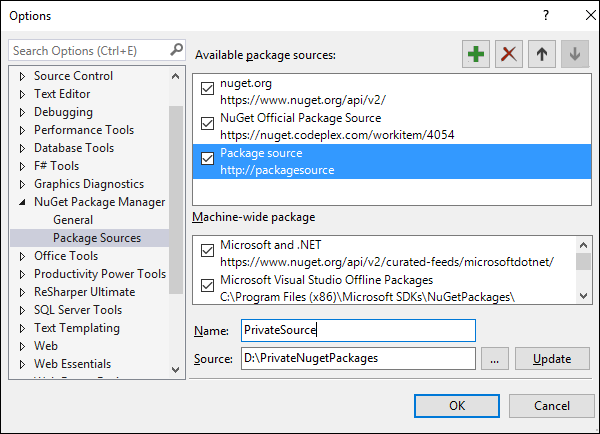
You will see that another checkbox is added in the Available package sources section, let us specify a name and source path and click OK.
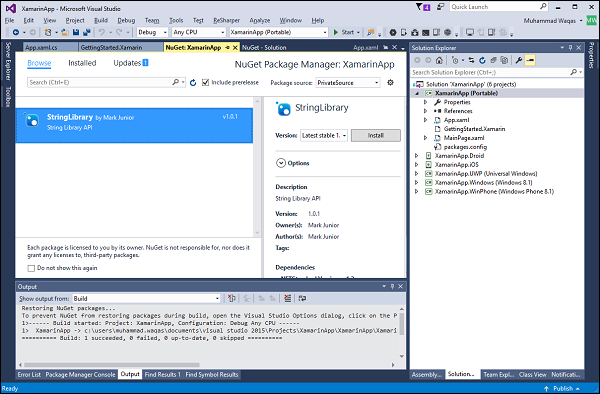
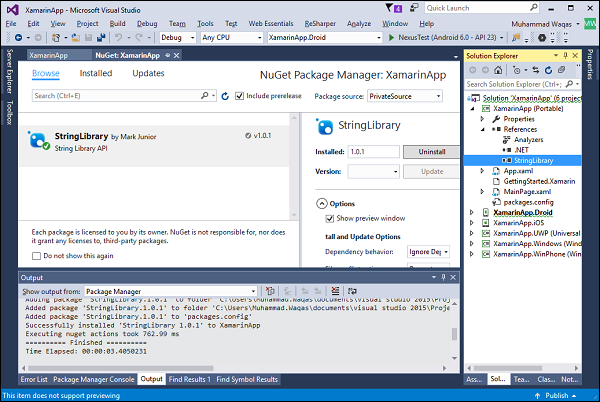
Let us now go to the Browse tab and select PrivateSource from the Package source dropdown list and you will see the StringLibrary NuGet package. Select StringLibrary and click Install.
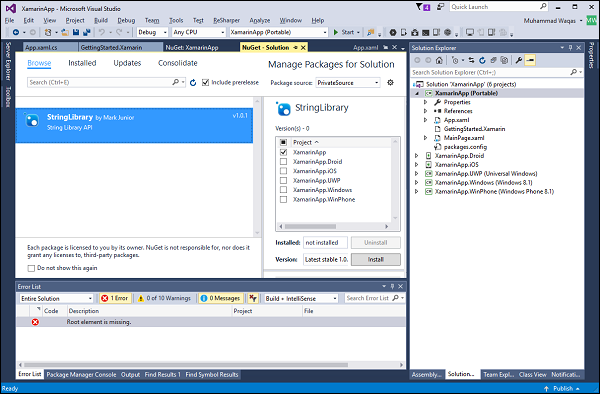
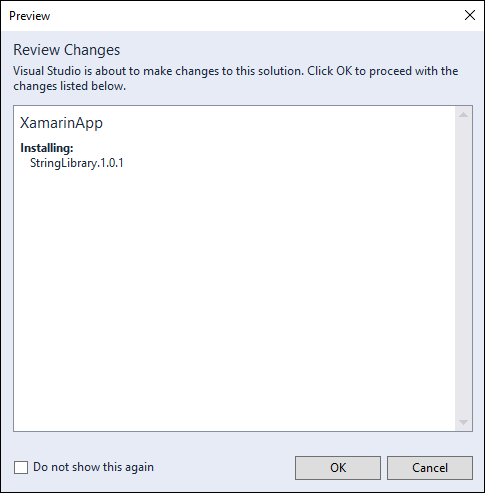
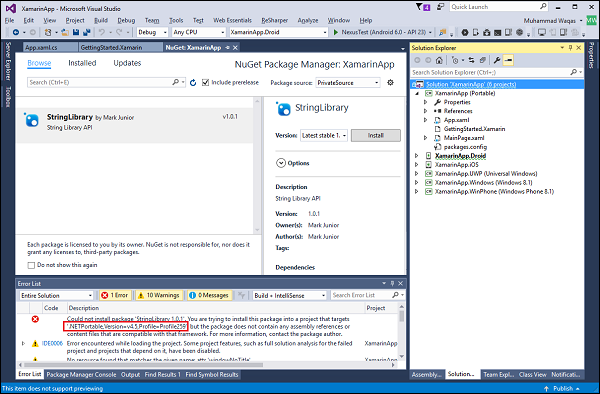
Click OK and you will see one error.
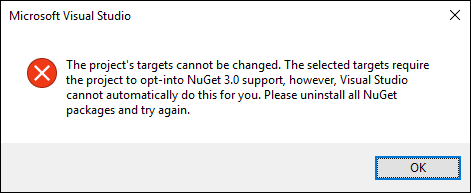
We can’t use library with .NETPortable profile version 259, we will be fixing this error in the next chapter.
.NET Core - PCL Troubleshooting
In this chapter, we will be fixing the error we got while installing the NuGet package from our private feed in Xamarin.Forms project.
We will further understand the problem in brief. To start with, let us right-click on the PCL library and select Properties.
On this page, you will see the whole series of frameworks targeted. From the error, you can see that the .NETPortable profile 259 is not compatible with our StringLibrary 1.0.1. However, it is trying to take reference from the .NET Standard 1.1 library.

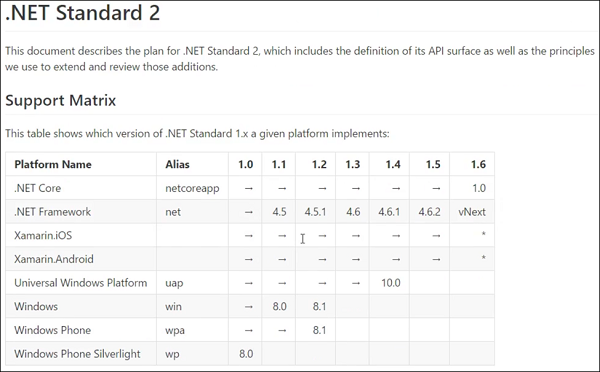
Let us now see the .NET Standard Library and identify which platform is not compatible with our library.
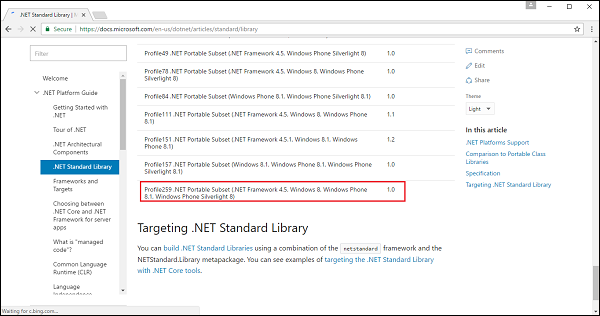
You can see that Windows Phone Silverlight 8 is compatible with .NET Standard 1.0. If you open the following webpage, then you will see that Profile259 can support only .NET Standard 1.0.
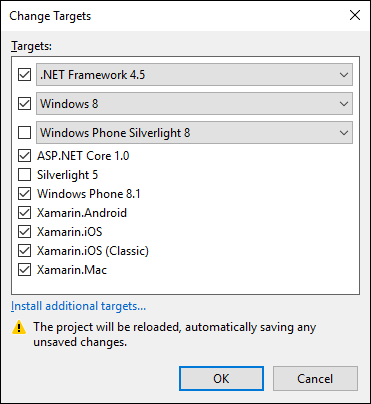
Let us now uncheck Windows Phone Silverlight 8.

Click the OK button.
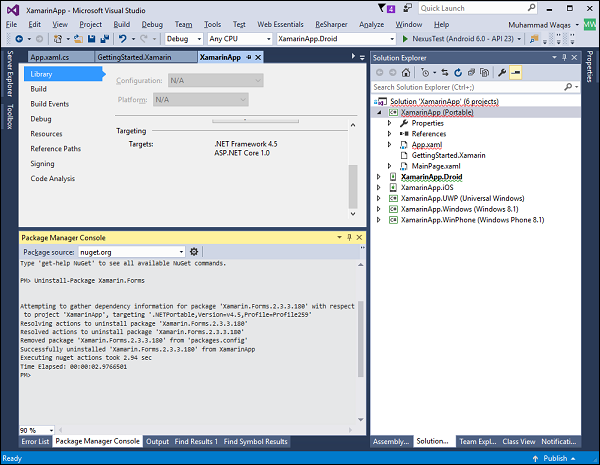
Now to fix this issue click OK and cancel the Change Targets dialog and then open Package Manager Console and execute the following command.
PM > Uninstall-Package Xamarin.Forms
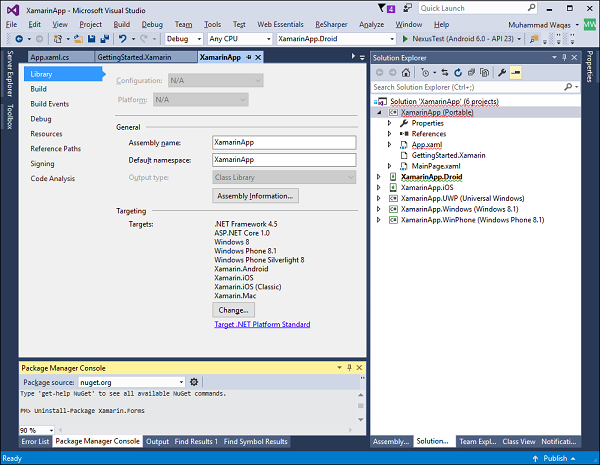
Let us now go to the Properties of PCL library. Click on the Change button.
Uncheck Windows Phone Silverlight 8 and Click OK.
You can now see that Windows Phone Silverlight 8 is no longer available in Targeted framework. You can also see the profile that is the target now. To see this, let us unload the PCL library and edit the XamarinApp.csproj file.
You can see now that TargetFrameworkProfile is now Profile111.
If you open the documentation, then you will see that Profile111 is supporting .NET Standard 1.1.

Let us now reload the PCL again and open the NuGet Package Manager and try to install the StringLibrary package from private feed.
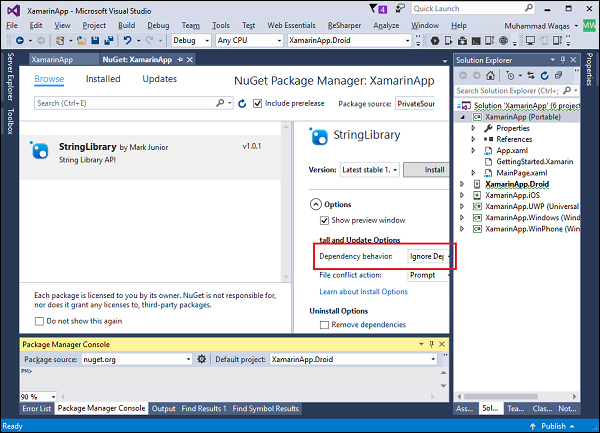
From the Dependency behavior dropdown list, select Ignore Dependencies and then click Install.
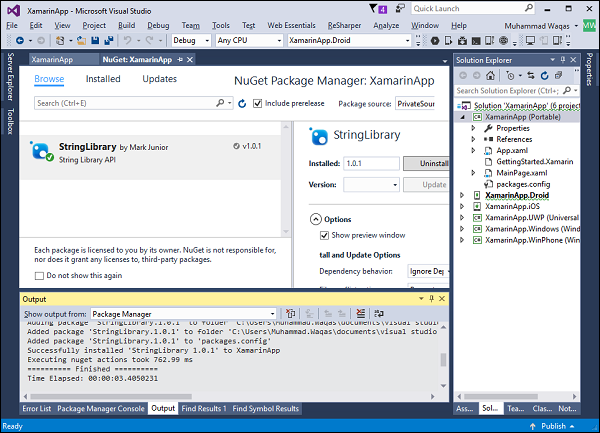
You can see that the StringLibrary package is now installed from the private feed. If you expand the References of PCL, then you will see that the StringLibrary reference is also added as shown below.
We had uninstalled the Xamarin.Forms for the Windows Phone Silverlight 8 issue. The Xamarin.Forms needs to be installed again. It is recommended that the same version is installed.
Once the installation completes, let us use the StringLibrary functionality in your application.
.NET Core - Create a Testing Project
In this chapter, we will discuss how to create a Testing project using .NET Core. Unit testing is a development process for the software that has the smallest testable parts of an application, which are called units. They are individually and independently scrutinized for any proper operation. Unit testing is can either be automated or done manually as well.
Let us now open the New Project dialog box and select Visual C# → .NET Core template.
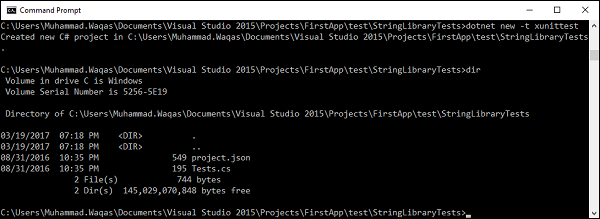
On this dialog box, you can see that there is no project template for unit testing. To create a unit test project, we should use the command line utility. Let us go to the Solution folder that we created; create a test folder and inside the test folder create another folder and call it StringLibraryTests.
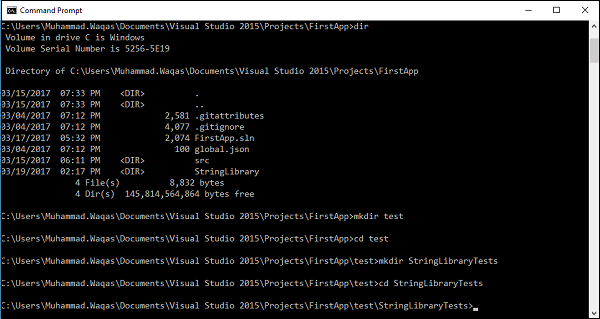
Let us now use the dotnet commandline utility to create a new test project by executing the following command −
dotnet new -t xunittest
You can now see that a new C# project is created; let us look into the folder by executing the v command and you will see project.json and Tests.cs files as shown below.
Here is the code in project.json file.
{
   "version": "1.0.0-*",
   "buildOptions": {
      "debugType": "portable"
   },
   "dependencies": {
      "System.Runtime.Serialization.Primitives": "4.1.1",
      "xunit": "2.1.0",
      "dotnet-test-xunit": "1.0.0-rc2-192208-24"
   },
   "testRunner": "xunit",
   "frameworks": {
      "netcoreapp1.0": {
         "dependencies": {
            "Microsoft.NETCore.App": {
               "type": "platform",
               "version": "1.0.1"
            }
         },
         "imports": [
            "dotnet5.4",
            "portable-net451+win8"
         ]
      }
   }
}
Following is the code in the Test.cs file.
using System;
using Xunit;
namespace Tests {
   public class Tests {
      [Fact]
      public void Test1() {
         Assert.True(true);
      }
   }
}
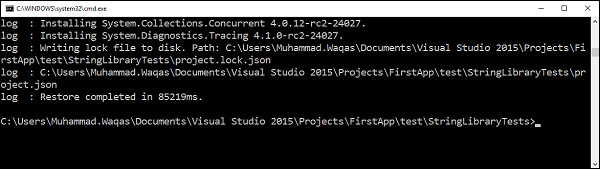
To fetch the necessary dependencies from NuGet, let us execute the following command −
dotnet restore
We can run the test when the necessary dependencies are restored.
You can see that the compilation succeeded; as you go down you can see some information about the test executed.
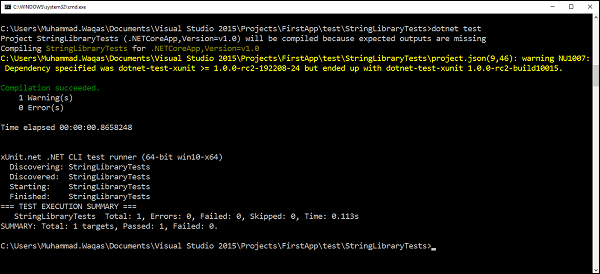
Currently we have 1 test executed, 0 error, 0 failed, 0 skipped and the time taken by the execution process also mentioned as information.
.NET Core - Running Tests in Visual Studio
In this chapter, we will discuss how to run tests in Visual Studio. The .NET Core has been designed with testability in mind, so that creating unit tests for your applications is easier than ever before. In this chapter, we will run and execute our test project in Visual Studio.
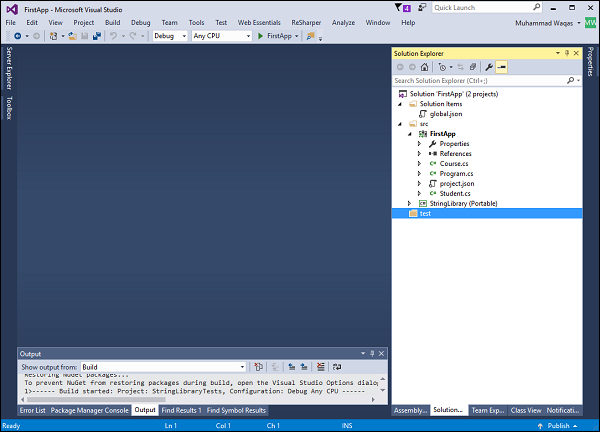
Let us open the FirstApp solution in Visual Studio.
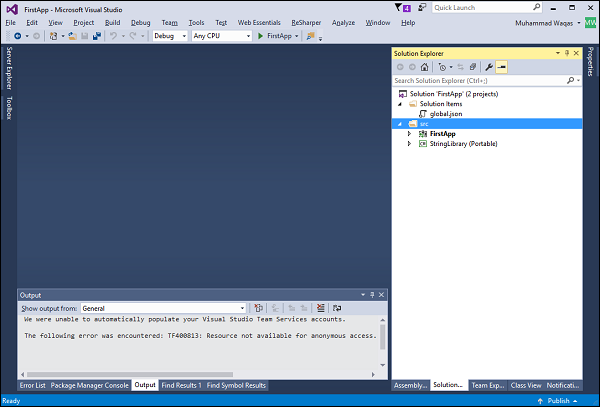
You can see that it has only two projects and you will not be able to see the test project because we haven’t added that project in our solution.
Let us add a folder first and call it test.
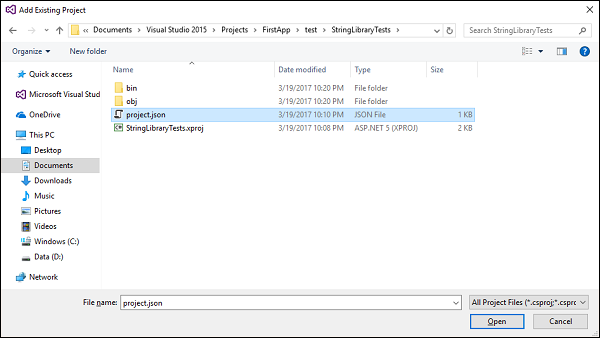
Right-click on the test folder.
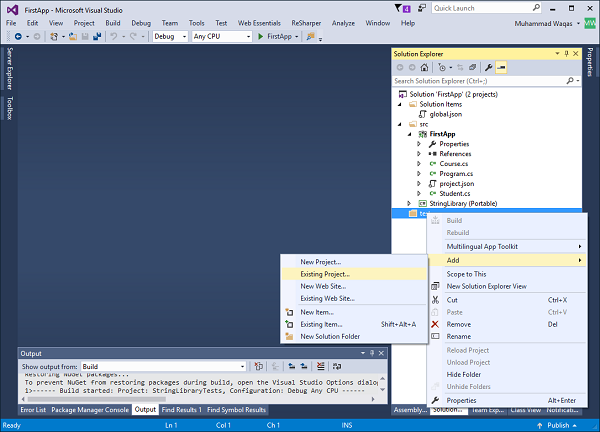
Select project.json file and click Open.
The following screenshot shows the code in Tests.cs file as output.
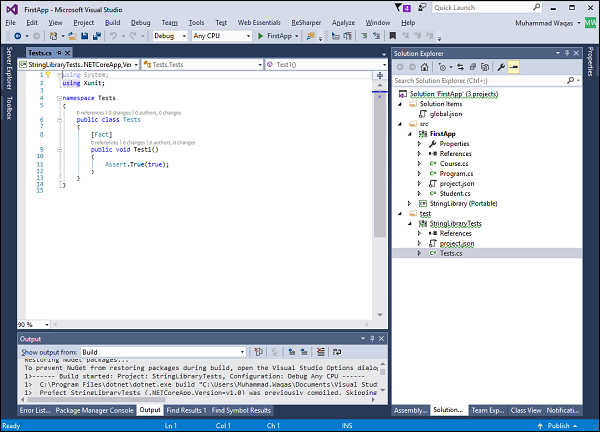
It is the default implementation and it is just testing that True is equal to true. It is the xUnit testing framework and you will see the Fact attribute that annotates and denotes the test method.
using System;
using Xunit;

namespace Tests {
   public class Tests {
      [Fact]
      public void Test1() {
         Assert.True(true);
      }
   }
}
Following is the implementation of project.json file.
{
   "version": "1.0.0-*",
   "buildOptions": {
      "debugType": "portable"
   },
   "dependencies": {
      "System.Runtime.Serialization.Primitives": "4.1.1",
      "xunit": "2.1.0",
      "dotnet-test-xunit": "1.0.0-rc2-192208-24"
   },
   "testRunner": "xunit",
   "frameworks": {
      "netcoreapp1.0": {
         "dependencies": {
            "Microsoft.NETCore.App": {
               "type": "platform",
               "version": "1.0.1"
            }
         },
         "imports": [
            "dotnet5.4",
            "portable-net451+win8"
         ]
      }
   }
}
In project.json file, the most important dependency to the testing framework is the xunit, which brings in the Fact attribute. It brings in the testing framework and APIs for testing with xunit.
We also have the dotnet-test-xunit, this is an adopter so that xunit can work with .NET Core, specifically with dotnet test command line utility. Then you will see the testRunner which will run xunit and you can also see the netcoreapp1.0 framework.
You will see the .NETCore.App dependeny below.
To run test in Visual Studio, let us open Test Explorer from the Test → Window → Test Explorer menu option.
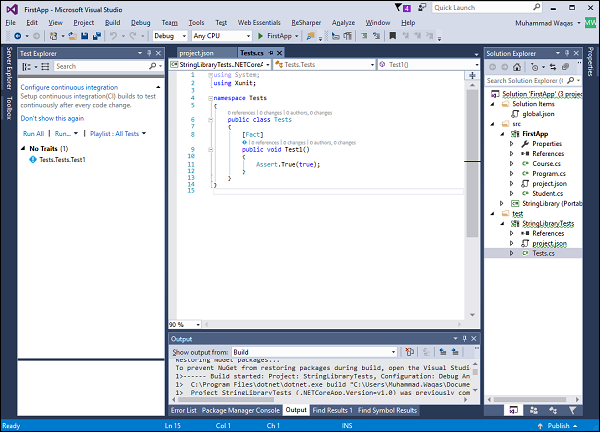
And you can see that Visual Studio automatically detects the test. The name of the test consists of namespace.className.TestMethodName. Let us now click on Run All button in Test Explorer.
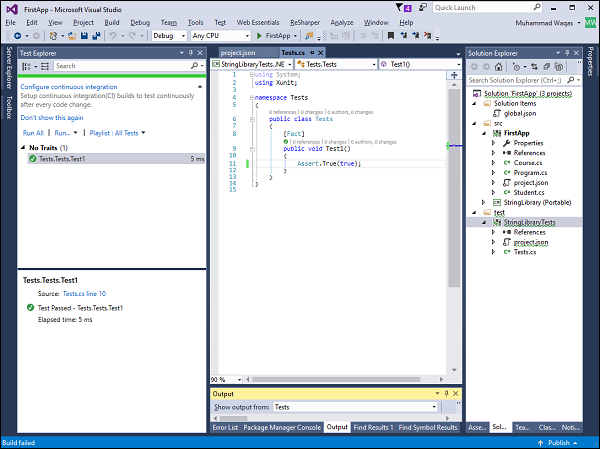
It will first build the code and the run the test and you will see the total time taken by the test. Let us change the test method so that we can see the output when the test fails.
using System;
using Xunit;

namespace Tests {
   public class Tests {
      [Fact]
      public void Test1() {
         Assert.True(false);
      }
   }
}
Let us execute the test again by clicking on the Run All button link.
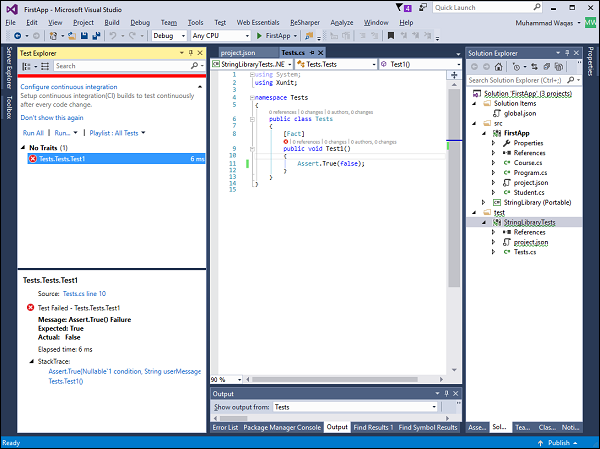
You can now see the test failure.
.NET Core - Testing Library
In this chapter, we will test our StringLibrary and to do so, we need to rearrange our projects so that we can follow the default convention.
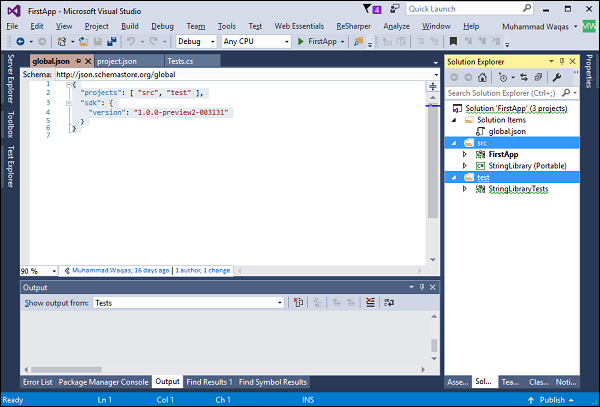
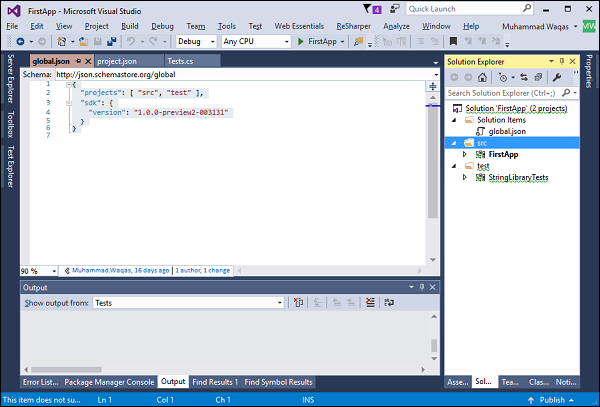
Let us open the global.json file.
{
   "projects": [ "src", "test" ],
   "sdk": {
      "version": "1.0.0-preview2-003131"
   }
}
At the top of this file you will see the project settings and it sets up some folder such as src and test by default.
As by convention we must have projects in these folders, this is the new convention and that is going to be used as part of .NET Core.
In the Solution Explorer, you can see that both the console project and the library project are inside the src folder while the Testing project is inside test folder.
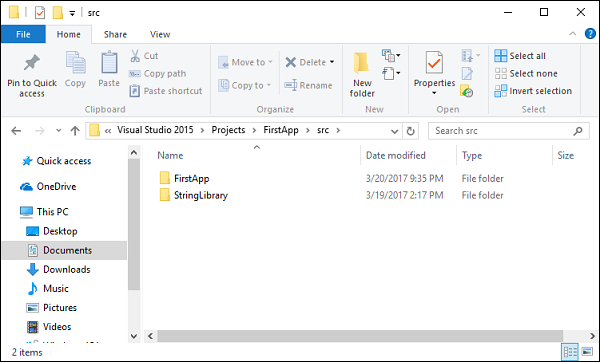
And the projects structure in Solution Explorer doesn’t represent where the projects physically exist on the disk. Let us now open the Solution folder and you will see that StringLibrary project is not inside the src folder.
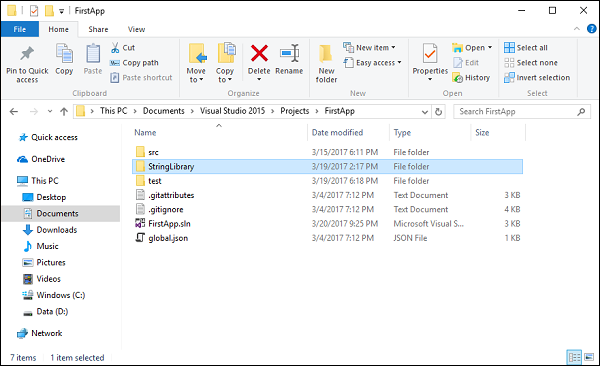
You can see that both src and test folders map to the convention specified in the global.json file. However, we have one project StringLibrary which is out of convention. Let us now add the StringLibrary project inside the src folder.
In the src folder, we have two projects and we need to fix the problem so that we can use all the projects properly. Let us go back to the Visual Studio and right-click on the StringLibrary project and select the Remove option. It won’t delete it, but it will only remove the project.
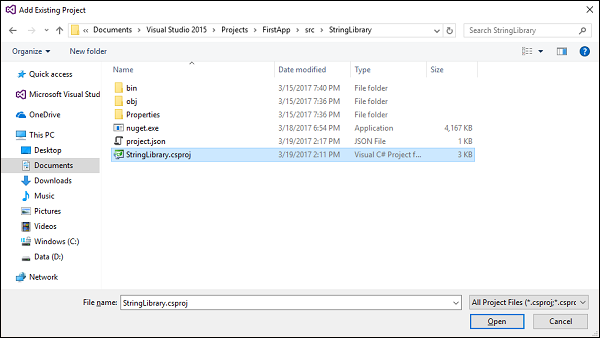
Now right-click on the src folder and select Add → Existing Project…
Browse to the StringLibrary project which is now inside the src folder, select the StringLibrary.csproj file and click Open.
We now have to remove the reference of StringLibrary from the project.json file of the console app.
{
   "version": "1.0.0-*",
   "buildOptions": {
      "emitEntryPoint": true
   },
   "dependencies": {
      "Microsoft.NETCore.App": {
         "type": "platform",
         "version": "1.0.1"
      },
      "NuGet.CommandLine": "3.5.0",
      "System.Runtime.Serialization.Json": "4.0.3"
   },
   "frameworks": {
      "netcoreapp1.0": {
         "dependencies": { },
         "imports": "dnxcore50"
      }
   }
}
Save the changes and then add a reference of StringLibrary again in your console project.
{
   "version": "1.0.0-*",
   "buildOptions": {
      "emitEntryPoint": true
   },
   "dependencies": {
      "Microsoft.NETCore.App": {
         "type": "platform",
         "version": "1.0.1"
      },
   "NuGet.CommandLine": "3.5.0",
      "System.Runtime.Serialization.Json": "4.0.3"
   },
   "frameworks": {
      "netcoreapp1.0": {
         "dependencies": {
            "StringLibrary": {
               "target": "project"
            }
         },
         "imports": "dnxcore50"
      }
   }
}
Now everything should be working again and you can build StringLibrary and then FirstApp (console project) without any error. Let us now test the StringLibrary functionality using xunit. We need to add reference of StringLibrary into our testing project. Right-click on the References of StringLibraryTests project and select Add Reference…
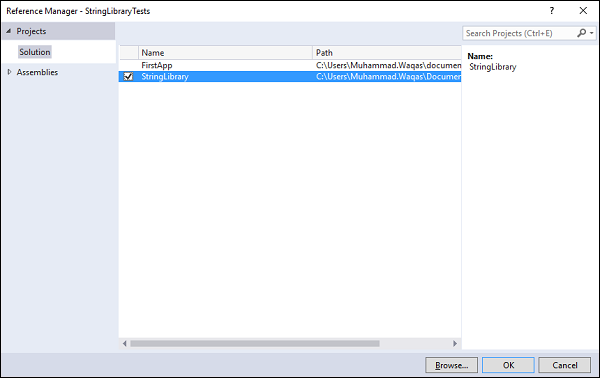
Click OK which will add a reference of StringLibrary to our testing project. Let us now replace the following code in the Tests.cs file.
using System;
using Xunit;
using StringLibrary;

namespace Tests {
   public class Tests {
      [Fact]
      public void StartsWithUpperCaseTest() {
         string input = "Mark";
         Assert.True(input.StartsWithUpper());
      }
      [Fact]
      public void StartsWithLowerCaseTest() {
         string input = "mark";
         Assert.True(input.StartsWithLower());
      }
      [Fact]
      public void StartsWithNumberCaseTest() {
         string input = "123";
         Assert.True(input.StartsWithNumber());
      }
   }
}
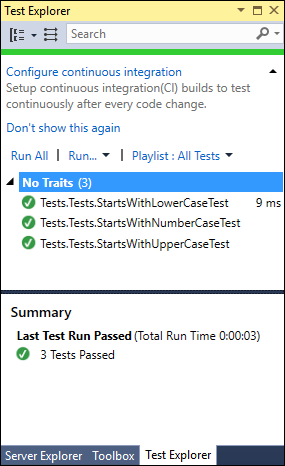
You can see that we have three test methods which will test the functionality of StringLibrary. Let us click the Run All link and you will see the following output in Test Explorer.
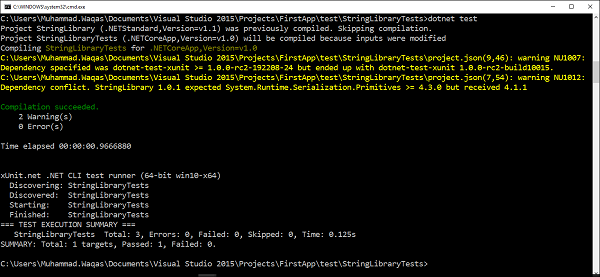
You can also run the tests from the command line. Let us open the command prompt and execute the dotnet test command.
Managed Extensibility Framework
In this chapter, we will discuss the Managed Extensibility Framework (MEF). MEF can be used for third-party plugin extensibility, or it can bring the benefits of a loosely-coupled plugin-like architecture to regular applications.
MEF is a library for creating lightweight, extensible applications.
It allows application developers to discover and use extensions with no configuration required.
MEF is an integral part of the .NET Framework 4, and is available wherever the .NET Framework is used that improves the flexibility, maintainability and testability of large applications.
You can use MEF in your client applications, whether they use Windows Forms, WPF, or any other technology, or in server applications that use ASP.NET.
MEF has been ported as Microsoft.Composition to .NET Core as well but partially.
Only System.Composition is ported, and System.ComponentModel.Composition is not available yet. This means, we don’t have the catalogs which can load types from assemblies in a directory.
In this chapter, we will only learn how we can use MEF in .NET Core application.
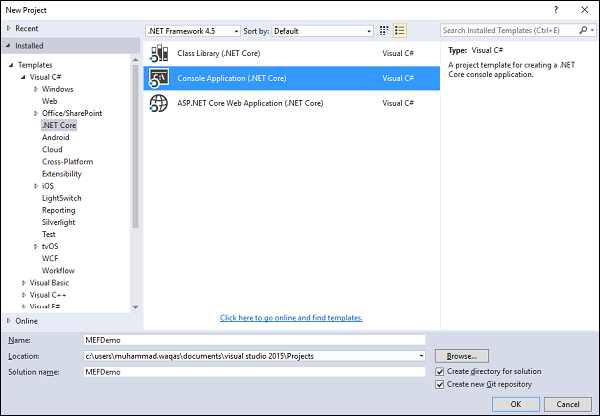
Let us understand a simple example in which we will use MEF in .NET Core console application. Let us now create a new .NET Core console project.
In the left pane, select Templates → Visual C# → .NET Core and then in the middle pane, select Console Application (.NET Core).
Enter the name of the project in the Name field and click OK.
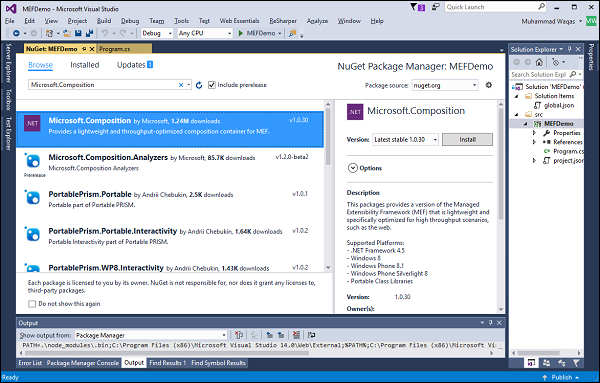
Once the project is created, we need to add reference of Microsoft.Composition so that we can use MEF. To do so, let us right-click on the project in Solution Explorer and Manage NuGet Packages…
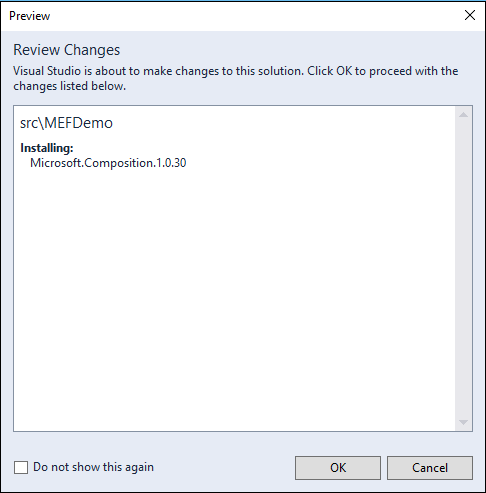
Search for Microsoft.Composition and click Install.
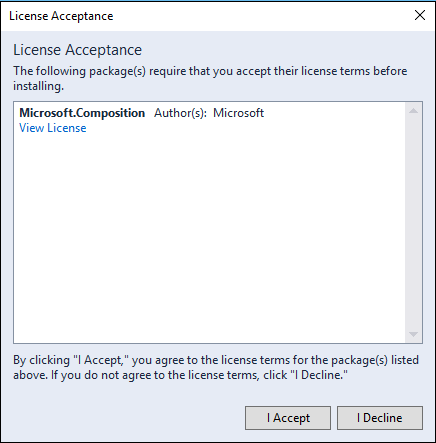
Click the OK button.
Click the I Accept button.
When the installation completes, you will find an error in References.

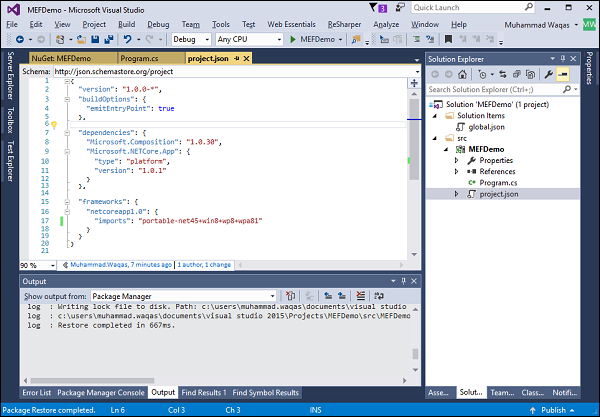
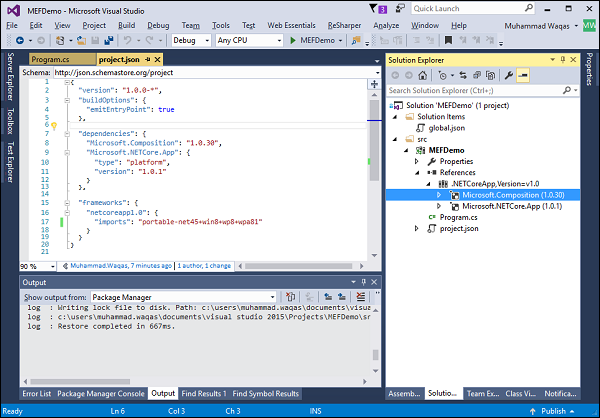
Let us open the project.json file.
{
   "version": "1.0.0-*",
   "buildOptions": {
      "emitEntryPoint": true
   },

   "dependencies": {
      "Microsoft.Composition": "1.0.30",
      "Microsoft.NETCore.App": {
         "type": "platform",
         "version": "1.0.1"
      }
   },

   "frameworks": {
      "netcoreapp1.0": {
         "imports": "dnxcore50"
      }
   }
}
You can see that the Microsoft.Composition dependency is added, but the problem is that this package is not compatible with dnxcore50. So we need to import portablenet45+win8+wp8+wpa81. Let us now replace your project.json file with the following code.
{
   "version": "1.0.0-*",
   "buildOptions": {
      "emitEntryPoint": true
   },
   "dependencies": {
      "Microsoft.Composition": "1.0.30",
      "Microsoft.NETCore.App": {
         "type": "platform",
         "version": "1.0.1"
      }
   },
   "frameworks": {
      "netcoreapp1.0": {
         "imports": "portable-net45+win8+wp8+wpa81"
      }
   }
}
Save this file and you will see that the error is rectified.
If you expand the References, then you will see a reference of Microsoft.Composition.
First we need to create an interface that is to be exported and implement the interface and decorate the class with the export attribute. Let us now add a new class.
Enter the name for your class in the Name field and click Add.
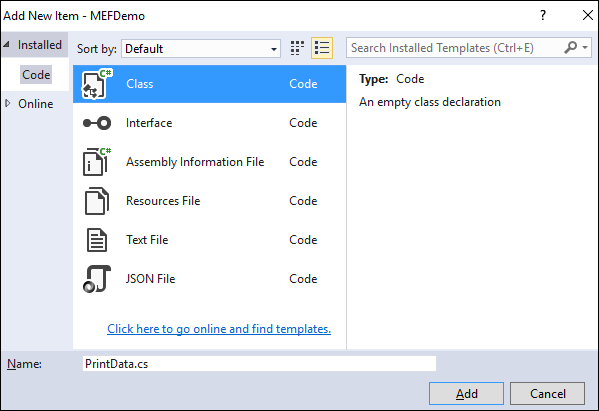
Let us add the following code in the PrintData.cs file.
using System;
using System.Collections.Generic;
using System.Composition;
using System.Linq;
using System.Threading.Tasks;

namespace MEFDemo {
   public interface IPrintData {
      void Send(string message);
   }
   [Export(typeof(IPrintData))]
   public class PrintData : IPrintData {
      public void Send(string message) {
         Console.WriteLine(message);
      }
   }
}
As mentioned above, Catalogs are not available in Microsoft.Composition namespace. So, it will load all the types from the Assembly with export attribute and attach to the import attribute as shown in the Compose method in the Program.cs file.
using System;
using System.Collections.Generic;
using System.Composition;
using System.Composition.Hosting;
using System.Linq;
using System.Reflection;
using System.Threading.Tasks;

namespace MEFDemo {
   public class Program {
      public static void Main(string[] args) {
         Program p = new Program();
         p.Run();
      }
      public void Run() {
         Compose();
         PrintData.Send("Hello,this is MEF demo");
      }
      [Import]
      public IPrintData PrintData { get; set; }

      private void Compose() {
         var assemblies = new[] { typeof(Program).GetTypeInfo().Assembly };
         var configuration = new ContainerConfiguration()
            .WithAssembly(typeof(Program).GetTypeInfo().Assembly);

         using (var container = configuration.CreateContainer()) {
            PrintData = container.GetExport<IPrintData>();
         }
      }
   }
}
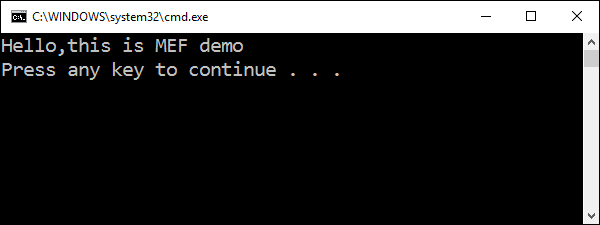
Let us now run your application and you will see that it is running by instantiating the PrintData class.
To learn more about MEF, let us visit the following Url https://msdn.microsoft.com/en-us/library/dd460648%28v=vs.110%29.aspx for more details.
.NET Core - SDK
In this chapter, we will understand the upcoming features in .NET Core. We will start with the .NET command line tools by opening the following Url in browser https://github.com/dotnet/cli
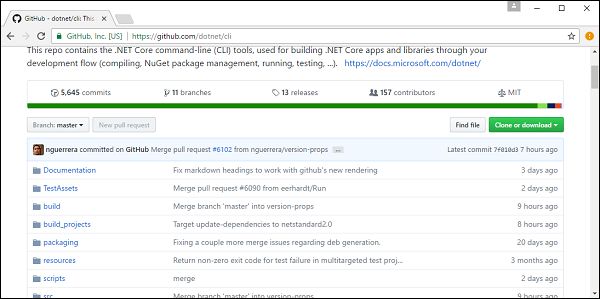
To know more about the progress, you can download the latest version of .NET Core SDK by scrolling down and you will see the Installer and Binaries section.
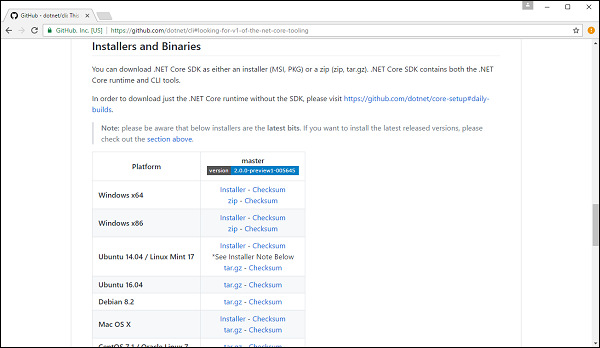
You can see the latest version of preview tools for different operating systems, let us select the Installer as per your operating system.
We are working on preview 1 of .NET Core 2.0.
Let us now look at our current tooling by opening the command prompt and execute the following command.
dotnet --info
You will see information about the currently installed version of .NET Command Line Tools on your system as shown below.
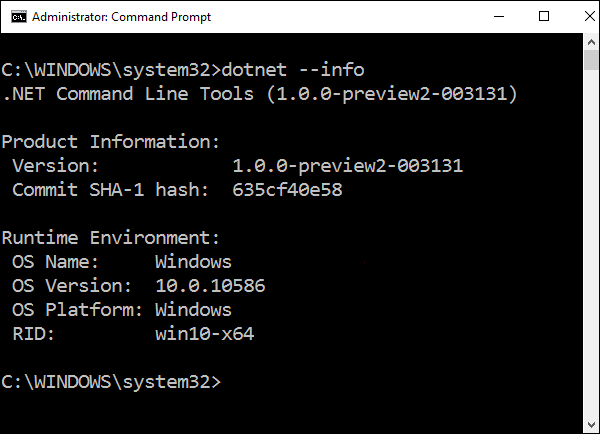
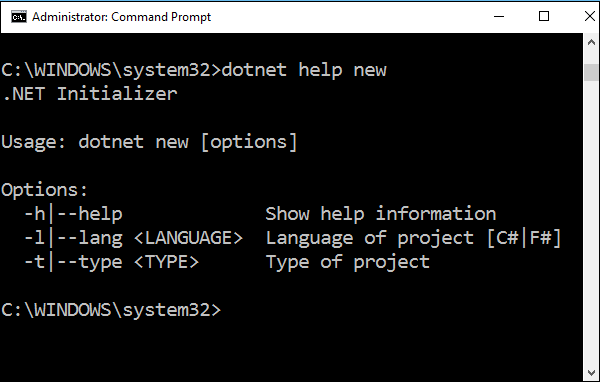
You can see that currently we have preview 2 tooling. Let us now run the following command to see about the new command.
dotnet help new
For new command language of project, you can select like C# and F# and the type of project, etc.
Let us now see the changes in the latest version of .NET Core. Once the installer is downloaded, double-click on it to install it. Click on Install.
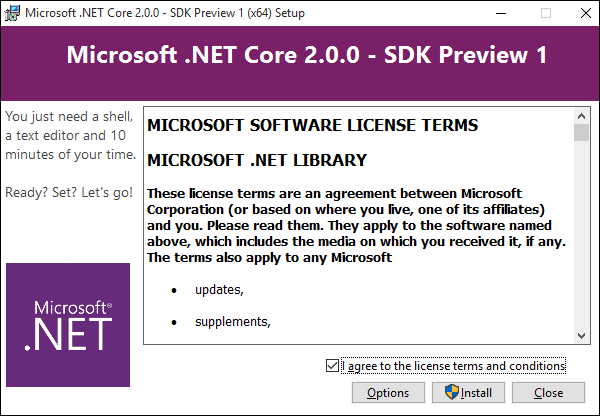
The following screenshot shows the installation process.
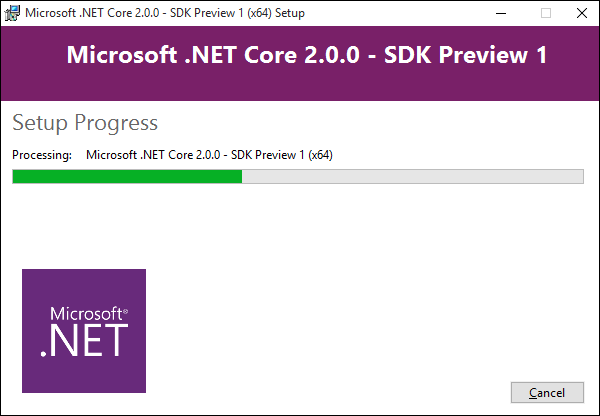
It will start the installation process. One the installation is finished, Close this dialog.
Open the command prompt and execute the following command.
dotnet --info
You will see information of currently installed version of .NET Command Line Tools on your system as shown below.
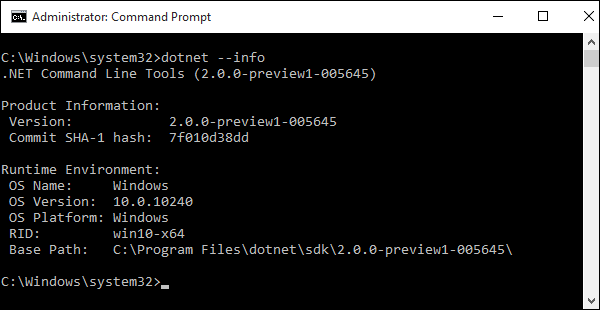
You can now see that we have preview1 tooling of .NET Core 2. Let us now run the following code in the command prompt to see about the new command in .NET Core 2 preview1.
dotnet help new
The command helps you download packages as well to the package cache.
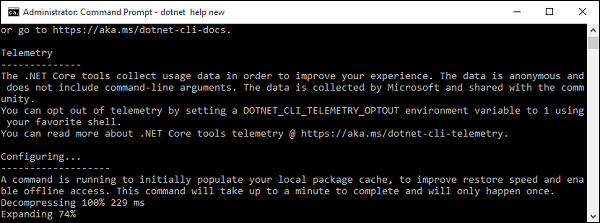
The command opens the following webpage which contains information about the new command in .NET Core 2 preview1.
Let us scroll down, you can now see that we can create the .NET Core application with more templates.
We can now create mstest, web, mvc and webapi projects as well using the command line.
.NET Core - MSBuild and project.json
The .NET Core has decided to drop project.json and go back to MSBuild and *.csproj. This is something that’s already happened in the just released .Net Core 2.0 preview1 tooling. This is fairly disappointing, because the project.json was a breath of fresh air. However, it is understandable and have many advantages as well.
Let us now discuss the advantages that the change brings in −
It would make the transition of the existing Visual Studio solutions to .NET Core straightforward.
It is a huge change and it will also enable leveraging existing investment in CI/RM based around MSBuild.
During build in MSBuild, we can think of incremental compilation, resolving buildtime dependencies, configuration management, etc.
A lot of work is required to ship dotnet cli on time, because it is no longer just about ASP.NET Core, but also console apps, UWP apps, etc.
Following are the changes in MSBuild and *.csproj −
Project.json file (*.xproj) will be replaced by MSBuild (*.csproj).
Features in project.json will start getting merged back into the the *.csproj.
It is not yet clear what they are going to do about the packages list, but it was mentioned they might keep it as json under nuget.json or merge it into the *.csproj.
Supposedly that transition should be smooth and potentially automatic if using Visual Studio.
Advantages of MSBuild
MSBuild is open source and available on GitHub and is bound to become fully crossplatform.
MSBuild will dramatically simplify and trim the structure of the *.csproj.
Microsoft is also introducing a new project system which will enable a lot of scenarios without the need for Visual Studio and the details are given on the this Url https://github.com/dotnet/roslyn-project-system/.
The goal is that even with the MSBuild setup, working with builds and project will be as seamless in Visual Studio IDE as outside of it.
MSBuild vs project.json
Let us now create a new console project with .NET Core preview2 tooling by executing the following command.
dotnet new -t console
To see all the files created within this project, run the dir command.
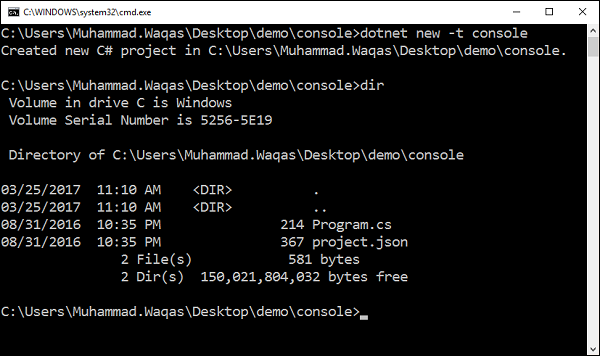
You can see that two files are created, Program.cs and project.json file.
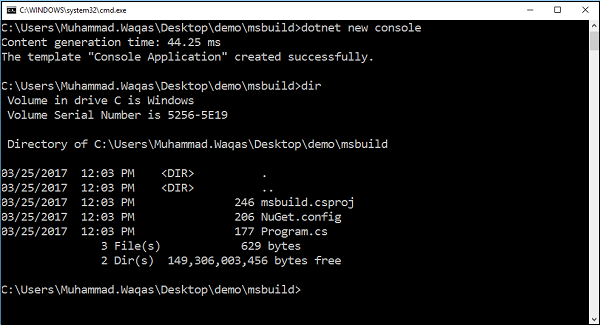
Let us now create a console app with .NET Core 2 preview1 tooling by executing the following command.
dotnet new console
To see all the files created within this project, run the dir command. You can see that three files are created, Program.cs, NuGet.config and MSBuild.csproj instead of the project.json file.
Let us now compare project.json and MSBuild.csproj files side by side.
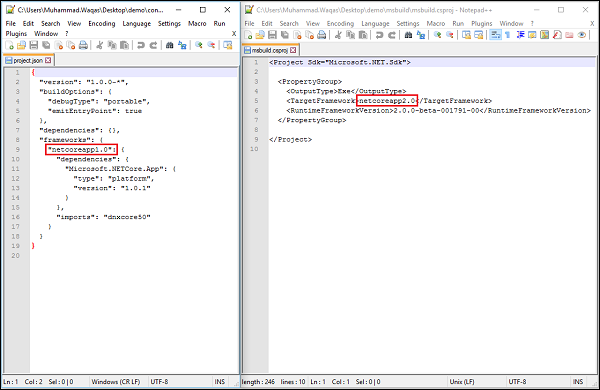
To the left, we have the file in json format while on the right, the file is in XML format. You can see that in the project.json file, inside the dependencies section, there is netcoreapp1.0, while in MSBuild.csproj file, you will see the netcoreapp2.0.
Restoring and Building with MSBuild
In this chapter, we will discuss how to restore and build your MSBuild (*.csproj) file using the command line utility. To see what commands are available in .NET Core 2.0 preview 1, let us run the following command.
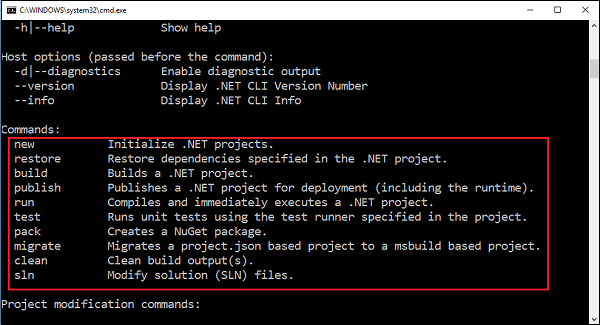
dotnet help
You will see all the commands like new, restore, build, etc.
Following is the default implementation in Program.cs file.
using System;
namespace MSBuild {
   class Program {
      static void Main(string[] args) {
         Console.WriteLine("Hello World!");
      }
   }
}
Let us now execute the following command to see the progress.
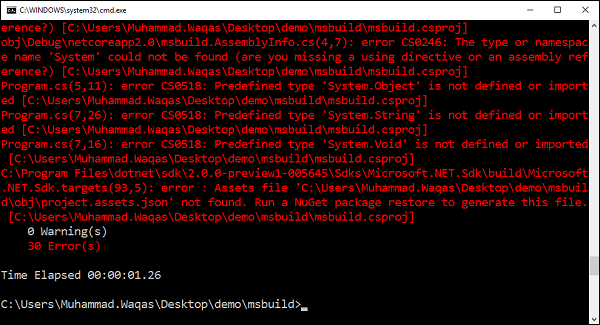
dotnet build
You will see a lot of errors. These errors need to be rectified.
Let us now run the following command.
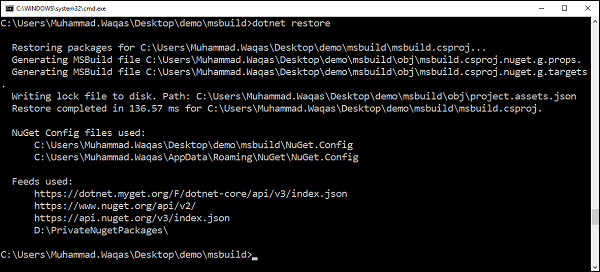
dotnet restore
You can see that all the packages are restored. Some new folders and files have also been generated.
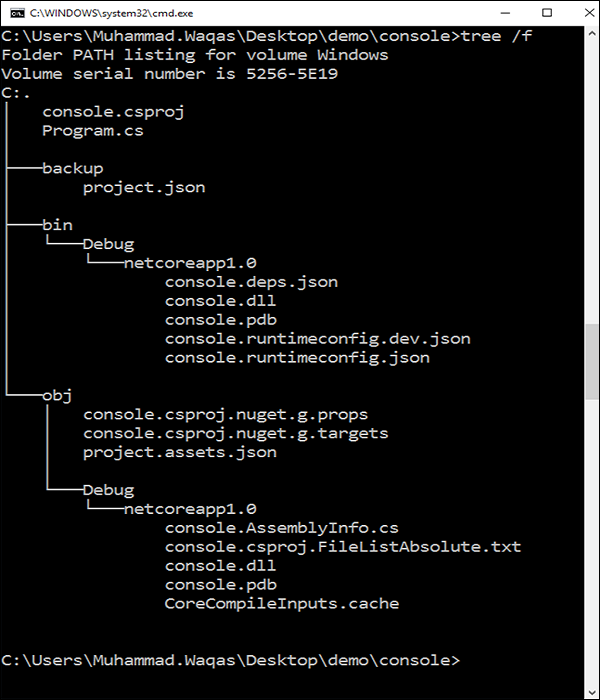
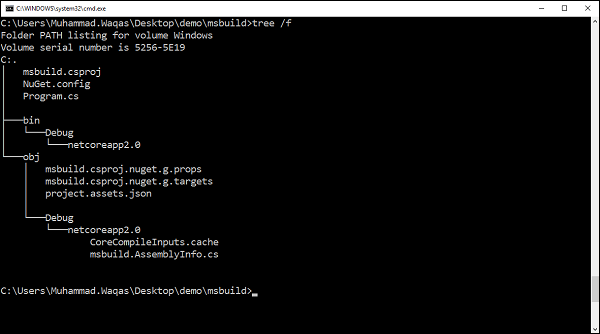
To see the directory structure, let us run the following command.
tree /f
Following is the directory structure −
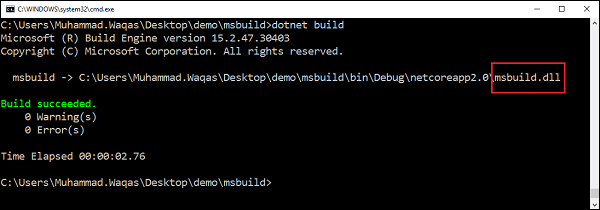
Let us now rebuild the project running the following command again.
dotnet build
Now you project will build successfully without any error(s) and MSBuild.dll is also created.
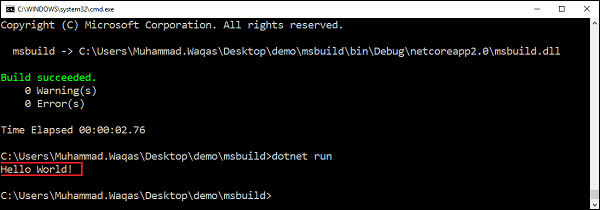
To see the output, let us run the following command −
dotnet run
You can see the following output on your console.
.NET Core - Migrations
In this chapter, we will migrate the console application which contains the project.json file build system instead of MSBuild (*.csproj). So, we have an old project which contains the following files.
Now the question is, why do we need migration? This project is created using .NET Core 1.0 preview 2 tooling and now we have installed .NET Core 2.0 preview 1 tooling. Now when you build this application using .NET Core 2.0 command line utility, then you will see the following error.
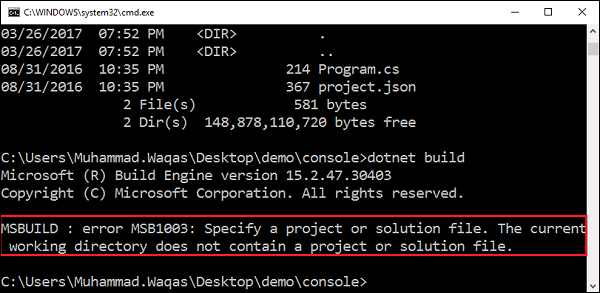
This is because the project.json build system is no longer available in .NET Core 2.0, so we need migration so that it can work properly. To see the available commands, let us run the following command.
dotnet help
In the commands section, you can see the different commands and you can also see the migrate command which will migrate a project.json based project to a MSBuild based project.
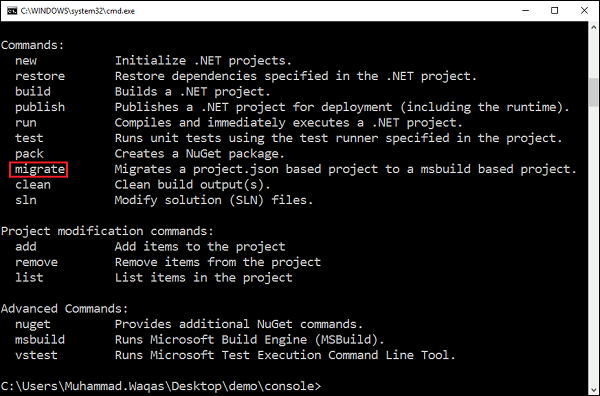
Let us now run the following command.
dotnet migrate
You will see a summary of the migration process and here you can also see that a project is migrated successfully.
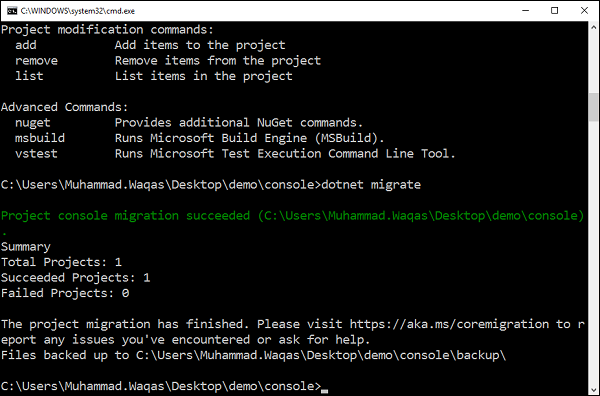
Let us now see the directory structure by using the following command.
tree /f
You will now see the *.csproj file along with Program.cs file in the project root directory and project.json is moved to the backup folder.
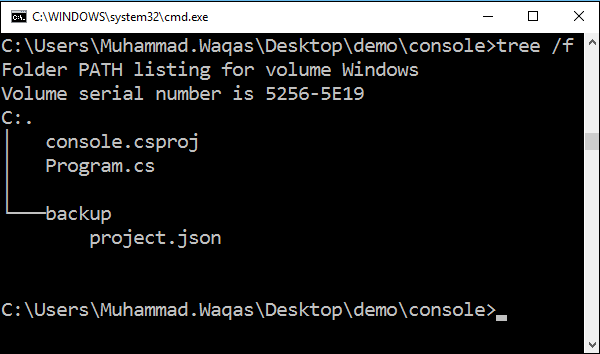
Let us open the console.csproj file. Now you can restore and build this project using the MSBuild system by running the following command.
dotnet restore
You can now see that all the packages are restored.
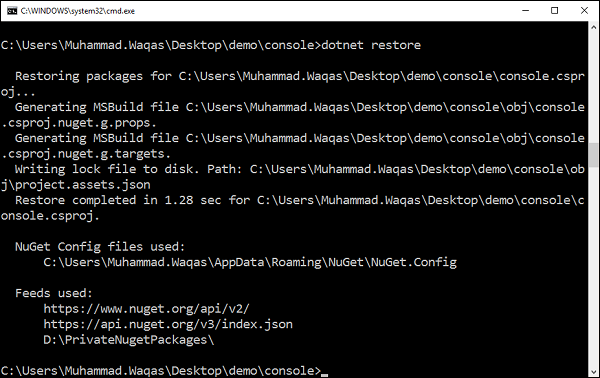
You can now build your project with the following command.
dotnet build
You can now see that the project is built successfully using MSBuild and console.dll is also generated in ..\bin\Debug\netcoreapp1.0 folder.
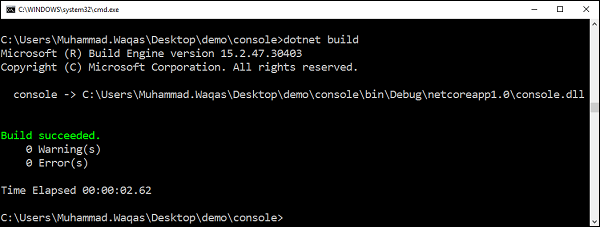
The following screenshot shows the directory structure and files.