
EJB - Environment Setup
EJB is a framework for Java, so the very first requirement is to have a Java Development Kit (JDK) installed in your machine.
System Requirement
| JDK | 1.5 or above. |
|---|---|
| Memory | no minimum requirement. |
| Disk Space | no minimum requirement. |
| Operating System | no minimum requirement. |
Step 1 - Verify Java Installation in Your System
Now open console and execute the following java command.
| OS | Task | Command |
|---|---|---|
| Windows | Open Command Console | c:\> java -version |
| Linux | Open Command Terminal | $ java -version |
| Mac | Open Terminal | machine:~ joseph$ java -version |
Let's verify the output for all the operating systems −
| OS | Output |
|---|---|
| Windows |
java version "1.6.0_21" Java(TM) SE Runtime Environment (build 1.6.0_21-b11) Java HotSpot(TM) 64-Bit Server VM (build 23.21-b01, mixed mode) |
| Linux |
java version "1.6.0_21" Java(TM) SE Runtime Environment (build 1.6.0_21-b11) Java HotSpot(TM) 64-Bit Server VM (build 23.21-b01, mixed mode) |
| Mac | java version "1.6.0_21" Java(TM) SE Runtime Environment (build 1.6.0_21-b11) Java HotSpot(TM) 64-Bit Server VM (build 23.21-b01, mixed mode) |
If you do not have Java installed, install the Java Software Development Kit (SDK) from www.oracle.com. We are assuming that Java 1.6.0_21 as installed version for this tutorial.
Step 2 – Set JAVA Environment
Set the JAVA_HOME environment variable to point the base directory location where Java is installed on your system. For example,
| OS | Output |
|---|---|
| Windows | Set the environment variable JAVA_HOME to C:\Program Files\Java\jdk1.6.0_21 |
| Linux | export JAVA_HOME=/usr/local/java-current |
| Mac | export JAVA_HOME=/Library/Java/Home |
Append Java compiler location to System Path.
| OS | Output |
|---|---|
| Windows | Append the string ;C:\Program Files\Java\jdk1.6.0_21\bin to the end of the system variable, Path. |
| Linux | export PATH=$PATH:$JAVA_HOME/bin/ |
| Mac | not required |
Verify Java Installation using java -version command explained above.
Step 3 – Download and Install NetBeans IDE
Download the latest version of NetBeans IDE from netbeans.org. At the time of writing this tutorial, I downloaded Netbeans 7.3 which comes bundled with JDK 1.7 using the following link www.oracle.com
| OS | Installer name |
|---|---|
| Windows | Netbeans 7.3 |
| Linux | Netbeans 7.3 |
| Mac | Netbeans 7.3 |
Step 4 – Setup JBoss Application Server
You can download the latest version of JBoss Server from www.jboss.org. Download the archive as per the platform. Extract the Jboss to any location on your machine.
| OS | File name |
|---|---|
| Windows | jboss-5.1.0.GA-jdk6.zip |
| Linux | jboss-5.1.0.GA-src.tar.gz |
| Mac | jboss-5.1.0.GA-src.tar.gz |
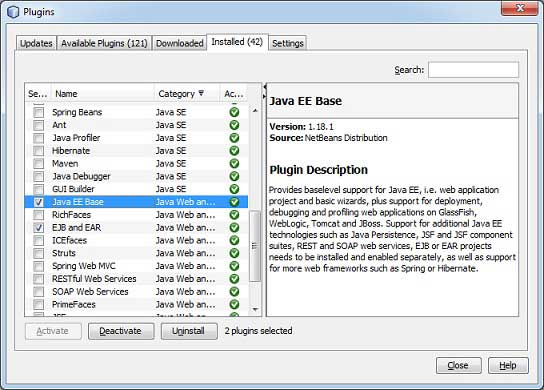
Step 5 - Configure JEE Plugins to Netbeans
Open Plugin window using Tools > Plugins. Open "Available Plugin" tab and select "Java EE Base" and "EJB and EAR" under "Java Web and EE" category. Click install button. Netbeans will download and install the respective plugins. Verify plugins installation using "Installed" tab (as shown in the image given below).
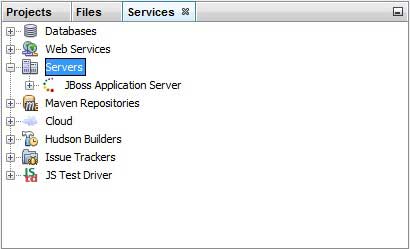
Step 6 - Configure JBoss Server in Netbeans
Go to Services tab and right click on servers to add a new server.
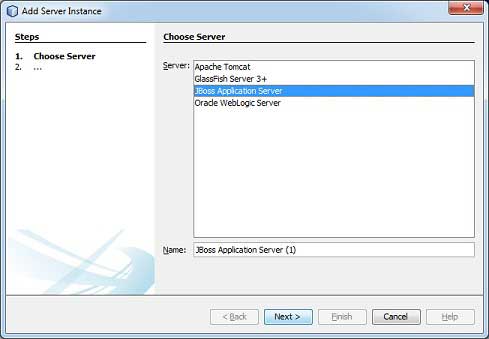
Add Server Instance wizard will open. Select JBoss and in next step enter the relevant details to configure server in netbeans.
Once everything is configured, you will see the following screen.

Step 7 - Install Database Server (PostGreSql)
Download latest version of PostGreSql database server from www.postgresql.org. At the time of writing this tutorial, I downloaded PostGreSql 9.2
| OS | Installer name |
|---|---|
| Windows | PostGreSql 9.2 |
| Linux | PostGreSql 9.2 |
| Mac | PostGreSql 9.2 |


