
ASP.NET Core - Identity Configuration
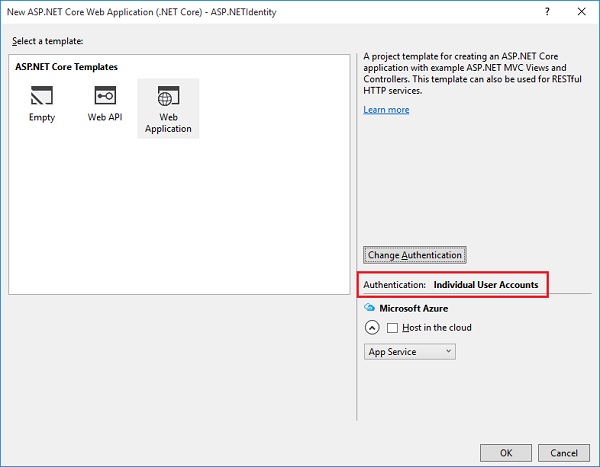
In this chapter, we will install and configure the Identity framework, which takes just a little bit of work. If you go to the Visual Studio and create a new ASP.NET Core application, and you select the full web application template with authentication set to individual user accounts, that new project will include all the bits of the Identity framework set up for you.
We started from an empty project. We will now set up the Identity framework from scratch, which is a good way to learn about all the pieces that are in the full application template because it can be confusing if you haven't worked your way through all the codes in detail.
To get started, we will need to install the dependency, which is Microsoft.AspNet.Identity. We will proceed by installing Microsoft.AspNet.Identity.EntityFramework and then, implement the Identity framework that works with the Entity Framework.
If we take a dependency on Identity.EntityFramework, the package is inclusive of the Identity package.
If you build your own data stores, you can work just with the Identity package.
Once our dependencies are installed, we can create a customer User class with all the information we want to store about a user.
For this application, we are going to inherit from a class provided by the Identity framework and that class will give us all the essentials like the Username property and a place to store the hashed passwords.
We will also need to modify our FirstAppDemoDbContext class to inherit from the Identity framework's IdentityDb class.
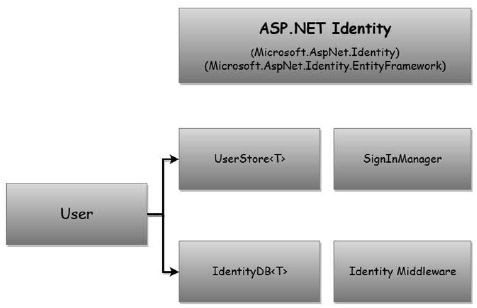
The IdentityDb gives us everything we need to store as user information with the Entity Framework. Once we have a User class and a DBContext set up, we will need to configure the Identity services into the application with the ConfigureServices method of the Startup class.
Just like when we needed to add services to support the MVC framework, the Identity framework needs services added to the application in order to work.
These services include services like the UserStore service and the SignInManager.
We will be injecting those services into our controller to create users and issue cookies at the appropriate time.
Finally, during the Configure method of startup, we will need to add the Identity middleware.
This middleware will not only help to turn cookies into a user identity, but also make sure that the user doesn't see an empty page with a 401 response.
Let us now follow the steps given below.
Step 1 − We need to proceed by adding a dependency on the Identity framework. Let us add Microsoft.AspNet.Identity.EntityFramework dependency into the project.json file. This will include all of the other necessary Identity packages that we need.
{
   "version": "1.0.0-*",
   "compilationOptions": {
      "emitEntryPoint": true
   },

   "dependencies": {
      "Microsoft.AspNet.Mvc":  "6.0.0-rc1-final",
      "Microsoft.AspNet.Diagnostics": "1.0.0-rc1-final",
      "Microsoft.AspNet.IISPlatformHandler": "1.0.0-rc1-final",
      "Microsoft.AspNet.Server.Kestrel": "1.0.0-rc1-final",
      "Microsoft.AspNet.StaticFiles": "1.0.0-rc1-final",
      "EntityFramework.MicrosoftSqlServer": "7.0.0-rc1-final",
      "EntityFramework.Commands": "7.0.0-rc1-final",
      "Microsoft.AspNet.Mvc.TagHelpers": "6.0.0-rc1-final",
      "Microsoft.AspNet.Identity.EntityFramework": "3.0.0-rc1-final"
   },

   "commands": {
      "web": "Microsoft.AspNet.Server.Kestrel",
      "ef": "EntityFramework.Commands"
   },

   "frameworks": {
      "dnx451": { },
      "dnxcore50": { }
   },

   "exclude": [
      "wwwroot",
      "node_modules"
   ],

   "publishExclude": [
      "**.user",
      "**.vspscc"
   ]
}
Step 2 − Save this file. The Visual Studio restores the packages and now, we can add our User class. Let us add the User class by right-clicking on the Models folder and selecting Add → Class.
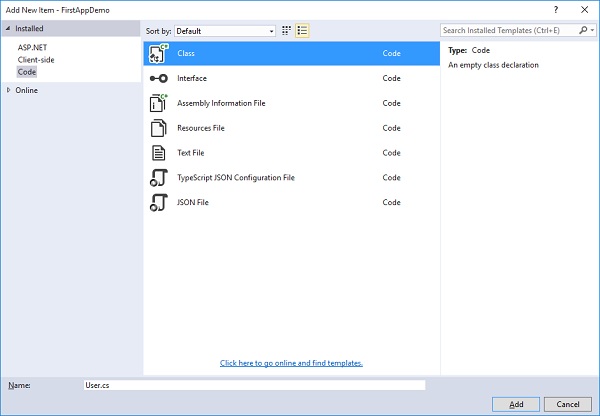
Call this class User and click on the Add button as in the above screenshot. In this class, you can add properties to hold any information that you want to store about a user.
Step 3 − Let us derive the User class from a class provided by the Identity framework. It is the IdentityUser class that is in the Identity.EntityFramework namespace.
using Microsoft.AspNet.Identity.EntityFramework;

using System;
using System.Collections.Generic;
using System.Linq;
using System.Threading.Tasks;

namespace FirstAppDemo.Models {
   public class User : IdentityUser {
   }
}
Step 4− Let us now go to the IdentityUser, put the cursor on that symbol, and press F12 to see the Visual Studio's metadata view.
#region Assembly Microsoft.AspNet.Identity.EntityFramework, Version = 3.0.0.0,

namespace Microsoft.AspNet.Identity.EntityFramework {
   public class IdentityUser : IdentityUser<string> {
      public IdentityUser();
      public IdentityUser(string userName);
   }
}
Step 5 − You can see that IdentityUser is derived from the IdentityUser of the string. You can change the type of the primary key by deriving from the IdentityUser and specifying our generic type parameter. You can also store things with a primary key that is ideally an integer value.
Step 6 − Let us now place the cursor on the IdentityUser of string and press F12 again to go to the metadata view.
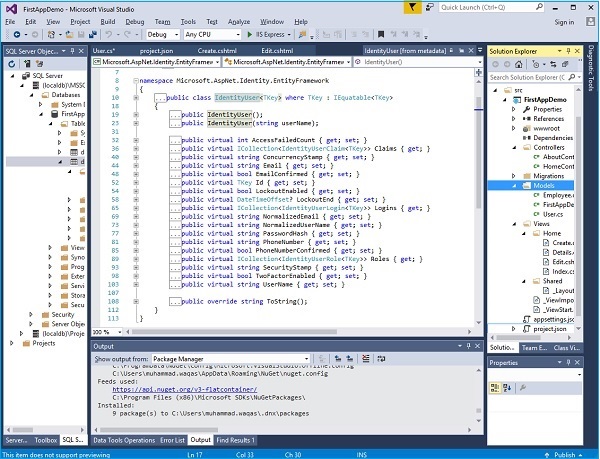
You can now see all the information related to a user by default. The information includes the following −
The fields that we won't use in this application, but are available for use.
The Identity framework can keep track of the number of failed login attempts for a particular user and can lock that account over a period of time.
The fields to store the PasswordHash, the PhoneNumber. The two important fields that we will be using are the PasswordHash and the UserName.
We will also be implicitly using the primary key and the ID property of a user. You can also use that property if you need to query for a specific user.
Step 7 − Now, we need to make sure that the User is included in our DBContext. So, let us open the FirstAppDemoDBContext that we have in our application, and instead of deriving it directly from the DBContext, which is the built-in Entity Framework base class, we now need to derive it from the IdentityDbContext.
using Microsoft.AspNet.Identity.EntityFramework;
using Microsoft.Data.Entity;

namespace FirstAppDemo.Models {
   public class FirstAppDemoDbContext : IdentityDbContext<User> {
      public DbSet<Employee> Employees { get; set; }

      protected override void OnConfiguring(DbContextOptionsBuilder optionsBuilder) {
         optionsBuilder.UseSqlServer("Data Source = (localdb)\\MSSQLLocalDB;
            Initial Catalog = FirstAppDemo;Integrated Security = True;
            Connect Timeout = 30;Encrypt = False;TrustServerCertificate = True;
            ApplicationIntent = ReadWrite;MultiSubnetFailover = False");
      }
   }
}
Step 8 − The IdentityDbContext class is also in the Microsoft.AspNet.Identity.EntityFramework namespace and we can specify the type of user it should store. This way, any additional fields we add to the User class gets into the database.
The IdentityDbContext brings additional DbSets, not just to store a user but also information about the user roles and the user claims.
Our User class is ready now. Our FirstAppDemoDbContext class is configured to work with the Identity framework.
We can now go into Configure and ConfigureServices to set up the Identity framework.
step 9 − Let us now start with ConfigureServices. In addition to our MVC services and our Entity Framework services, we need to add our Identity services. This will add all the services that the Identity framework relies on to do its work.
public void ConfigureServices(IServiceCollection services) {
   services.AddMvc();

   services.AddEntityFramework()
      .AddSqlServer()
      .AddDbContext<FirstAppDemoDbContext>
      (option => option.UseSqlServer(Configuration["database:connection"]));

   services.AddIdentity<User, IdentityRole>()
      .AddEntityFrameworkStores<FirstAppDemoDbContext>();
}
The AddIdentity method takes two generic type parameters — the type of user entity and the type of role entity.
The two generic type parameters are the types of our user — the User class we just created and the Role class that we want to work with. We will now use the built-in IdentityRole. This class is in the EntityFramework namespace.
When we are using the Entity Framework with Identity, we also need to invoke a second method − the AddEntityFrameworkStores.
The AddEntityFrameworkStores method will configure services like the UserStore, the service used to create users and validate their passwords.
Step 10 − The following two lines are all we need to configure the services for the application.
services.AddIdentity<User, IdentityRole>()
   .AddEntityFrameworkStores<FirstAppDemoDbContext>();
Step 11 − We also need to add the middleware. The location of where we insert the middleware is important because if we insert the middleware too late in the pipeline, it will never have the chance to process a request.
And if we require authorization checks inside our MVC controllers, we need to have the Identity middleware inserted before the MVC framework to make sure that cookies and also the 401 errors are processed successfully.
public void Configure(IApplicationBuilder app) {
   app.UseIISPlatformHandler();

   app.UseDeveloperExceptionPage();
   app.UseRuntimeInfoPage();

   app.UseFileServer();

   app.UseIdentity();
   app.UseMvc(ConfigureRoute);

   app.Run(async (context) => {
      var msg = Configuration["message"];
      await context.Response.WriteAsync(msg);
   });
}
Step 12 − The location where we insert the middleware is where we will add the Identity middleware. The following is the complete implementation of the Startup.cs file.
using Microsoft.AspNet.Builder;
using Microsoft.AspNet.Hosting;
using Microsoft.AspNet.Http;

using Microsoft.Extensions.DependencyInjection;
using Microsoft.Extensions.Configuration;

using FirstAppDemo.Services;
using Microsoft.AspNet.Routing;
using System;

using FirstAppDemo.Entities;
using Microsoft.Data.Entity;

using FirstAppDemo.Models;
using Microsoft.AspNet.Identity.EntityFramework;

namespace FirstAppDemo {
   public class Startup {
      public Startup() {
         var builder = new ConfigurationBuilder()
            .AddJsonFile("AppSettings.json");
         Configuration = builder.Build();
      }
      public IConfiguration Configuration { get; set; }

      // This method gets called by the runtime.
      // Use this method to add services to the container.
      // For more information on how to configure your application,
      // visit https://go.microsoft.com/fwlink/?LinkID = 398940
      public void ConfigureServices(IServiceCollection services) {
         services.AddMvc();
            services.AddEntityFramework()
            .AddSqlServer()
            .AddDbContext<FirstAppDemoDbContext>(option =>
            option.UseSqlServer(Configuration["database:connection"]));

         services.AddIdentity<User, IdentityRole>()
            .AddEntityFrameworkStores<FirstAppDemoDbContext>();
      }
      // This method gets called by the runtime.
      // Use this method to configure the HTTP request pipeline.
      public void Configure(IApplicationBuilder app) {
         app.UseIISPlatformHandler();
         app.UseDeveloperExceptionPage();
         app.UseRuntimeInfoPage();
         app.UseFileServer();
         app.UseIdentity();
         app.UseMvc(ConfigureRoute);

         app.Run(async (context) => {
            var msg = Configuration["message"];
            await context.Response.WriteAsync(msg);
         });
      }
      private void ConfigureRoute(IRouteBuilder routeBuilder) {
         //Home/Index
         routeBuilder.MapRoute("Default", "{controller=Home}/{action=Index}/{id?}");
      }
      // Entry point for the application.
      public static void Main(string[] args) => WebApplication.Run<Startup>(args);
   }
}
Step 13 − Let us now move ahead by building the application. In the next chapter, we need to add another Entity Framework migration to make sure we have the Identity schema in our SQL Server database.


